LKprototype
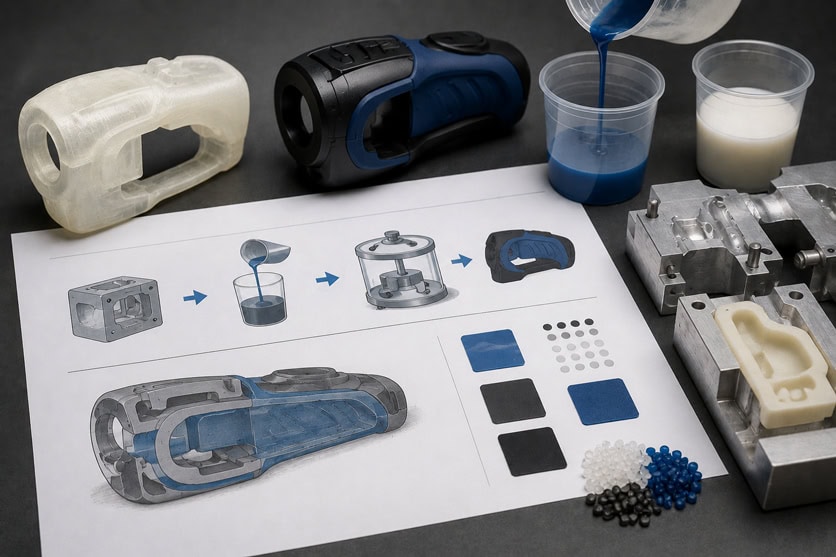
You can make an overmolding prototype by pouring one material over another. This helps you create a part with different features. Vacuum casting for rapid prototyping lets you mix materials like hard plastics and soft elastomers in one part. This method is good when you need strong layers to stick together. It is important to pick materials that work well together and stick well. Here are some common materials used:
Material Type | Description |
|---|---|
Rigid Polyurethanes | They resist impacts and chemicals. |
Flexible Polyurethanes | People use them for bendy parts. |
Soft Rubber | It gives grip or makes things softer. |
Elastomers | These are good for soft-touch spots. |
You can use this easy guide to overmolding to make better prototypes.
Key Takeaways
Overmolding uses different materials to make prototypes with special features. This helps the parts work better and look nicer.
Vacuum casting is a cheap way to make a few overmolded parts. It lets you test and change designs quickly.
Picking materials that work well together is very important for strong bonding. Always test them together to make sure they stick well.
Make your molds with grooves and draft angles. These features help your prototypes come out easily and stay strong.
Overmolding works well for things like electronics, medical devices, and car parts. It gives them better grip and makes them last longer.
WHAT IS MULTI-MATERIAL OVERMOLDING?
OVERMOLDING DEFINITION
Multi-material overmolding is when you join two or more materials in one part. You mold one polymer on top of another material. The other material can be plastic, metal, or a composite. This lets you make a prototype with both hard and soft parts. For example, you can put a soft, rubbery layer over a hard plastic base. This gives your part new features that one material alone cannot do. Overmolding prototype parts can look nicer and work better. You can also use different colors and finishes.
HOW OVERMOLDING WORKS IN PROTOTYPE MANUFACTURING
There are different ways to make an overmolding prototype. Each way helps you join two materials in one part. Here is a table that shows some common ways to do overmolding:
Step/Method | Description |
|---|---|
Two-shot molding | First, mold one material. Then quickly add the second material. |
Pick-n-place molding | Mold the first part. Then put it in another mold for the next material. |
Transfer overmolding | A robot moves the part between molds for each material. |
Rotational overmolding | The mold moves between stations for each material. |
Core-back overmolding | Part of the mold slides so you can inject the second material after the first. |
You can use these ways to make parts with two or more materials.
BENEFITS OF OVERMOLDING FOR RAPID PROTOTYPING
Overmolding prototypes have many good points. You can make handles easier to grip, so they are safer and more comfortable. You can cut down on vibration, which protects small parts inside your product. Overmolding can keep out water, so your product lasts longer and does not rust. You can also make a softer grip, which helps people avoid hurting their hands. These things make your prototypes more useful and more like the final product.
Tip: Overmolding prototype parts let you test how they work in real life before making lots of them.
COMMON RIGID AND SOFT MATERIAL COMBINATIONS
You can pick from many material pairs for your overmolding prototype. Here are some common ones:
Rigid Material | Soft Material | Application Description |
|---|---|---|
Plastic | Plastic | Use two plastics with different features for special uses. |
Plastic | Rubber/Silicone/TPE | Add a soft grip to hard plastic, often used in electronics and tools. |
Metal | Plastic | Cover metal with plastic for safety or a better look. |
Metal | Rubber/Silicone/TPE | Add rubber to metal for grip and extra design choices. |
You can mix these materials to get the best results for your overmolding prototype.
HOW VACUUM CASTING ENABLES OVERMOLDING PROTOTYPES
MASTER MODEL PREPARATION
First, you need to make a master model. You can use CNC machining or 3D printing for this. The master model is the base for your mold. You need two master models. One is a full model. The other has the overmold area taken out. This helps you see where the soft material will go later.
Step | Description |
|---|---|
Create a master pattern | Make a master using CNC or 3D printing. |
Use liquid silicone to copy the master pattern. | |
Prepare the resin | Mix the resin for casting. |
Cast and finish the part | Pour resin, let it cure, and finish the part. |
SILICONE MOLD CREATION
You use liquid silicone to make a mold that matches your master model. This mold helps you make parts that are very accurate. When you design the mold, check if your materials work well together. You can add special shapes to make the bond stronger. Reverse draft designs help the soft material stay in place. Tight fits stop leaks and other problems. You can use undercuts to make the parts hold together better. Always try to make your silicone molds as accurate as you can.
Check if your materials work together.
Design shapes that lock together for strength.
Use more than one material for color and feel.
Make parts with tight fits.
Add undercuts and reverse drafts for better holding.
Think about shrinkage and accuracy in your design.
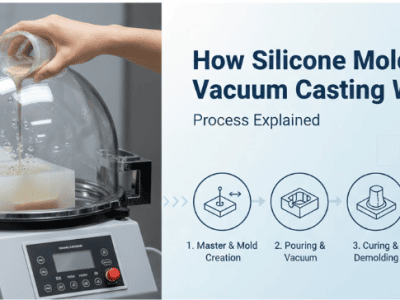
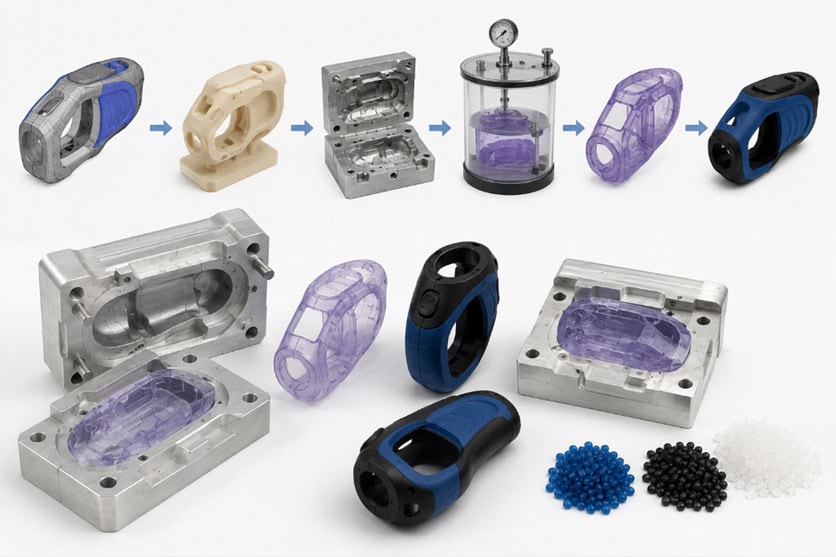
STEP-BY-STEP VACUUM CASTING PROCESS
You follow clear steps to make your overmolding prototype:
Make the master model.
Create the silicone mold.
Prepare the resin.
Cast the base part.
Cure and finish the base part.
This process lets you make parts with different looks and feels. You can get results like injection molding.
Tip: Always check your mold to make sure it is right before you cast.
SECONDARY CASTING FOR OVERMOLDING FEATURES
After you make the base part, put it in a second mold. You add a softer material to fill the overmold area. This step gives your part new textures and makes it tougher. Cast urethane is good for making a few parts. Vacuum casting helps you make prototypes with nice surfaces and color.
Add color and nice surfaces.
Use cast urethane for strong parts.
Make parts that stay together well.
POST-PROCESSING AND FINISHING
You can finish your overmolded parts in many ways. Pick a shiny, dull, or rough finish to fit your needs. You can polish the part to look like metal. Painting and silk screening let you add logos or pictures.
Technique | Description |
|---|---|
Glossy smooth finish | Shiny surface that looks nice. |
Smooth Matte finish | Dull surface with no shine. |
Rough finish | Bumpy surface for grip or style. |
Polished metallic finish | Shiny surface that looks like metal. |
Structured finish | Patterned surface for design. |
Painting | Use car paints for color. |
Silk screening | Add logos or pictures to the part. |
Note: You can use wet painting or powder-coating to make the part last longer.
MATERIAL SELECTION FOR OVERMOLDING PROTOTYPES
COMPATIBLE PLASTICS AND ELASTOMERS
You must pick materials that stick well together. Some plastics and elastomers bond better than others. The right pair makes your prototype last longer. Polyurethanes, thermoplastic elastomers (TPE), thermoplastic polyurethane (TPU), silicone, and rubber are common choices. You can use these for both the base and the overmold layer. Always check if your materials match by using charts or doing small tests.
TPU, TPE, SILICONE AND URETHANE OPTIONS
There are many good materials for overmolding. Each one has its own good and bad points.
TPE feels soft and looks nice. It is easy to recycle and shape. People use it for grips and toys. TPE does not like high heat and can stretch out.
TPU is bendy and strong. It fights off chemicals and works for medical parts and shoes. TPU can be hard to finish and may soak up water.
Silicone can take high heat and stays soft. It is good for seals and medical tools.
Urethane is strong and can be hard or soft. It is great for making prototypes with different textures.
Here is a table to help you compare TPU:
Aspect | Details |
|---|---|
Advantages | Abrasion resistance, biocompatibility, chemical resistance, elasticity, food grade, soft touch |
Disadvantages | Needs surface prep, not very rigid, can warp, absorbs moisture |
ADHESION AND MATERIAL BONDING CONSIDERATIONS
You want your overmolded parts to stay together. Good bonding depends on a few things:
Clean the surfaces before you start. Dirt or oil can make the layers come apart.
Make sure the base and overmold have close melting points. This helps them stick better.
Do not wait too long between casting the two layers. If you do, the bond can get weak.
Add texture or grooves to the base part. This helps the soft layer grip better.
Dry your materials, especially nylon, to stop bubbles or weak spots.
Tip: You can use primers or heat the base part to make the bond even stronger.
METAL INSERTS AND HYBRID MATERIAL DESIGNS
You can put metal inserts in your overmolding prototypes. Place the metal piece in the mold before pouring the plastic or elastomer. The new layer will cover the metal and hold it tight. This makes your part stronger and adds new features, like threads or electrical contacts. Always check that your materials stick well to metal. Design your mold carefully to stop warping or gaps.
Note: Hybrid designs let you mix different materials for better performance and new functions.
DESIGN RULES FOR MULTI-MATERIAL OVERMOLDING
GEOMETRY OPTIMIZATION FOR OVERMOLDING
You can make your prototype work better by changing its shape. Add grooves, channels, or undercuts to lock the soft layer in place. These features stop the layers from coming apart. Bumpy or ribbed areas make your part last longer and work better. Always match the shape to how you want to use the part.
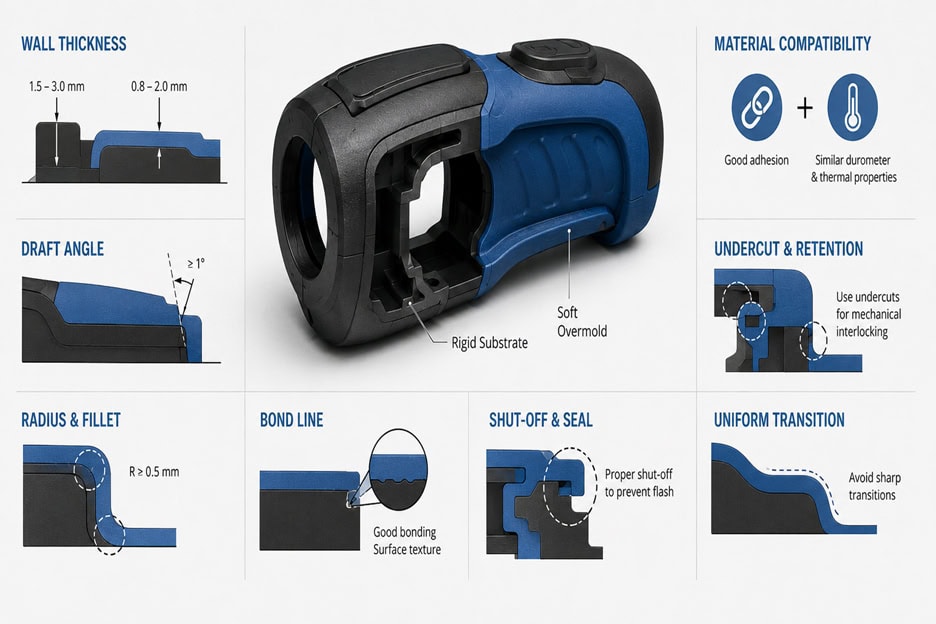
RECOMMENDED WALL THICKNESS AND TOLERANCES
Picking the right wall thickness helps your part stay strong and work well. Here is a table that shows the best wall thickness for some materials:
MATERIAL | RECOMMENDED WALL THICKNESS |
|---|---|
ABS | 0.045 in. - 0.140 in. |
Polycarbonate | 0.040 in. - 0.150 in. |
Polyurethane | 0.080 in. - 0.750 in. |
Nylon | 0.030 in. - 0.115 in. |
Polypropylene | 0.035 in. - 0.150 in. |
Machining tolerance is about ±0.003 in. Resin tolerance should be at least 0.002 in./in. If you use liquid silicone rubber, set tolerance to 0.025 in./in. These numbers help your part work right.
DESIGNING FOR STRONG MATERIAL BONDING
You can make strong bonds by picking materials that stick together. Test if the base and overmold work well together. Pick materials that fit where the part will be used. Put gates so the material spreads out and covers the bond area. Watch out for shrinking so your part does not bend. These steps help your part last longer and work better.
AVOIDING AIR TRAPS, FLASH AND DELAMINATION
You can stop problems by doing these things:
Put gates so the material flows around the base.
Add tiny vents at the ends of the flow.
Clean the vents often.
Do not put gates where they cause too much stress.
Use holes and undercuts to help the layers stick.
These tips help your part keep its shape and work well.
DESIGNING FOR EASY DEMOLDING
You should make your part easy to take out of the mold. Use draft angles and do not use sharp corners. Smooth changes between materials stop sticking. Plan your mold so you can remove the part without breaking it. This keeps your part working well and helps you make parts faster.
Tip: Always check your design to make sure it is strong and works well.
OVERMOLDING VS OTHER PROTOTYPE MANUFACTURING METHODS
INSERT MOLDING VS OVERMOLDING
You can make strong prototypes with insert molding or overmolding. Insert molding is done in one step. You put a metal or ceramic piece in the mold. Then, plastic covers the insert using prototype injection molding. Overmolding takes two steps. First, you make a plastic base with prototype injection molding. Next, you add another layer with prototype injection molding. Overmolding lets you use two plastics or mix hard and soft plastic. Insert molding is best for strong and electrical parts. Overmolding gives better grip and looks. Here is a table to help you compare:
Comparison Dimension | Insert Molding | Overmolding |
|---|---|---|
Craftsmanship | Place insert, then prototype injection molding covers it | Make base, then add layer with prototype injection molding |
Application | Medical, electrical, strong parts | Handles, grips, soft-touch parts |
Material | Metal or ceramic with plastic | Hard plastic with soft plastic |
Cost | Lower, good for many parts | Higher, adds value and features |
Insert molding is easy and quick. Overmolding is harder but gives more choices.
TWO-SHOT MOLDING VS OVERMOLDING
You can also use two-shot molding or overmolding for prototypes. Two-shot molding uses a special machine for prototype injection molding. It puts two plastics in one cycle. Overmolding uses two molds and two steps with prototype injection molding. Two-shot molding gives you more design options. You can use many colors and textures. Overmolding is easier if you do not have special machines. Here is a table to compare:
Comparison Dimension | Two-Shot Mold | Overmold (Secondary Molding) |
|---|---|---|
Injection Machine | Needs special prototype injection molding machine | Uses standard prototype injection molding machine |
Number of Molds | One set | Two sets |
Process | Two injections, one ejection | Two injections, two ejections |
Bonding Control | Needs careful machine setup | Uses injection speed and timing |
Waste | Less waste | More waste |
Cost | Lower | Higher |
Pick two-shot molding for tricky parts. Overmolding is good for simple changes.
VACUUM CASTING VS PROTOTYPE INJECTION MOLDING
Vacuum casting and prototype injection molding both make prototypes. Vacuum casting uses silicone molds. Prototype injection molding uses metal molds. Vacuum casting is fast and cheap for small batches. Prototype injection molding costs more but makes lots of parts. Here is a table to show the differences:
Feature | Vacuum Casting | Prototype Injection Molding |
|---|---|---|
Production Volume | 10-100 parts | 1,000+ parts |
Tooling Cost | Low | High |
Lead Time | 1-2 weeks | 4-8 weeks |
Part Durability | Good for testing | Best for final use |
Vacuum casting is best for quick tests. Prototype injection molding is best for big jobs.
CHOOSING THE RIGHT METHOD FOR YOUR PROJECT
Think about what you need before you pick a method. Look at these points:
Choose the right materials for prototype injection molding or vacuum casting.
Use insert molding for strong and simple parts.
Pick overmolding for soft grips or color.
Use two-shot molding for tricky designs.
Think about cost, speed, and how many parts you want.
Make sure your parts can take heat and rubbing.
Check if you need special shapes like undercuts or grooves.
Tip: Prototype injection molding gives you the most choices for materials and shapes. Insert molding and overmolding help you add new features to your prototypes.
COST, LEAD TIME AND LOW-VOLUME PRODUCTION CONSIDERATIONS
TOOLING COST COMPARISON
Vacuum casting can help you save money on overmolding prototypes. Silicone molds cost less than metal molds. You do not need to spend a lot at the start. Vacuum casting is good for making only a few parts. This is because you do not pay high tooling costs. Here are some reasons why vacuum casting saves money:
Silicone molds are cheap and simple to make.
You can make strong prototypes without spending a lot.
You do not need pricey machines for small batches.
This method lets you test your design before making many parts.
You can change your design fast if you want to improve it.
LEAD TIME ADVANTAGES OF VACUUM CASTING
Vacuum casting lets you get parts quickly. You can make strong prototypes in just a few days. This process helps you get parts fast for testing or feedback. Look at this table:
Feature | Details |
|---|---|
Silicone Mold Capacity | 15 to 20 parts per mold |
Lead Time for 10 Parts | 7 working days |
Factors Affecting Output | Complexity, size, and painting |
You can finish silicone molds in a short time. This helps you start making parts right away. Vacuum casting is good when you need parts fast. It works well for testing and making small batches.
Tip: Making molds quickly lets you try new ideas and get strong parts fast.
WHEN TO USE OVERMOLDING FOR LOW-VOLUME MANUFACTURING
Use overmolding when you need tough parts made from more than one material. Overmolding gives you strong grip areas and keeps layers together. You can make custom parts with both hard and soft materials. This method is good for small batches when you want to test your product. Overmolding is great for handles, grips, and parts that need to feel soft. The process helps you get strong parts without waiting for big production runs.
Overmolding is best for strong prototypes with special features.
You can use it for custom runs and market tests.
This method gives you more choices for your designs.
COMMON OVERMOLDING DEFECTS AND HOW TO PREVENT THEM
When you make overmolded prototypes, you may see some common problems. If you know what to look for, you can stop these defects before they ruin your parts.
WEAK BONDING BETWEEN MATERIALS
Weak bonding happens when the two layers do not stick well. You may see the soft layer peel off or separate from the base. To prevent this:
Clean all surfaces before you start.
Choose materials that bond well together.
Add grooves or textures to help the layers lock.
Do not wait too long between casting the base and the overmold.
Use a primer or heat the base part to help the bond.
Tip: Test a small sample first to check if your materials stick well.
FLASH AND MOLD LEAKAGE
Flash is extra material that leaks out of the mold. It can make your part look messy and may cause fit problems. To avoid flash and leakage:
Make sure your mold fits tightly.
Check for damage or wear on the mold edges.
Use the right amount of clamping force.
Keep the mold clean and free of dust.
If you see flash, trim it off after casting. You can also adjust the mold for a better fit.
BUBBLES AND VOID FORMATION
Bubbles and voids make your part weak and look bad. They happen when air gets trapped or when moisture is in the material. You can prevent these by:
Drying TPE or other materials for 4-6 hours to keep moisture below 0.1%.
Pouring resin slowly to avoid trapping air.
Using a vacuum chamber to pull out bubbles before casting.
Note: Always check your materials for moisture before you start.
WARPAGE AND DIMENSIONAL ISSUES
Warping means your part bends or twists out of shape. Dimensional issues make your part the wrong size. These problems can happen if the temperature is not even or if the overmolded layer is too thin. To prevent warping:
Keep the mold at a steady temperature.
Make the overmolded layer thick enough for strength.
Let the part cool slowly and evenly.
You can also see deformation if you use unstable materials or if the part is too thin. Pick stable, UV-resistant materials and add stabilizers if needed.
Tip: Always measure your parts after casting to catch problems early.
Common Overmolding Defects and Solutions
Defect | Cause | Prevention Method |
|---|---|---|
Blistering | Moisture in raw materials | Dry materials before casting |
Color Fading | UV exposure, unstable material | Use UV-resistant materials, add stabilizer |
Deformation | Uneven temp, thin layers | Control temp, increase layer thickness |
By following these steps, you can make strong, good-looking overmolded prototypes every time.
REAL-WORLD APPLICATIONS OF MULTI-MATERIAL OVERMOLDING
CONSUMER ELECTRONICS
Overmolding is used in many electronics. Manufacturers make special cases and covers with overmolding. These parts keep the inside safe and look nice. Wearable electronics, like fitness trackers and smartwatches, use overmolding for flexible sensors and connectors. This makes devices comfy and strong. Overmolding gives parts a better grip and absorbs shocks. You see overmolding in phone accessories, headphones, and game controllers.
MEDICAL DEVICES
Overmolding is important in medical devices. You find easy-to-hold grips and handles on tools and instruments. These grips help doctors use devices safely and easily. Overmolding makes parts that meet hygiene and use rules. Wearable medical devices use overmolding for soft and flexible materials. This makes them more comfortable and helps them stay on patients. Overmolding also gives medical devices biocompatibility and lets them be cleaned well.
Note: Overmolding helps make medical devices comfortable and dependable.
AUTOMOTIVE INTERIOR COMPONENTS
Car makers use overmolding for many inside parts. You see it in headrests, armrests, gear shift knobs, and dashboard controls. Overmolding adds soft surfaces and makes things feel better to touch. It also makes parts stronger and protects them from hits. Overmolding is used for seals, sensors, and electrical connectors. These parts keep out dust, water, and shaking. You get parts that last longer and look good in your car.
INDUSTRIAL EQUIPMENT HANDLES AND GRIPS
Overmolding is found in handles and grips for machines. It makes tools and fitness equipment easier to hold and cuts down vibration. Overmolding adds shock absorption and insulation, making tools safer and simpler to use. Overmolding helps make tough parts that do not wear out fast. You can use overmolding to make high-quality parts for machines and robots. This helps products last longer and saves money on repairs.
Industry | Applications |
|---|---|
Medical Devices | Easy grips, biocompatibility, cleaning strength, wearable comfort |
Consumer Electronics | Special cases, flexible sensors, better grip, shock absorption |
Automotive | Headrests, armrests, gear shift knobs, seals, sensors, electrical connectors |
Industrial Equipment | Handles, grips, less vibration, shock absorption, insulation, toughness |
FAQ
CAN VACUUM CASTING BE USED FOR OVERMOLDING?
Yes, you can use vacuum casting for overmolding. This method lets you make parts with two or more materials. You start by making a base part. Then, you place it in a new mold and pour a second material over it. Vacuum casting works well for small batches and testing. You do not need expensive tools. You can try out new ideas quickly. This method helps you see how your prototypes will look and feel before you move to the injection molding process.
Tip: Vacuum casting is great for making soft grips, seals, or color accents on hard parts.
WHAT MATERIALS WORK BEST FOR OVERMOLDING PROTOTYPES?
You have many choices for materials. Some of the best ones include:
Polyurethane for strong, tough parts.
Thermoplastic elastomers (TPE) for soft-touch areas.
Thermoplastic polyurethane (TPU) for flexible and durable layers.
Silicone for heat resistance and flexibility.
You should always check if the two materials stick well together. Try a small test before making many parts. Good bonding gives you better results.
IS OVERMOLDING BETTER THAN TWO-SHOT MOLDING FOR PROTOTYPES?
Overmolding and two-shot molding both help you make multi-material parts. Overmolding uses two steps and works with simple tools. Two-shot molding uses one machine and makes parts faster. For prototypes, overmolding is often better. You can change your design easily. You do not need special machines. Overmolding costs less for small runs. Two-shot molding is better for making many parts at once.
Method | Best For | Cost | Flexibility |
|---|---|---|---|
Overmolding | Small batches | Lower | High |
Two-shot Mold | Large production | Higher | Medium |
HOW STRONG IS THE BOND IN VACUUM CASTING OVERMOLDING?
The bond strength depends on your material choices and how you prepare the surfaces. If you clean the base part and pick materials that match, you get a strong bond. Adding grooves or textures helps the layers lock together. Most vacuum cast overmolded parts hold up well for testing and light use. For heavy-duty parts, you may need to use the injection molding process for the best strength.
Note: Always test your parts to make sure the bond meets your needs.
CONCLUSION: WHEN TO CHOOSE VACUUM CASTING FOR MULTI-MATERIAL OVERMOLDING
Vacuum casting is a smart way to make prototypes with more than one material. You can try out new designs fast and see how different materials work together. This method lets you make parts with both hard and soft spots. You get strong bonds and smooth surfaces without spending a lot.
When you pick vacuum casting for overmolding, think about these things:
The master model must be good. A careful master model helps you stop mistakes in your final part.
Materials can shrink and change the size of your part. You need to plan for this when you make your mold.
Keeping the temperature steady stops your part from bending. You should keep the curing temperature the same.
Molds wear out after many uses. Silicone molds get old, so check them often.
Draft angles help you take your part out of the mold. You should add these to your design.
Rounded corners help your mold last longer. Sharp corners can break the mold.
How you place your part in the mold matters. Good placement helps air get out and resin fill the mold.
Splitting the mold lets you make tricky shapes. Multi-part molds help you make things like undercuts.
The surface finish comes from your master model. A smooth master gives you a smooth part.
Tip: Use vacuum casting if you need a small number of parts, need them fast, or want to change your design. This method is good for prototypes with both hard and soft materials.
Pick vacuum casting for overmolding if you want to save money, try new ideas, or make special parts. You get fast results and can change your design easily. Vacuum casting helps you make strong and nice-looking prototypes that fit what you need.
Vacuum casting lets you quickly test overmolded materials in prototypes. You can check how the materials work together and see if they are strong. Good results come from choosing the right materials and using smart design. Try these tips in your next project to get better parts. If you want to know more, read guides about advanced prototyping or ask experts for help.