LKprototype
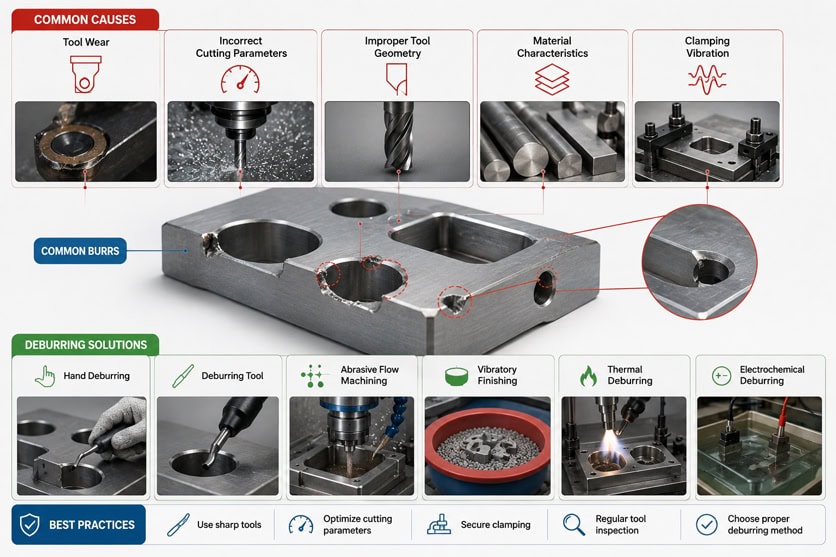
You can remove cnc machining burrs using deburring tools, abrasive methods, or specialized equipment. Burrs often appear on machined parts. If you leave burrs on parts, you risk many problems. Even small burrs can stop parts from fitting together. You may see higher failure rates in assemblies and increased rejection costs. For example:
Burrs cause up to 20% of assembly failures in tight-tolerance parts.
Untreated burrs account for 80% of "parts don’t fit" issues.
Medical parts with burrs fail pressure tests three times more often.
Removing burrs helps you make sure your parts work well and last longer.
Key Takeaways
Burrs can make parts not fit and cost more money. Taking them off helps parts fit together the right way.
Check and take care of cutting tools often. Sharp tools make fewer burrs and better parts.
Change machining settings like feed rate and spindle speed. Good settings make fewer burrs and smoother surfaces.
Pick the best deburring method for the part shape and material. Manual methods are good for small jobs. Automated methods are better for big batches.
Make parts with smooth edges and no sharp corners. Good design stops burrs from forming when machining.
OVERVIEW OF CNC MACHINING BURRS
WHAT ARE BURRS IN CNC MACHINING
When you machine a part, you often see small, unwanted pieces of material sticking out from the edges. These are called burrs. In CNC machining, a burr is an extra bit of metal that forms on the edge or surface of a part after cutting or drilling. Burrs usually look like ragged or bumpy edges. You can find them at the entrance or exit of holes, along sharp corners, or where two features meet. The size and shape of burrs depend on the material, the tool, and the way you cut. Softer metals like aluminum and copper often make longer burrs. Harder metals, such as tool steel, create smaller but sharper burrs.
Tip: Burrs are not just a cosmetic issue. They can make parts unsafe or cause them to fail in use.
WHY BURRS FORM DURING CNC MACHINING
Burrs form because the material does not break cleanly when you cut it. Instead, some of the metal bends or tears before it separates from the part. Several main reasons cause burrs to appear:
Poisson Burrs: These happen when the cutting tool pushes down, making the material bulge out.
Roll-Over Burrs: These form at the exit point when thin material bends over the edge.
Tear Burrs: These result from the material tearing away, often due to dull tools or wrong feed rates.
Cut-Off Burrs: These stay at the center when you cut a part off from the main stock.
The type of material also matters. Here is a quick look at how different materials react:
Material Type | Burr Size | Characteristics |
|---|---|---|
Soft and Ductile | Larger burrs | Deform easily before fracture (e.g., aluminum, brass, copper alloys) |
Harder Materials | Smaller but sharper burrs | Resist plastic deformation (e.g., tool steel, titanium) |
Ductile materials like aluminum and brass form larger burrs.
Hard materials like tool steel produce smaller, sharper burrs.
The grain structure of the metal affects how burrs form under stress.
HOW BURRS AFFECT PART QUALITY AND SURFACE FINISH
Burrs can cause many problems for your finished parts. They lower the quality of the surface and can change the size of your part. If you leave cnc machining burrs on a part, you may need extra steps to fix the surface. This adds time and cost to your process. Burrs can also make it hard for parts to fit together or move smoothly. In some cases, burrs can even make a part fail during use. You should always check for burrs and remove them to keep your parts safe and reliable.
COMMON TYPES OF CNC MACHINING BURRS
ROLLOVER BURRS
Rollover burrs show up when the tool leaves the workpiece. The tool bends the material over the edge instead of cutting it off. You can see these burrs on milled edges and slot exits. They also appear on turned parts where the tool finishes its cut. Rollover burrs are different from other burrs because of where they form and how they look.
Rollover burrs happen at the tool exit, with the material bending over.
You find them on milled and turned edges, mostly at the end of a cut.
Breakout burrs are not the same. They form when the cut tears through the material, often at drilled hole exits.
Tear burrs come from dull tools or weak machines. The material smears or breaks instead of cutting cleanly.
Cut-off burrs show up at the end of a cut that separates a part. They make sharp points that can cause problems when putting parts together.
Note: Rollover burrs are the most common burrs you will see in CNC machining.
BREAKOUT BURRS
Breakout burrs form when the tool breaks through the material. This makes the material tear at the exit side. You often see these burrs at the end of drilled holes. The material does not break smoothly, so it rips and leaves a rough edge. Breakout burrs can make holes look uneven. They can also cause trouble if you need a smooth finish or a tight fit.
POISSON BURRS
Poisson burrs form when the cutting force pushes material to the side. This makes the edge bulge out. You might see these burrs on thin parts or near sharp corners. The name comes from the Poisson effect. This means the material gets wider in one way when squeezed in another. Poisson burrs are usually small, but they still change how your part looks and fits.
FEATHER BURRS
Feather burrs are very thin and look like tiny feathers on the edge of a part. You often see them after drilling, especially at the start or end of a hole. Feather burrs can also show up after milling or turning. They usually appear at the end of a toolpath. The table below shows which machining jobs make feather burrs the most:
Machining Operation | Burr Type Produced | Additional Notes |
|---|---|---|
Drilling | Feather burrs | Small burrs at hole entrance; larger at exit |
Milling | Toolpath burrs | Common at slot or pass exit |
Turning | Toolpath burrs | Similar to milling, often at edges |
Grinding | General burrs | Can be influenced by thermal stresses |
Tip: Even though feather burrs are small, you should take them off. This helps stop sharp edges and makes your parts safer.
CAUSES OF BURR FORMATION IN CNC MACHINING
TOOL WEAR AND TOOL GEOMETRY
You must check your cutting tools often. When tools get old, their edges turn round and lose sharpness. A dull tool pushes the material instead of cutting it. This makes thick, rolled burrs on your parts. Using the wrong tool shape can also cause more burrs. Sharp tools with the right shape help you make clean cuts and fewer burrs.
Tip: Look at your tools often. Change them before they get too dull. This helps you stop extra burrs and keeps your parts looking nice.
INCORRECT MACHINING PARAMETERS
Machining settings are important for burrs. If you set the feed rate too high, burrs get bigger. Lighter feeds can make fewer burrs, but if you go too light, you might push the material instead of cutting it. Worn tools also make bigger burrs. Sharper tools help you get less burrs. Spindle speed and tool size change burr size, too. Faster speeds and bigger tools can make larger burrs.
Parameter | Effect on Burr Formation |
|---|---|
Feed Rate | Higher rates make bigger burrs; lighter feeds make less burrs |
Tool Wear | Makes bigger burrs; sharp tools make less burrs |
Spindle Speed | Faster speeds can make bigger burrs |
Tool Diameter | Bigger tools can make bigger burrs |
You can use up milling with CBN tools to make burrs shorter by 76.8%. Ceramic-coated carbide tools in up milling make burrs shorter by 52.4%. Changing how deep you cut also makes burrs smaller.
MATERIAL PROPERTIES AND CHIP FORMATION
How hard or soft a material is changes burrs. Ductile materials like aluminum and copper bend when you cut them. This bending makes burrs on the edges of your parts. Softer, ductile materials usually give smoother finishes. Harder materials need special settings to make less burrs. Brittle materials can get good finishes with deeper cuts and faster feeds.
Ductile materials bend and make burrs.
Softer materials give smoother finishes.
Harder materials need special settings to make less burrs.
Using sharp tools at faster speeds helps stop dragging.
Lower cutting force helps stop tool bending and burrs.
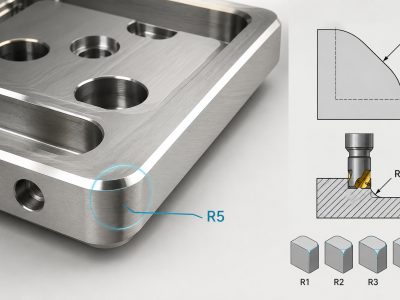
PART DESIGN AND EDGE CONDITIONS
How you design your part changes burrs. Sharp corners, thin edges, and tricky shapes make burrs form more easily. If you design parts with fewer sharp corners, you get less cnc machining burrs. You should also think about the edge shape. Smooth changes and rounded edges help stop burrs. When you plan your part, think about how the tool will move and where burrs could show up.
Note: Good part design and careful planning help you stop burrs and make your parts better.
INSPECTING AND DETECTING MACHINING BURRS
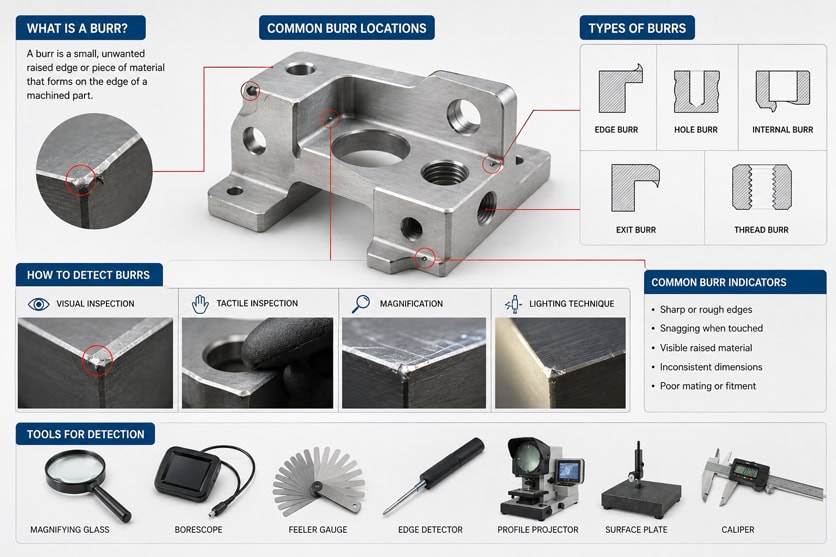
VISUAL INSPECTION METHODS
You can find most cnc machining burrs just by looking. Use bright lights and shine them at an angle. This helps you see small burrs that hide in shadows. Always look from the same spot to avoid mistakes. Use a magnifier or a small microscope for tiny parts. Move the part around under the light to see shiny spots. Check places like hole exits, groove edges, and where flat meets curved. Learn how different burrs look. Roll-over burrs look like thin lips. Tear burrs look rough and uneven.
Move the part to see light from different sides.
Look at places where burrs usually show up.
Practice spotting roll-over and tear burrs.
Visual checks are quick and cheap. They are good for a first look before using tools.
MEASUREMENT TOOLS FOR BURR DETECTION
You can use special tools to measure burrs very well. Optical systems like cameras or microscopes help you see and measure burrs. Some labs use computer programs to find burrs in pictures. These ways can measure burr size with over 80% accuracy. Lasers can measure tiny burrs but take more time. Computers can also guess burrs in small holes with about 80% accuracy. If you do not have fancy tools, a screen caliper works for burr width and height.
Use a profilometer to measure burrs by touching or not touching.
Try a coordinate measuring machine for detailed scans.
Pick the tool that fits your part and what you need to check.
IDENTIFYING CRITICAL EDGES AND SURFACES
You must know which edges and surfaces are most important to check. The table below shows ways to inspect and what they do:
Method/Technique | Description |
|---|---|
Use magnifiers or microscopes to check edges and holes. | |
Coordinate Measuring Machines (CMM) | Scan surfaces and create maps for precise burr measurement. |
Profilometers | Measure burr size with contact or non-contact sensors. |
Ultrasonic Testing | Find burrs in complex shapes by checking sound changes. |
Eddy Current Testing | Spot burrs by looking at electromagnetic differences. |
Procedure Steps | 1. Clean the part. 2. Use magnification. 3. Measure burrs. 4. Compare to limits. 5. Record results. |
Pay attention to edges that touch other parts or change how the part works. Clean the part before you check it. Always compare what you find to the allowed limits.
HOW TO PREVENT BURRS IN CNC MACHINING
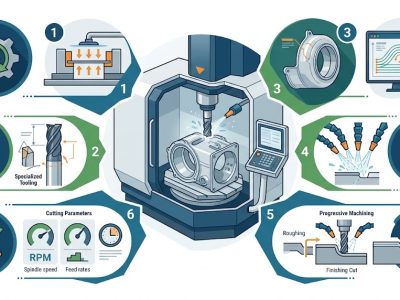
MACHINING PARAMETER OPTIMIZATION
You can reduce burrs by adjusting your machining parameters. Start by setting the right feed rates and spindle speeds. If you use a moderate feed rate, you help the tool cut cleanly. Too fast or too slow can both cause more burrs. Try to use climb milling when possible. This method gives you cleaner edges and less burr formation. Adjust your depth of cut for each material. Harder materials may need smaller cuts. Always check your settings before you start a new job.
TOOL SELECTION AND TOOL MAINTENANCE
Choosing the right tool is important for burr prevention. Sharp carbide or PCD tools work best for clean cuts. High rake angles and polished flutes help chips move away from the cutting area. You should also keep your tools in good shape. Regular maintenance schedules are essential for minimizing burr formation in CNC machining. If you replace worn nozzles and keep optics clean, you get better results. Preventive maintenance, like changing consumable parts on time, helps you keep cutting quality high and reduces burrs.
DESIGNING PARTS FOR FEWER BURRS
You can design your parts to make burrs less likely. Here are some ways to do this:
Optimize tool geometry by using sharp tools with high rake angles.
Adjust cutting parameters to use moderate speeds and feed rates.
Plan tool paths to avoid sudden entry or exit points.
Use stable workholding, like vacuum jigs, to stop part movement.
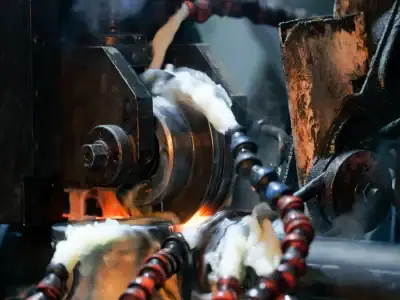
Keep coolant flowing to flush away chips and reduce heat.
Select sharp tools and modify tool paths instead of using traditional zigzag paths.
Make tool entry and exit smooth and control the cutting direction.
Use strong clamping to prevent vibration.
If you follow these steps, you will see fewer cnc machining burrs on your finished parts.
BURR FREE MACHINING STRATEGIES
Many shops use special strategies to avoid burrs. You can try these methods:
Optimize tool path and cutting direction. Use climb milling and change the exit angle for cleaner cuts.
Select the right cutting tools. Keep them sharp and use positive rake angles.
Adjust feeds, speeds, and chip load. Lower the feed rate at the tool exit to reduce heat and pressure.
Manage coolant and lubrication. Good thermal control keeps the material from getting too soft and forming burrs.
Tip: If you combine these strategies, you can make parts with almost no burrs and save time on finishing.
CNC DEBURRING METHODS FOR MACHINING PARTS
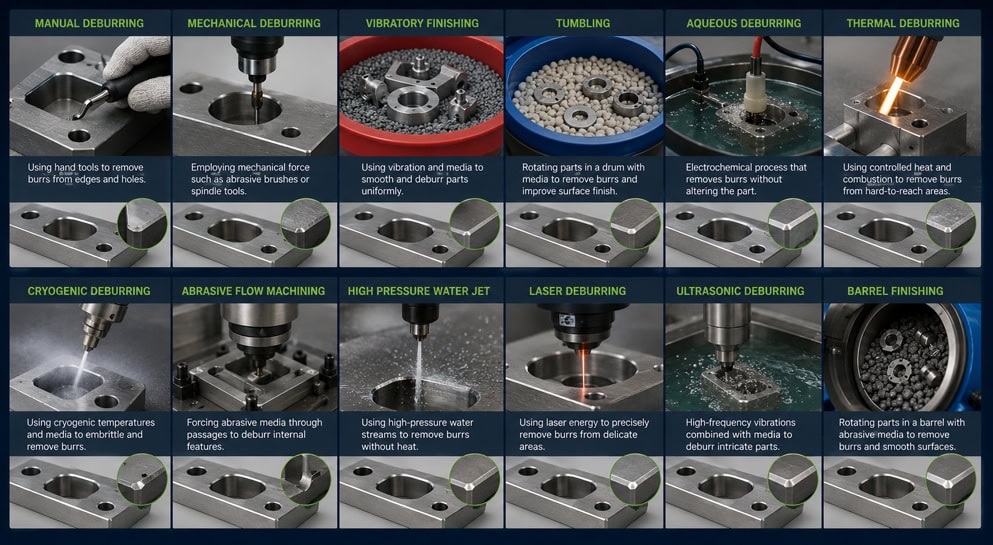
MANUAL DEBURRING TECHNIQUES
You can take off burrs by hand with simple tools. Machinists use these ways for small jobs or special parts. Here are some common tools:
Swivel-blade deburring tools are good for edges and holes.
Countersinks help make holes smooth and neat.
Files and scrapers fix flat edges.
Abrasive pads and stones smooth out surfaces and tiny burrs.
Small rotary tools reach burrs in tight places.
Manual deburring lets you control the work, but it takes more time and skill. Different people may get different results.
MECHANICAL AND AUTOMATED DEBURRING
Mechanical and automated systems use machines to take off burrs. These ways are best for big batches of parts. You get faster work and the same results each time. See the table below:
Method | Throughput | Consistency |
|---|---|---|
Automated | High | Uniform results |
Mechanical | Slower | Variable results |
Automated deburring saves labor and keeps edges the same on every part. Machines work quicker than people and finish more parts in less time.
THERMAL DEBURRING PROCESS
Thermal deburring uses a quick burst of heat to burn away burrs. You put parts in a chamber and fill it with gas. The gas lights up and removes burrs from all sides at once. This way is good for hard-to-reach spots. It works for tricky shapes and small holes.
CHEMICAL AND ELECTROCHEMICAL DEBURRING
Chemical and electrochemical ways use liquids or electric currents to dissolve burrs. These methods are great for tricky shapes. They do not scratch or hurt the part. You get smooth edges and a nice finish. These ways also stop new burrs from forming. You can do many parts at once and keep costs down. Both ways give you high quality and the same results every time.
CRYOGENIC AND FROZEN DEBURRING METHODS
Cryogenic deburring uses very cold temperatures to make burrs break easily. You tumble the parts while they are frozen. The burrs snap off, but the main part stays safe. This way is good for tricky shapes and blind holes. You can do many parts at once and keep the surface smooth. Cryogenic deburring gives you accurate and steady results every time.
Tip: Pick the best deburring way based on your part shape, material, and how many parts you need to finish. Taking off cnc machining burrs helps you make safe, high-quality products.
MACHINING BURR REMOVAL METHODS COMPARISON
DEBURRING SPEED AND EFFICIENCY
When you pick a deburring method, think about how fast it works. Mechanical ways, like using abrasive belts, are quick and steady. These are good for jobs with lots of parts. Manual deburring is slower and not great for big batches. Dry deburring is fast because you do not need much setup or cleaning. Wet deburring takes longer since you must wash and check each part. For making many parts, strong deburring machines work fast and handle lots at once. If you have small jobs or fragile parts, use precision deburring machines for better control.
SURFACE FINISH QUALITY COMPARISON
You want your parts to look nice and fit right. Manual and automated deburring give different results. The table below shows how they are not the same:
Aspect | Manual Deburring | Automated Deburring |
|---|---|---|
Consistency | Operator-dependent, variable quality | Process-parameter-controlled, repeatable |
Speed | Depends on operator skill and fatigue | Constant and predictable cycle time |
Flexibility | Adapts to irregular shapes easily | Needs programming for new part types |
Operator Risk | Higher risk of injury | Lower risk, less operator contact |
Automated systems help you get the same finish every time. This is very important for things like medical devices, where small changes can cause trouble.
COST AND PRODUCTION IMPACT
Deburring can make your CNC jobs cost more than you think. If your parts are tricky or have lots of features, manual work costs go up. This extra work can make you spend more than planned. Automated and high-tech ways cost more at first, but they save money later by cutting labor and mistakes.
CHOOSING THE BEST DEBURRING METHOD
Pick the deburring way that fits your part and how many you need. The table below gives you a quick guide:
Scenario | Recommended Method |
|---|---|
Simple edges | CNC Chamfering |
Complex 3D contours | Robotic Brushing |
High-volume small parts | Vibratory Tumbling |
Internal passages | High-Pressure Waterjet |
Inaccessible features | Electrochemical (ECD) |
Complex multi-feature parts | Thermal (TEM) |
Tip: Always think about your material, part shape, and how many you need. For test parts, use manual deburring on the most important edges. For lots of parts, use machines or mass finishing to save time and money.
STEP BY STEP CNC DEBURRING PROCESS
EDGE REMOVAL PROCEDURES
You start deburring by removing burrs from the edges. Pick the right tool for your part. Swivel-blade tools work well for holes and slots. Files and abrasive stones help you smooth flat edges. If you use a machine, set the speed and feed rate to match your material. Hold the part steady to avoid mistakes. Move the tool along the edge with steady pressure. Check the edge often to see if burrs remain. For tricky shapes, use rotary tools or brushes. Always work from the outside toward the center. This keeps the surface safe.
Tip: Wear gloves and eye protection. Burrs can be sharp and dangerous.
CLEANING AND SURFACE PREPARATION
After you remove burrs, clean the part. Use compressed air to blow away loose chips. Wipe the surface with a lint-free cloth. If you see oil or dust, wash the part with mild soap and water. Dry the part with a clean towel. For metal parts, use a solvent to remove grease. Make sure the surface is dry before you move to the next step. Cleaning helps you see if burrs remain. It also prepares the part for inspection.
Cleaning Method | Best For | Extra Notes |
|---|---|---|
Compressed Air | Loose chips | Use safety glasses |
Soap and Water | Oil and dust | Dry fully after washing |
Solvent Cleaning | Metal parts | Remove grease and residue |
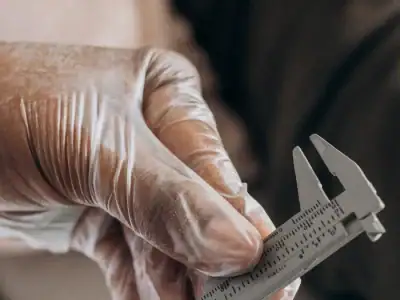
FINAL INSPECTION AND QUALITY VERIFICATION
You finish the process by checking your work. Use a magnifier to look at the edges. Shine a light at an angle to spot tiny burrs. Run your finger along the edge to feel for rough spots. Measure the edge with a caliper if you need exact results. Compare your part to the quality standards. Record your findings in a log. If you find burrs, repeat the removal steps. Quality checks help you make sure your parts are safe and ready for use.
✅ Careful inspection keeps your parts reliable and your customers happy.
BEST PRACTICES FOR REDUCING BURRS IN CNC MACHINING
OPTIMIZING CUTTING CONDITIONS
You can reduce burrs by setting the right cutting conditions. Start by choosing the correct feed rate and spindle speed for your material. Use a moderate feed rate to help the tool cut cleanly. If you set the feed too high, you will see larger burrs. If you set it too low, the tool may rub instead of cut. Adjust the depth of cut for each job. Harder materials need smaller cuts. Softer metals allow deeper cuts. Always check your machine settings before you start.
Tip: Test your settings on a scrap piece first. This helps you avoid mistakes on your final part.
IMPROVING TOOL PATH STRATEGIES
You can change your tool path to make fewer burrs. Plan your tool movement so the tool exits the material in a smooth way. Avoid sharp turns or sudden stops. Use climb milling for cleaner edges. Try to finish cuts at a gentle angle. This reduces stress on the edge and keeps burrs small. For holes, use a peck drilling cycle. This lifts the tool out often and clears chips away.
Here is a quick guide:
Tool Path Strategy | Burr Reduction Effect |
|---|---|
Climb Milling | High |
Gentle Exit Angles | Medium |
Peck Drilling | High |
Sharp Turns | Low |
Note: Review your tool paths in your CAM software before you run the job.
USING HIGH PRECISION CUTTING TOOLS
You should use high precision tools for the best results. Sharp tools with the right geometry cut cleaner edges. Carbide and PCD tools stay sharp longer. Tools with polished flutes help chips move away from the cut. Replace worn tools before they get dull. Dull tools make more burrs and rough edges.
Choose tools made for your material.
Keep a tool maintenance log.
Inspect tools before each job.
🛠️ High precision tools help you make parts with smooth edges and less finishing work.
FAQ ABOUT CNC MACHINING BURRS AND DEBURRING
WHAT CAUSES BURRS IN CNC MACHINING
You see burrs when the cutting tool pushes or tears the material instead of making a clean cut. Tool wear, wrong tool shape, and poor cutting settings often cause burrs. Soft metals bend and form burrs more easily. Hard metals resist cutting and make sharp burrs. If you use dull tools or set the feed rate too high, you get more burrs. Part design also matters. Sharp corners and thin edges make burrs appear.
Burrs form when you do not control the cutting process well. Check your tools and settings often.
WHAT IS THE BEST CNC DEBURRING METHOD
You can choose from many deburring methods. The best method depends on your part shape, material, and how many parts you need to finish. Manual deburring works well for small jobs or custom parts. Automated deburring suits large batches and gives you steady results. Thermal deburring removes burrs from hard-to-reach spots. Chemical and electrochemical methods help with complex shapes. Cryogenic deburring works for delicate parts.
Method | Best For |
|---|---|
Manual | Small jobs, custom work |
Automated | Large batches |
Thermal | Complex shapes |
Chemical/Electrochemical | Delicate parts |
Cryogenic | Fragile parts |
HOW CAN MACHINING BURRS BE PREVENTED
You can prevent burrs by using sharp tools and setting the right feed rate. Choose the best tool for your material. Plan your tool path to avoid sudden stops. Use climb milling for cleaner edges. Keep your tools in good shape. Design your parts with smooth edges and avoid sharp corners. Test your settings on scrap material before you start.
🛠️ Prevention saves you time and money. Good planning stops burrs before they start.
WHAT IS THE DIFFERENCE BETWEEN MANUAL AND AUTOMATED DEBURRING
Manual deburring uses hand tools like files and scrapers. You control the process and can fix tricky spots. Automated deburring uses machines to remove burrs. Machines work faster and give you the same results every time. Manual methods take more time and skill. Automated methods suit big batches and complex parts.
Manual deburring: Good for custom work, slow, needs skill.
Automated deburring: Fast, steady, best for many parts.
You should pick the method that fits your job and part needs. If you work with cnc machining burrs often, automated deburring helps you finish parts quickly.
Taking off cnc machining burrs makes your parts better and safer. You can use manual, automated, or chemical deburring. The best choice depends on your part’s shape and what it is made of. To get good results, do these things:
Look at your parts after every machining step.
Change your tools and settings when needed.
Use the deburring method that fits your job.
Checking your parts often helps you stop mistakes and keeps your parts working well.