LKprototype
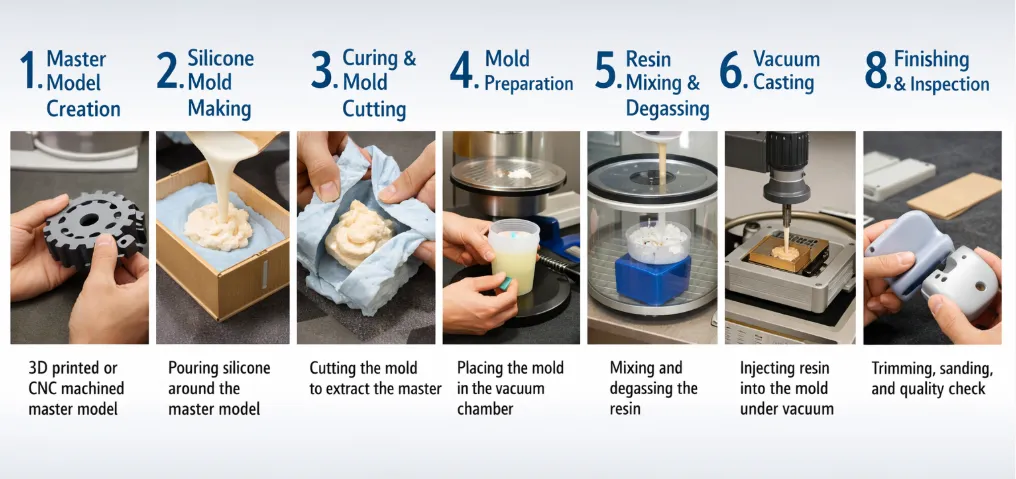
Estimated reading time: 22 minutes
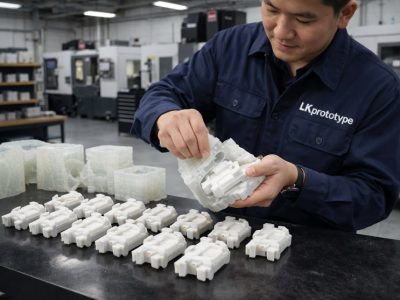
You use the vacuum casting process to make exact parts from a master model. This method lets you change your design and use cheap tools. It is great for making prototypes and small batches. You get high-quality prototypes with smooth surfaces and tricky shapes. This happens because there are fewer air bubbles and you can use more materials.
Advantage | Description |
|---|---|
Reduced Porosity and Defects | Gets rid of air pockets so parts are stronger. |
Superior Surface Finish | Makes smoother surfaces, so you do not need much extra work. |
Complex Geometries | Lets you make detailed designs that other ways cannot do. |
Material Versatility | Works with many resins and alloys for different uses. |
Very fast and saves money
Prototypes look just like the real thing
Can use many types of materials
Quick to finish
If you want good results for your next vacuum casting project, you can check out LKprototype's vacuum casting services at https://www.lkprototype.com/vacuum-casting-service/.
Key Takeaways
Vacuum casting is great for making good prototypes and small batches fast and at a low cost.
Using a vacuum helps lower air bubbles, so the parts are stronger and smoother.
Pick the right resin for your project to get things like bendiness or see-through parts.
Follow each step, from making a master model to finishing, to get good results.
You can work with a professional manufacturer for help and quicker work.
Vacuum Casting Process Overview
What Is Vacuum Casting?
Basic Definition
Vacuum casting helps you make parts using liquid resin and a silicone mold. First, you start with a master model. You put this model in a box and cover it with silicone. When the silicone gets hard, you take out the master model. Then you pour resin into the empty mold. The vacuum takes away air bubbles. This makes the parts smooth and correct. Vacuum casting is good for making prototypes and small batches.
How Vacuum Environment Improves Quality
Vacuum casting uses a vacuum chamber to pull air out. This stops bubbles and problems in the parts. The vacuum helps the resin fill every tiny space. You get parts that look nice and are strong. The vacuum makes it easy to make tricky shapes.
Why Vacuum Casting Is Used
For Prototyping
Vacuum casting lets you make prototypes that look like real products. You can test your design and see if it fits and works. You can show these models to clients or use them for tests. People use vacuum casting for making new products, checking designs, and testing how things work.
For Small Batch Production
Vacuum casting is great for making a small number of parts. You can make parts fast and do not need expensive tools. It works well for short runs, test batches, and special series. You get good quality and quick results.
Key Benefits and Applications
High Surface Quality
Parts made by vacuum casting have smooth surfaces and clear details. The process copies the master model very well. This is good for models used in marketing and showing to others.
Low Tooling Cost
You spend less money because silicone molds are cheaper than metal ones. You can make many parts from one mold. This makes vacuum casting a smart choice for saving money on prototypes and small batches.
Wide Material Options
Vacuum casting works with many kinds of resins and elastomers. You can pick materials that act like ABS, PC, or rubber. This helps you meet the needs of different jobs and industries.
Tip: If you want really good prototypes or small batch parts, you can check out LKprototype's vacuum casting services at https://www.lkprototype.com/vacuum-casting-service/.
Industry | Applications |
|---|---|
Automotive | Prototype dashboards, door handles, light covers, air vents |
Consumer Electronics | Device enclosures, wearable tech prototypes, buttons, switches |
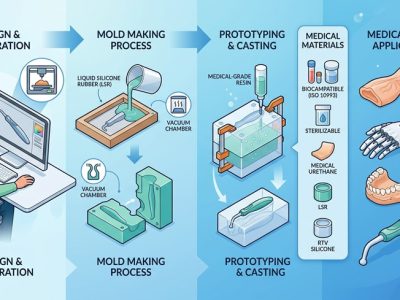
Medical | Device prototypes, custom orthopedic devices, equipment casings |
Aerospace | Cabin parts, air ducts, covers, enclosures |
Food and Beverage | Packaging prototypes |
Vacuum casting gives you lots of choices, fast results, and good parts. You can use it for many things, like electronics and medical devices.
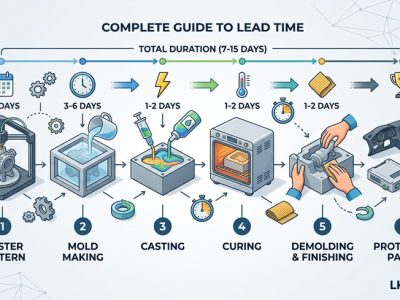
Quick Steps of the Vacuum Casting Process
You can finish vacuum casting in seven main steps. Each step helps you make good parts for prototypes or small batches.
Step 1 – Create Master Model
First, you make a master model. You can use CNC machining or 3D printing. The master model must match your design. If the master is smooth and correct, your parts will be better.
Step 2 – Make Silicone Mold
Next, put the master model in a mold box. Pour liquid silicone over the model. The silicone covers all the details. Use a vacuum chamber to pull out air bubbles. This makes the mold surface smooth.
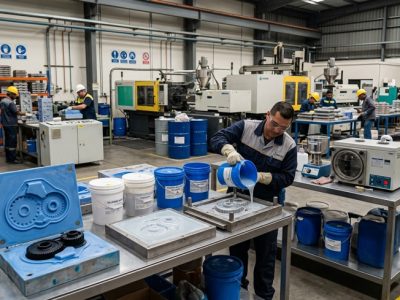
Step 3 – Prepare Resin Material
Pick the right resin for your part. Polyurethane resins are common. They can act like ABS, PP, or PC plastics. Mix the resin and hardener together. Measure them carefully. Use a vacuum to take out bubbles from the resin.
Step 4 – Vacuum Pouring
Pour the resin into the silicone mold. Do this inside a vacuum chamber. The vacuum pulls resin into every small space. This stops air pockets and problems.
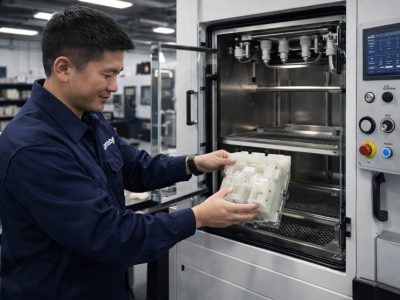
Step 5 – Oven Curing
Put the filled mold in an oven. The heat makes the resin hard. How long and how hot depends on the resin.
Step 6 – Demolding
After curing, take the part out of the silicone mold. Be careful so you do not break the part or mold. You can use the silicone mold many times.
Step 7 – Post Processing
Cut off extra material like gates or flash. You may sand or paint the part to make it look better. This step gives your part the final look and feel.
Tip: If you want expert help with vacuum casting, LKprototype can help you. They offer fast and reliable vacuum casting services. Learn more at https://www.lkprototype.com/vacuum-casting-service/.
Common Challenge | Description |
|---|---|
Air Bubbles | Air can get trapped and cause weak spots or rough surfaces. |
Dimensional Accuracy | Changes in temperature or vacuum can make parts the wrong size. |
Surface Finish | Complex shapes may need extra sanding or finishing. |
Material Limitations | Not all resins work well for every part. |
Cost Efficiency | The first setup can cost more, but it saves money for small batch production. |
If you follow these steps, you can use vacuum casting to make strong and detailed parts for many uses.
Master Model Creation
CAD Design Basics
You begin by making a master model in CAD. It is important to be exact. Every small detail you add will show up later. Your model must have the right size and shape. If you make a mistake, the casting will copy it. The master model is the pattern for your silicone mold. Try not to bend or change the model. Any errors will show up in every part you make. Careful CAD work helps you get good results.
Design for Vacuum Casting
Focus on smooth surfaces and clear shapes. Do not use sharp corners or undercuts. These make it hard to take out the part. Think about how resin will move in the mold. Make sure your design lets resin fill the mold easily. This helps stop air bubbles. Your master model should be strong and not bend. This keeps it from changing shape during vacuum casting.
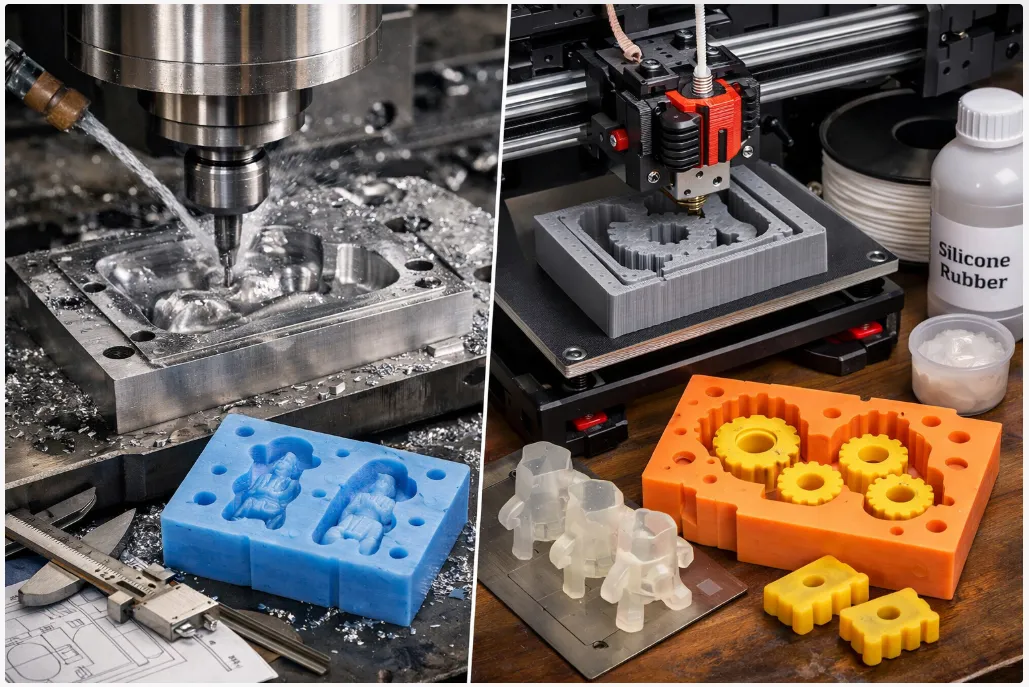
3D Printing and CNC Machining
There are two main ways to make your master model. You can use 3D printing or CNC machining.
Method | Advantages | Disadvantages |
|---|---|---|
3D Printing | Good for making a few parts fast. No need for special tools. | Each part can cost more than other ways. |
CNC Machining | Gives you very exact parts. | Costs more and takes longer for just a few parts. |
When to Use 3D Printing
Pick 3D printing if you need a fast prototype. It is also good for tricky shapes. This way works well for small numbers of parts. You can test your design before casting.
When to Use CNC Machining
Use CNC machining if you want very exact and strong parts. This way is best when you need high accuracy. CNC machining gives you a master model that fits well. This helps with vacuum casting.
Preparing the Master Model
Get your master model ready before making the mold. Making the surface smooth helps copy details. You can sand, polish, or paint the model. These steps help the silicone mold show every feature.
Surface Polishing
Sand and polish the master model to make it smooth. This gets rid of rough spots. The smooth surface is ready for vacuum casting.
Sealing and Coating
Put on a coating or primer to seal the surface. This keeps the silicone from sticking. It also makes it easy to take out the mold. You get better parts when your model is clean and sealed.
Tip: If you want help with vacuum casting, LKprototype can guide you. Learn more at https://www.lkprototype.com/vacuum-casting-service/.
Making the surface smooth helps copy details in the mold.
You can sand, polish, or put on a coating.
Silicone Mold Casting Process
Mold Box Setup
First, you build a mold box for casting. Pick a container that does not let air through. The bottom should be flat. Coated MDF is a good choice because it lasts longer. You can use a plastic food box with the bottom cut out. Tape it so it stays together. Seal all the edges with hot glue or silicone. This stops leaks. Some people use cardboard, foam core, or acrylic sheets. If you use cardboard, cover it with packing tape. This keeps the silicone from soaking in.
If you need help with vacuum casting, LKprototype can help you. Visit https://www.lkprototype.com/vacuum-casting-service/.
Positioning the Master
Put your master model in the middle of the mold box. Make sure it stands up straight. It should not touch the sides. This lets the silicone cover every part. Hold the master in place so it does not move.
Pouring and Curing Silicone
Mix the silicone by following the directions. Measure each part carefully. This gives you the right mix. Use a tool that shakes to get rid of bubbles. Pour the silicone slowly into the box. Start at the bottom and let it flow over the master. Cover the master with at least 1 centimeter of silicone. Wait for the silicone to get hard. This can take hours. Check the bottle for how long to wait.
Silicone Mixing Ratio
Read the instructions for mixing the silicone. Use the right amounts. This helps the mold get strong and cure well.
Degassing Silicone
Use a vacuum chamber or a shaking tool to remove bubbles. This makes your vacuum casting molds better.
Slicing and Demolding
When the silicone is hard, cut the mold along the parting line. Cut carefully to keep the mold strong. Put a thin coat of mold release agent before pouring silicone. Let it dry all the way. When you take out the master, bend the silicone gently. This keeps it from breaking. You can use a heat gun to warm the mold. This makes it easier to remove.
Mold Splitting Methods
Pick a cutting way that matches your part’s shape. Clean the master before you spray mold release or wax. Careful cutting and removing protect the master and the mold.
Gating and Ventilation System
Plan where to put gates and vents. Good spots help resin flow faster and push out air. Strong gating and venting help you cast more parts. They also make the parts better.
Gate Location Design
Put gates where resin can go in easily. This fills every detail and stops problems.
Vent Hole Placement
Add vent holes at the top. This lets air out. It stops bubbles and makes smooth surfaces in vacuum casting.
Vacuum Casting Step-by-Step
Mixing and Degassing Resin
First, you mix the resin for vacuum casting. You need to measure the resin and hardener very carefully. If you do not use the right amount, the casting will not turn out well. Always read the instructions for your resin before you start.
Resin Measurement
Use a digital scale to measure both parts of the resin.
Make sure your container is big enough for mixing.
Mix the resin slowly so you do not make lots of bubbles.
Vacuum Degassing
Air bubbles can make your parts weak. You have to get rid of them before you pour the resin. Here are the steps for vacuum resin casting:
Put the mixed resin in a container with extra space.
Place the container inside a vacuum chamber.
Turn on the vacuum until it reaches 29 inches of mercury.
Wait a few minutes so the bubbles rise up and pop.
Tip: Pour the resin from higher up to help break big bubbles. This makes your vacuum casting parts stronger.
Filling the Mold Under Vacuum
Pour the resin with no bubbles into the silicone mold. Do this inside the vacuum chamber. The vacuum helps the resin fill every small detail. It also stops air pockets from forming.
Pouring Speed Control
Pour the resin slowly and do not rush. If you pour too fast, you can trap air inside. Slow pouring gives you smooth parts and the right shape.
Oven Curing and Part Removal
After you fill the mold, put it in an oven to cure. The temperature and time you need depend on the resin and how big your part is.
Typical Curing Temperature
Curing Stage | Temperature (℃) | Time |
|---|---|---|
Initial Curing | 60-70 | 30-60 minutes |
Secondary Curing | 70-80 | 2-3 hours |
Curing Time Range
Curing Stage | Average Time |
|---|---|
Small Pieces | 1-3 hours |
Large Pieces | 3-6 hours |
Take the part out of the mold after it is cured. Be gentle with the mold so you do not break it.
If you want help with your vacuum casting project, LKprototype can help you. Visit https://www.lkprototype.com/vacuum-casting-service/ for more information.
Post-Processing and Quality Check
After you remove your part from the mold, you need to make it look and work its best. Post-processing steps help you get a smooth finish and strong part. You also need to check the quality before you use the part.
Trimming and Cleaning
You start by trimming and cleaning your part. This step removes extra material and makes the part neat.
Removing Gates and Flash
Cut off the gates and flash with a sharp knife or small saw. These are the extra bits left from the resin flowing into the mold. You can use small files or sandpaper to smooth the edges. Always check for leftover pieces around the parting lines.
Surface Finishing
Surface finishing gives your part a professional look. You can make the surface smooth, add color, or copy textures.
Sanding
Sanding is important in vacuum casting. Start with coarse sandpaper to remove big bumps. Move to finer grits for a smooth finish. Sand parting lines to make them disappear.
Painting
You can paint your part to match your design. Use a primer first. Spray thin coats and let each coat dry. This helps the paint stick and look even.
Texture Replication
If you want a special texture, you can add it during finishing. Use tools or special films to copy patterns from the master model. This step makes your part look like a real product.
Tip: LKprototype offers expert vacuum casting services, including post-processing and finishing. You can learn more at https://www.lkprototype.com/vacuum-casting-service/.
Inspection and Testing
You need to check your part to make sure it meets your needs. Use simple tools or advanced machines for this step.
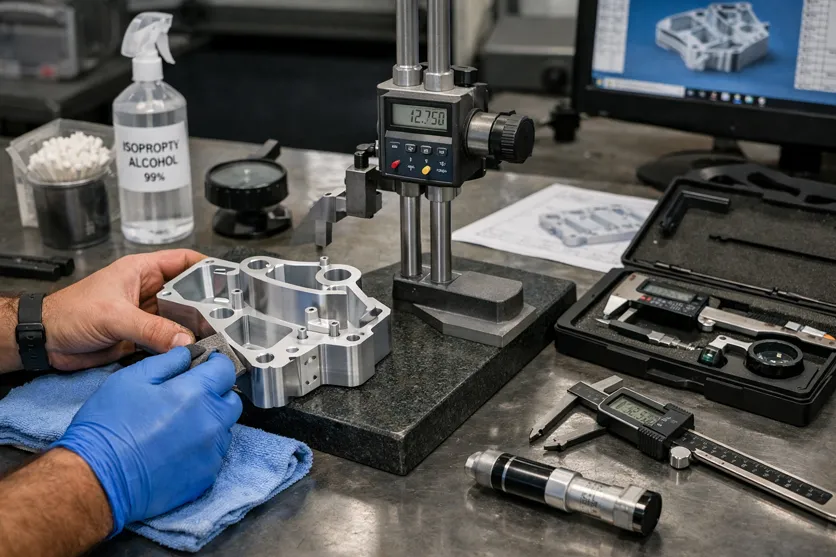
Dimensional Inspection
Measure your part with calipers or a ruler. Make sure the size matches your design. For more accuracy, use a 3D scanner or a coordinate measuring machine.
Visual Inspection
Look at the surface for bubbles, warping, or missing details. Check that the finish is smooth and the color is even.
Inspection Method | Description |
|---|---|
Dimensional Accuracy Testing | Using calipers, CMM (Coordinate Measuring Machines), or 3D scanning. |
Material Property Testing | Tensile strength, hardness, and impact resistance tests. |
Surface Finish Inspection | Checking for defects like bubbles, warping, or incomplete fills. |
You can trust vacuum casting to give you parts that look good and work well when you follow these steps.
Troubleshooting and Best Practices
When you use vacuum casting, you might have some problems. If you know how to find and fix these, your parts will turn out better.
Common Issues in Vacuum Casting
Air Bubbles
Air bubbles can show up inside your parts. These bubbles make the part weaker and mess up the surface. Air gets trapped when you mix resin, pour it, or inside the mold. You can see bubbles as tiny holes or cloudy spots on your part.
Short Shots
Short shots happen if resin does not fill the mold all the way. You might see missing corners or shapes that are not finished. This can happen from trapped air, thick resin, or pouring too slow.
Surface Defects
Surface defects are rough spots, dents, or marks on your part. These can happen if the mold gets old, you do not use enough mold release, or gases get stuck during casting.
Tip: If you want to stop these problems and need help, LKprototype has vacuum casting services. You can learn more at https://www.lkprototype.com/vacuum-casting-service/.
Here is a table that lists common problems and what causes them:
Issue | Typical Cause |
|---|---|
Air bubbles | Air or gas gets trapped when mixing, pouring, or inside molds. |
Dimensional variability | Shrinkage, mold wearing out, or heat changes during curing. |
Surface defects | Mold gets old, not enough mold release, or gas gets stuck during casting. |
Material limitations | Using resin that does not flow well in the vacuum. |
Mold wear | Silicone mold breaks down over time, mostly with high heat. |
Root Causes
Poor Degassing
If you do not take out air from the resin, bubbles will show up. Poor degassing happens if you skip the vacuum step or rush. Always use a vacuum chamber to pull out air before you pour resin.
Incorrect Gating
Gates and vents help resin move and let air out. If you put gates in the wrong place or do not use enough vents, air gets stuck. This can cause short shots and bubbles. Plan your gating so resin fills the whole mold.
Tips for Consistent Results
You can follow these best practices to keep your vacuum casting working well.
Process Control
Make clear steps for mold prep, mixing, casting, and curing.
Write down vacuum levels, heat, and times for every batch.
Use good resins from trusted sellers.
Mix resin and hardener in the right amount and stir well.
Pour resin slowly and steady so you do not make bubbles.
Best Practice | Description |
|---|---|
Standardize Procedures | Write clear steps for each stage and teach everyone who works on casting. |
Monitor Every Batch | Keep notes of vacuum, heat, and material for every run. |
Mix Properly | Use the right mix and stir until the resin looks even. |
Maintain Correct Vacuum Level | Watch the vacuum gauge to keep the pressure steady. |
Consistent Pouring Technique | Pour resin at a steady speed to stop bubbles from forming. |
Quality Checks | Measure and check parts to make sure they match your design. |
Mold Maintenance
Clean the mold after each use to get rid of dust and old resin.
Put on a good release agent before every casting.
Check the mold for cracks or damage. Replace it if you see any.
Store molds in a cool, dry place to help them last longer.
Note: Checking your tools and taking care of molds helps you stop defects and keeps your parts looking good.
If you follow these tips, you will have fewer problems and get good parts every time you use vacuum casting.
Cost and Material Selection
When you start a vacuum casting project, you must think about cost and materials. These choices change how much money you spend. They also change how good your parts are and how well they work.
Mold Cost Factors
Many things can make silicone molds cost more or less. You should know these things before you begin.
Factor | Description |
|---|---|
Master Model Fabrication | The price changes if you pick 3D printing for speed or CNC machining for accuracy. |
Mold Complexity | More details need extra work and materials, so the price goes up. |
Material Selection | Some mold materials cost more, so the total price changes. |
Production Volume | If you want more parts, you need more molds, so the cost goes up for small batches. |
Post-Processing and Finishing | Extra steps for looks or marketing add to the cost. |
Mold Size
The size of your mold is important. Big molds use more silicone and cost more. Small molds use less and cost less. Match the mold size to your part to save money.
Mold Life
Silicone molds do not last forever. Most molds can make 15 to 25 parts before they break down. If you need more parts, you must make new molds. Planning for mold life helps you save money and stay on track.
Tip: If you want to save time and money, you can use a company like LKprototype. They help you pick the right mold size and control costs. Learn more at https://www.lkprototype.com/vacuum-casting-service/.
Choosing Resins and Elastomers
You have many choices for materials in vacuum casting. Each resin or elastomer has special features. Pick the one that works best for your job.
ABS-Like Resins: These are strong, keep their shape, and bend a little.
PC-Like Resins: These are clear, tough, and can handle heat up to 120°C.
PMMA/Acrylic Resins: These are very clear and let light pass through.
PP-Like Resins: These are soft, bendy, and do not get hurt by chemicals.
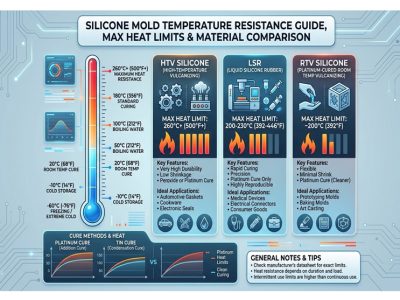
Silicone Rubber: This is safe for the body, keeps water out, and works in hot or cold.
TPU Plastic: This stretches like rubber but is strong like resin, so it is flexible and tough.
Here is a table to help you compare popular materials for vacuum casting:
Material | Shore Hardness | Description | Technical Info |
|---|---|---|---|
General Purpose | D 76-80 | Strong and impact-resistant, like ABS | TC-878, TC-852, or similar |
Rigid Clear | D 80 | Clear and useful for many things | Poly-Optic 1410 or similar |
Polycarbonate-Like | D 82-86 | Hard and tough material | TC-854 or similar |
ABS-Like Resin
Use ABS-like resin for parts that need to be strong and keep their shape. This is good for prototypes and small batches. It works well for covers, brackets, and parts that look and feel like real plastic.
PC-Like Resin
PC-like resin is best for clear parts that must be tough and handle heat. Use it for lenses, windows, and covers in electronics or cars. This resin stays clear and keeps its shape, even when things get hard.
Rubber-Like Materials
If you need soft or bendy parts, pick rubber-like materials like silicone rubber or TPU. These bend without breaking and last a long time. Use them for seals, gaskets, or grips in many jobs.
Note: Picking the right resin or elastomer helps you get the best parts for your project. If you need help, LKprototype can help you choose the best material.
If you know about cost and material choices, you can make smart choices for vacuum casting. This helps you get good parts that fit your needs and your budget.
Vacuum Casting vs Other Manufacturing Processes
Vacuum Casting vs Injection Molding
Cost Comparison
When you look at vacuum casting and injection molding, you see big cost differences. Vacuum casting does not need a lot of money to start. The tools and setup are cheaper. This is good for small batches and trying out new ideas. Injection molding costs more at the start because you need special molds. These molds are expensive, even if you use aluminum.
Vacuum casting costs less to set up.
It saves money if you only need a few parts.
Injection molding gets cheaper per part when you make lots of parts.
The molds for injection molding cost more than vacuum casting.
If you want to spend less on prototypes or small batches, vacuum casting is better. If you need many parts, injection molding is cheaper for each part.
Volume Suitability
Vacuum casting is best for making a few parts or custom jobs. You can change your design fast and test new ideas. Injection molding is for making thousands of the same part. It is used for big orders and mass production.
Vacuum casting is good for small batches and changing designs.
Injection molding is best for making lots of the same part.
If you want help with vacuum casting, LKprototype can help you. Visit https://www.lkprototype.com/vacuum-casting-service/ to learn more.
Vacuum Casting vs CNC Machining
Geometry Freedom
Vacuum casting lets you make parts with tricky shapes and small details. You can copy almost any master model. This is great for parts that need to look nice or have special features. CNC machining is better for parts that must be very exact and strong. It is not as good for making hard shapes or smooth surfaces.
Vacuum casting copies tricky shapes and makes nice-looking parts.
CNC machining is best for exact and strong parts.
Lead Time
You may need your parts quickly. Both vacuum casting and CNC machining can be fast. Here is a simple table to show the time:
Manufacturing Method | Lead Time |
|---|---|
Vacuum Casting | 10-15 days |
CNC Machining | 7-15 days |
Both ways can give you parts fast. Vacuum casting lets you make cool shapes. CNC machining gives you strong and exact parts. Pick the way that works best for your project and schedule.
When Should You Choose Vacuum Casting?
Ideal Use Cases
Vacuum casting is best when you want parts that look real. It works well if you need things made quickly and with care. Here are some times when vacuum casting is a good idea:
You want your parts to be very exact.
You need a prototype for real tests.
You plan to make only 10 to 100 parts.
You want special parts with different materials.
You need your parts finished fast.
Functional Prototypes
Vacuum casting helps you make prototypes that match your design. These prototypes let you test how things fit and work. You can check if they handle heat, force, or chemicals. This way, you see how your product works before making lots of them.
Low-Volume Production
Vacuum casting is smart for making a small number of parts. Silicone molds cost less than metal ones, so you save money. You can make special products or limited editions. This method helps you move from testing to making more parts. You get good parts quickly.
Tip: If you want help with vacuum casting for prototypes or small batches, LKprototype can help you fast. Learn more at https://www.lkprototype.com/vacuum-casting-service/.
When to Consider Other Processes
High Volume Production
Vacuum casting is not good for making thousands of parts. If you need lots of parts, use injection molding or other ways. These methods use strong molds and make parts faster and cheaper. Pick vacuum casting for small batches, but use other ways for big jobs.
Process | Best For | Mold Cost | Part Volume |
|---|---|---|---|
Vacuum Casting | Prototypes, low-volume | Low | 10–100 |
Injection Molding | High-volume production | High | 1,000+ |
You can choose the right process by thinking about your goals and budget.
Work with a Professional Vacuum Casting Manufacturer
Picking the right company for vacuum casting is important. It can change how your parts turn out. A professional manufacturer helps you at every step. They give you support, good quality, and fast work. You get help from the start to the end.
Engineering Support
A skilled team can turn your ideas into real things. You can show your drawings and talk about what you need. The engineers will help you find the best way to make your parts.
DFM Analysis
Design for Manufacturability (DFM) analysis checks if your design is good for vacuum casting. The team looks for ways to make your parts easier to make and stronger. You get tips about wall thickness, draft angles, and what materials to use. This step helps you avoid mistakes and saves time.
Tip: Good DFM analysis helps you save money and get better parts.
Quality Control
You want every part to be just right. A professional manufacturer checks each part to make sure it looks and works well.
Inspection Equipment
Modern tools help find problems early. You might see calipers, 3D scanners, or other machines. These tools measure your parts and look for mistakes. You get reports that show your parts match your drawings.
Fast Turnaround and Scalability
You may need your parts fast, especially for prototypes or small batches. A good manufacturer can deliver quickly and make more parts if you need them.
Prototype to Production
You can start with a few prototypes and then make more parts later. The same team can help with both steps. This saves time and keeps your project moving.
Here is a table to help you pick the right vacuum casting manufacturer:
Factor | Description |
|---|---|
Material Properties | Check if the manufacturer has materials that are strong and look good. |
Production Volume | Make sure they can make the number of parts you need. |
Cost | Compare prices to see what fits your budget. |
Regulatory Compliance | Check if they follow the rules for your industry. |
Manufacturer's Capabilities | See if they have the right skills and tools for your project. |
Note: LKprototype is a trusted company for vacuum casting. Their team gives expert help, checks quality, and delivers fast. You can learn more or contact them at https://www.lkprototype.com/vacuum-casting-service/.
You can use the vacuum casting process to make prototypes and small batches. This way gives you good parts fast. It also helps you save money and change your design if you need to. You can pick from many materials and make parts with lots of detail. If you want expert help, you can try LKprototype’s vacuum casting services at https://www.lkprototype.com/vacuum-casting-service/. Start your project now and see how simple it is.
FAQ
What is the typical lead time for vacuum casting parts?
You can get vacuum cast parts in about 10 to 15 days. The time changes if your parts are big or you order a lot. Fast delivery lets you try out your designs soon.
How many parts can you make from one silicone mold?
One silicone mold can make about 15 to 25 parts. The number depends on how tricky your part is and what resin you use. If you need more parts, you should plan to make extra molds.
Can you use vacuum casting for clear or colored parts?
Yes, you can pick clear, colored, or bendy materials. Many resins let you see through them or choose special colors. You can match the look you want for your project.
Tip: LKprototype has lots of vacuum casting materials. They offer clear and colored choices. You can learn more at https://www.lkprototype.com/vacuum-casting-service/.
What industries use vacuum casting most?
Industry | Common Uses |
|---|---|
Automotive | Prototypes, covers |
Electronics | Device cases, buttons |
Medical | Equipment, custom parts |
Vacuum casting is used in many jobs. It helps people make test parts and small batches for showing and trying out.