LKprototype
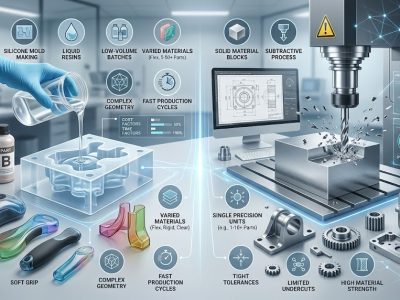
When you focus on CNC prototype parts design, you consider what machines can do quickly and efficiently. Effective CNC prototype parts design allows you to create metal and plastic prototypes with fewer errors and reduced costs. CAD modeling plays a crucial role in rapid prototyping, enabling you to make quick adjustments and achieve precise results.
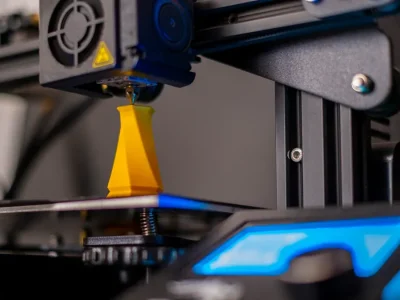
CNC machining is faster than molding and more accurate than 3D printing.
You can achieve tolerances as tight as ±0.01 mm.
A prototype can be completed in 24 to 72 hours, allowing for rapid testing and refinement of your design.
By following the right steps, you can enhance and simplify the prototyping process.
Key Takeaways
Make sure your design is easy to make. This helps stop mistakes and saves time and money.
Keep your design simple with less details. This makes it cheaper and faster to make.
Pick the best material for your prototype. Aluminum 6061 is a good choice because it is not too expensive and is easy to machine.
Plan your design so tools can reach every part. This helps make your part more accurate.
Work with machinists when you start designing. This helps find problems early and matches your design to what can be made.
CNC Prototype Parts Design Principles
When you begin cnc prototype parts design, you should think about three main ideas. These ideas are manufacturability, efficiency, and quality. They help you make parts that are easy to machine. They also help you save money and meet high standards. If you follow these ideas, you can make your cnc prototype machining better. You will get better results from your prototypes.
Manufacturability
Your designs should be easy to machine and put together. If you remember manufacturability, you can stop problems during cnc machining. You will also make fewer mistakes. Good manufacturability saves you time and money.
Here are some design ideas that help manufacturability:
Design Principle | Description |
|---|---|
Specify Tolerances | Match tolerances with what machines can do. This helps you avoid problems and keep quality. |
Functional Tolerances | Only use tolerances for important features. This makes things less complicated. |
Purposeful Tolerance Callouts | Give each tolerance a reason. This helps you check parts faster. |
Use of Radii | Use the biggest radii you can. This lets you use stronger tools and get smoother surfaces. |
Consistent Radii | Keep radii the same. This means fewer tool changes and easier manufacturing. |
Tip: When you design for manufacturing, always see if your part can be made with regular tools. This can help you avoid waiting and spending extra money.
Efficiency
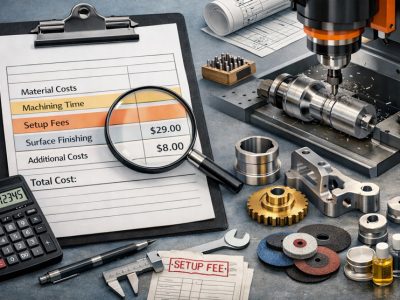
Efficient cnc prototype parts design helps you save time and money. Simple designs with fewer features are cheaper to machine. If you add tricky shapes or sharp corners, machining takes longer and costs more.
Simple designs with fewer features are cheaper to machine.
Hard shapes need special machining, which costs more.
Machining time goes up when designs are complicated.
Tight tolerances and fancy finishes can cost more if not needed.
Features like inside spaces and undercuts need special tools, which cost extra.
Tough materials like stainless steel or titanium need slower cutting and more tool changes, so costs go up.
Aluminum alloys are usually best for price and easy machining.
Normal production times (7-10 days) cost less, but rush orders (1-3 days) cost more.
You can also make things more efficient by using smart toolpaths and watching machines in real time. These ways help your cnc machines work longer and stop less. When you use cnc prototype machining, you make prototyping cheaper and easier to control.
Quality
Quality is very important in cnc prototype parts design. You want your prototypes to be very accurate and precise. Quality checks make sure your parts match your design and work right.
Here are some common quality rules and ways used in cnc:
Quality Standard/Method | Description |
|---|---|
Certificate of Conformity | A formal paper that says parts meet the needed rules and standards. |
Optical Dimensional Measurement (3D Scan) | Checks part size against the design using special scanning tools. |
Surface Roughness Measurement | Measures how smooth the surface is, using DIN ISO 4287 rules. |
Quality Control in CNC Machining | A step-by-step way to make sure parts meet industry rules by checking and testing. |
You can make quality better by using careful setups, good tools, and flexible ways to work. These steps help you make fewer mistakes and keep tight tolerances. Good tools also help your cnc machining work better, giving you cleaner cuts and less wasted material.
Note: Always check your prototype after machining. Use tools like 3D scanning and surface roughness checks to see if your part is right.
If you focus on manufacturability, efficiency, and quality, you build a strong base for good cnc prototype parts design. These ideas help you make prototypes that are easy to build, save money, and work well.
CNC Machining Process Overview
The cnc machining process helps you make real parts from ideas. You start with a design. Then machines shape the material into your prototype. Every step is important if you want a part that works well and looks nice.
CAD Modeling for CNC
You first make a 3D CAD model. This model shows all the shapes and sizes of your prototype. Good CAD models help all the measurements match your design. When you use careful CAD modeling, the cnc machine can make parts that fit and work as you want.
Tip: Always check your CAD model before moving on. Small mistakes can cause big problems later.
The cnc machine uses your digital model to know what to do. The steps are:
Design and CAD Modeling: You make a 3D model of your prototype.
CAM Programming: You turn your design into instructions for the cnc machine.
Machining: The machine follows the instructions to cut and shape the material.
Finishing and Quality Control: You check the part to make sure it is right.
CNC Machine Types
There are different cnc machines for making prototypes. Each type is best for certain shapes and materials. Here is a table that shows common cnc machines and what they do:
CNC Machine Type | Capabilities |
|---|---|
CNC Milling Machines | Make complex shapes and surfaces using spinning cutters. |
CNC Lathe Machines | Shape round parts with high accuracy. |
CNC Grinding Machines | Use rough wheels for smooth finishes and very exact parts. |
CNC Drilling Machines | Drill holes with high accuracy for jobs done many times. |
CNC Waterjet Cutting Machines | Cut many materials without heat, so the material stays the same. |
You pick the cnc machine that fits your prototype’s needs. Milling machines are good for most shapes. Lathe machines are best for round parts. Waterjet machines cut without heating the material.
Materials for CNC Prototyping
You have many choices for cnc prototyping materials. Some materials are better for certain jobs. Here is a table with common options:
Material | Characteristics | Reasons for Selection |
|---|---|---|
ABS | Strong, does not get hot easily, low friction | Tough and easy to machine |
Acetal | Strong, stays the same shape, does not take in water | Great for parts that need to be exact |
PEEK | Does not wear out fast, does not take in water | Good for high heat jobs |
Aluminum 6061 | Easy to machine, not expensive, can be used for many things | Most popular because it is cheap and easy to use |
Aluminum 7075 | Very strong, hard, light, handles heat well | Best for strong and long-lasting parts |
Aluminum 6061 is a top choice for cnc prototyping because it is cheap and easy to machine. You might use metal alloys if you need parts that are hard or can take heat. POM (Delrin) is also a good choice because it is not expensive and is easy to machine.
You pick your cnc prototyping material based on what your part needs to do, how much it costs, and how easy it is to machine. The right material helps your prototype work well and last longer.
CNC Prototype Machining Challenges
When you do cnc prototype machining, you can run into problems. Knowing about these problems helps you make better designs. It also helps you avoid mistakes in cnc machining and prototyping.
Tool Geometry
Tool geometry is very important in cnc prototype machining. The shape and size of the cutting tool change how smooth your part is. They also affect how accurate your part will be. You must pick the right tool for each job. The table below shows how tool choices change your results:
Factor | Effect on Precision and Surface Finish |
|---|---|
Tool Positioning | Bigger diameters are stronger but can make rougher surfaces if not used right. |
Tool Size | Large tools need more power and can get hot, which can hurt the surface. |
Rake Angle | Positive rake angles cut smoother but can make the tool edge weaker. |
Relief Angle | Gives space to stop rubbing, but too much can make the edge weak. |
Tool Edge Sharpness | Sharp edges cut cleaner but wear out faster. |
Tip: Always look at your tool geometry before you start cnc prototype machining. The right tool can help you work faster and get better quality.
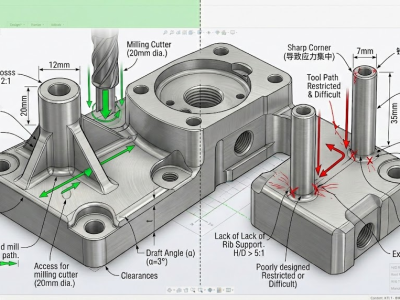
Tool Access
Tool access is another big problem in cnc prototype machining. If your design has deep holes or tight spots, the tool might not reach. Longer tools can help, but they shake more and are less accurate. Try to design your part so bigger and shorter tools can do most of the work. This makes cnc machining faster and keeps your parts more exact. Good tool access also saves money and makes your prototype better.
Material Limits
Material limits can change your cnc prototype machining plans. Some materials are hard to cut. Others do not handle heat or stress well. You need to think about strength, machinability, and how the material handles heat or electricity. For example, aluminum is good for heat sinks because it moves heat away. Plastics like PVC are better for stopping electricity. The table below shows some important material properties:
Property | Description | Example Materials |
|---|---|---|
Strength | Handles stress and force during use. | ABS, Nylon |
Durability | Lasts longer in tough environments. | Nylon, PVC |
Machinability | Easy to shape, saving time and money. | Aluminum, Plastics |
Thermal Conductivity | Moves heat away or keeps it in, depending on the need. | Aluminum, Plastics |
Electrical Conductivity | Lets electricity flow or blocks it, based on the part’s job. | Copper alloys, PVC |
When you plan cnc prototype machining, always pick a material that fits your part’s job. This helps you get a better prototype and makes your project work out well.
CNC Design Guidelines
Cavities and Pockets
When you design cavities and pockets for cnc prototype parts design, you need to think about tool size and depth. The depth of a cavity affects the tool you can use. If you make a cavity too deep, the tool may bend or break. You should keep the depth of the cavity to about three or four times the width of the endmill. This helps you avoid tool deflection and keeps your prototype strong.
Keep cavity depth within a 3:1 or 4:1 depth-to-width ratio.
Use variable depths for deeper pockets to keep the part strong.
Adjust radii and fillets based on how deep the cavity is.
Avoid deep, narrow pockets to help with chip removal and tool access.
If you follow these tips, you make cnc prototype machining easier and get better results.
Internal Edges
Internal edges in cnc machined parts can be tricky. The size of the radius in corners changes how easy it is to machine your prototype. Small radii need special tools that work slower and wear out faster. Large radii let you use bigger tools, which work faster and last longer.
Internal Edge Radius | Effect on Machinability | Effect on Tool Life |
|---|---|---|
Smaller Radii | Needs slower speeds, takes more time | Tool wears out faster |
Larger Radii | Allows faster speeds, smoother toolpaths | Tool lasts longer |
If you use small radius corners, you need to use small tools. These tools take longer and cost more. Large radii help you finish cnc prototype machining faster and save money.
Thin Walls
Thin walls can make cnc prototype machining hard. If you make walls too thin, they may bend or break during machining. You should follow minimum wall thickness guidelines for each material. This helps you keep your prototype strong and easy to machine.
Material | Minimum Wall Thickness |
|---|---|
Aluminum | 0.5 mm |
Stainless Steel | 1 mm |
Brass | 0.5 mm |
Plastics | 0.3 mm |
Composites | 0.8 mm |
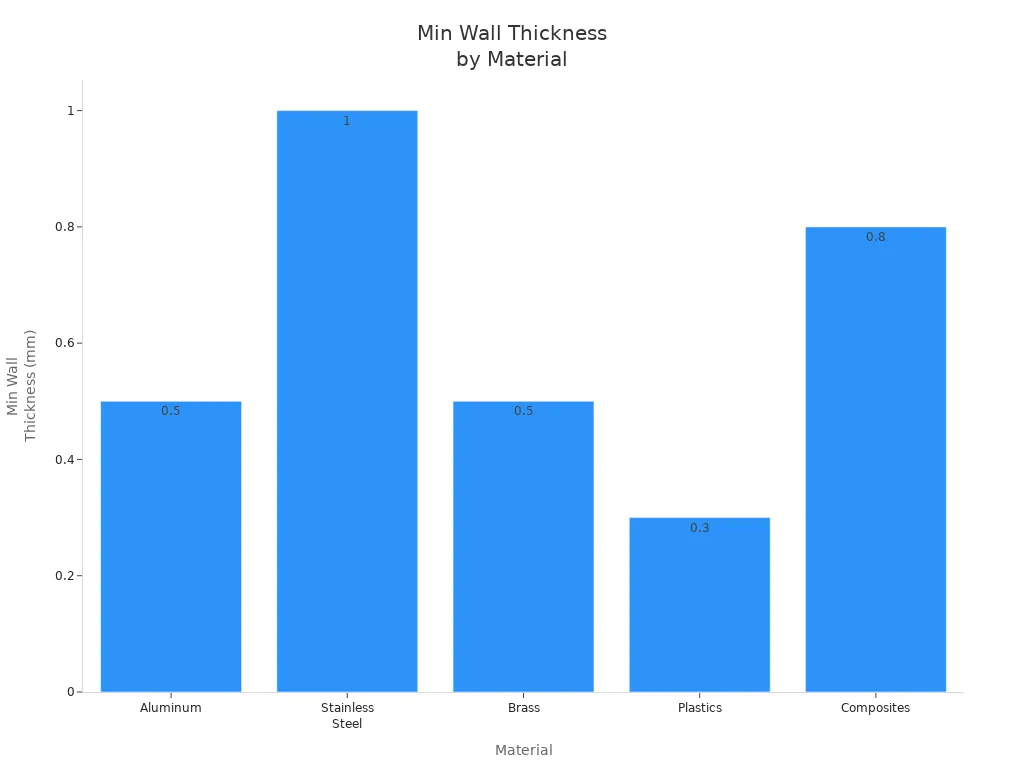
If you keep walls thicker than these values, you avoid problems with bending and breaking. This makes cnc prototype parts design more reliable.
Holes and Threads
When you add holes and threads to your cnc machined parts, you need to plan carefully. You should always show thread depth in your design. Treat thread depth as a minimum unless you say otherwise. Do not specify drill depth, because it changes with different tools.
Limit thread depth to 1x thread diameter for steel and 2x for aluminum.
Use chamfers on external threads and countersinks on internal threads to help threading tools and reduce burrs.
Avoid deep holes and tiny holes, as they can break tools and make chip removal hard.
Use standard hole and thread sizes to reduce tool changes.
Place holes using rectangular coordinates to make machining easier.
Drill from as few sides as possible to save time.
Leave enough space for drilling tools to work.
Avoid intersecting holes to prevent tool breakage.
Add extra depth for blind holes that need reaming.
If you follow these steps, you make cnc prototype machining smoother and reduce mistakes.
Tolerances
Tolerances tell you how much a part can change from the design and still work. Different industries need different tolerance ranges for cnc machined parts. You should only use tight tolerances where needed. This keeps cnc machining fast and costs low.
Industry | Tolerance Range |
|---|---|
Aerospace & Defense | ±0.005 mm to ±0.01 mm |
Medical & Healthcare | ±0.005 mm |
Automotive Manufacturing | ±0.01-0.02 mm |
Consumer Electronics | ±0.1-0.2 mm |
Industrial Automation | ±0.01-0.02 mm |
If you use the right tolerance for your prototype, you save time and money in cnc prototype machining.
Text and Surface Features
Adding text or special surface features to cnc machined parts can make cnc prototype machining more expensive and slow. Each letter or logo needs extra toolpaths and more time. You should avoid text unless you really need it. If you must add text, engraving is better than embossing because it costs less.
Engraving takes more time and may need small tools, which slow down machining.
Embossed text or logos make the part more complex and increase costs.
Complex surface features, like thin walls and deep cavities, also add to machining time and cost.
Removing text or logos from prototypes can save money and speed up prototyping.
If you keep your design simple, you make cnc prototype parts design faster and cheaper. This helps you get your prototype ready for testing sooner.
Part Orientation
How you place your part in cnc machining matters. It can change how fast you finish the job. It also affects how much it costs and how good your prototype is. Good part orientation helps you get better results. It makes the whole process easier.
Setup Reduction
Cutting down setup time in cnc machining helps you work faster. You also make fewer mistakes. Here are some steps to make setups better:
Check and write down your machine’s current settings.
Find steps that slow you down, like cleaning or picking tools.
Put cleaning items and tools nearby to save time.
Group parts that are alike so you do not change setups a lot.
Set up your machine with clear steps.
Measure the first part to see if it fits the tolerances.
Write down your new setup steps so you can use them again.
When you make setup times shorter, you can do more jobs. Your cnc machines work better. You get higher quality parts. Customers are happier.
Fixturing
Fixturing keeps your part still during cnc machining. The right fixture stops your part from moving. This helps you avoid mistakes. Do not use fixtures that are too complex. Buy good fixtures for better results. Use important surfaces to hold your part, but do not use too many. This keeps things flexible. Know how much force you use to clamp your part. Too much force can bend your part.
Some fixturing methods are:
Vise jaws hold parts tight.
Fixture plates use locators for many sides.
Rotating 4th axis fixtures save time.
Multi-axis tombstones help with different steps.
Bore clamps hold inside diameters.
Buttons or rests give support.
Dovetails lock parts in place.
Hydraulic or pneumatic devices clamp parts fast.
Using modular fixtures or hydraulic clamps makes your work easier and more reliable.
Accessibility
Accessibility means how easy it is to reach all areas of your part. If your design has deep pockets or tight spots, tools may not reach. Some features may be too hard to machine. You also need to think about how you hold your part. Bad support can make your part shake. This lowers accuracy. When you design your part, make sure tools and fixtures can reach everywhere. This helps you get better results. It keeps your cnc machining process smooth.
Tip: Always check your design for tool access and how you will hold the part before you start machining. This saves time and helps you avoid mistakes that cost money.
Advanced CNC Design
Undercuts
Sometimes, you need to add undercuts to your part. These are grooves or shapes that regular tools cannot reach from the top. Undercuts make cnc machining harder, so you must plan well. First, check if the tool can reach the undercut. If it cannot, the part will not have the right shape. You also need to think about your part’s shape and how it matches the cutting tool. The material you pick can make machining easier or harder. Tolerances are important because they help your part work as planned.
Design Consideration | Description |
|---|---|
The tool must reach undercut areas to avoid incomplete machining. | |
Component Geometry | Plan shapes that work with available tools and setups. |
Material Selection | Some materials make it easier to create undercuts. |
Tolerances | Set tolerances that ensure the part works and can be made accurately. |
Tip: Some undercuts need special tools or slower speeds. Always check if your design will wear out tools faster.
Multi-Axis Machining
Multi-axis cnc machining helps you make shapes that regular machines cannot. The tool can move in more than three directions. This lets you create parts with curves, angles, and deep pockets. You can also reach undercuts and tricky spots without moving the part by hand.
Multi-axis cnc machines make detailed 3D shapes and smooth curves.
You can machine undercuts and hard spots in one setup.
This way gives you better surfaces and more accuracy.
Aerospace and car companies use multi-axis cnc for very exact parts.
You save time because you do not need to stop and reset the part. You also get better results with fewer mistakes.
When to Use Advanced Features
Use advanced cnc features when your part needs tight tolerances, thin walls, or special materials. If your part has hard-to-reach spots, advanced machining helps you get the right shape. Tool access is important. If a regular tool cannot reach, you may need multi-axis cnc or special cutters.
Use advanced features for parts with strict tolerances.
Pick them when you need thin walls or special materials.
Choose advanced cnc when tool access is hard.
Note: Advanced cnc design can cost more. Only use these features when your part really needs them.
CNC Prototype Parts Design Checklist
A checklist helps you avoid mistakes. It helps you get good results from your cnc prototype project. You can use this checklist to guide your work. It helps you from your first idea to your last review.
Pre-Design Planning
Start your cnc project by planning carefully. This step helps you make a successful prototype. Follow these steps:
Make sure you can machine most features without moving the part.
Use standard cutting tools and regular processes.
Pick stock sizes that fit your design to cut down extra work.
Stay away from shapes that need special tools or interrupted cuts.
Design parts to be strong enough for clamping and machining.
Keep shapes simple and use big, flat surfaces for mounting.
Limit the number of steps and shoulders in your design.
Leave enough material for rough and finish machining.
Put machined surfaces in the same plane when you can.
Make sure standard cutters can reach all features.
Plan for burrs and add relief spaces for easy removal.
Use the shortest tolerances you need.
Avoid thin, long walls that can bend.
Split complex parts if needed to make machining easier.
Tip: Careful planning now saves you time and money later.
Design Review
Check your cnc design before you send it to the shop. Use these key points:
Key Element | Description |
|---|---|
Minimize setups | Design for fewer machining operations. |
Optimize part orientation | Make fixturing simple and reliable. |
Standardize features | Use common hole sizes, radii, and chamfers. |
Collaborate | Review designs with machinists to catch issues early. |
Talk to suppliers early. This helps you find problems with manufacturability. It helps you control costs before you start making the prototype.
Collaboration
Working with machinists and engineers gives you better cnc results. Talking openly helps you solve design problems. It helps you match your goals. You should:
Prepare detailed CAD models ready for cnc machining.
Share clear documentation with the machining team.
Talk often with machinists to spot challenges early.
Work together to match design needs with manufacturing abilities.
Collaboration helps you get a prototype that works well and meets your needs in the real world.
You can make better parts if you follow simple steps. Begin with a good CAD model. Use design rules to help your prototype get made easily. Talk with your team and ask cnc experts for help. Using smart ways helps you finish faster and get better parts.
Tip: Check your design before machining so you do not waste money on mistakes.
FAQ
What is the best material for CNC prototyping?
Aluminum 6061 works well for most prototypes. You get easy machining, low cost, and good strength. You can choose plastics like ABS or POM for lightweight parts. Always match the material to your part’s needs.
How do I choose the right tolerances for my part?
You should use tight tolerances only for important features. Loose tolerances save time and money. Check industry standards for your part. Ask your machinist for advice if you are unsure.
Can I add text or logos to my CNC prototype?
You can add text or logos, but this increases cost and machining time. Engraving works better than embossing. Keep designs simple to speed up production. Only add text if it is necessary for your prototype.
What is the minimum wall thickness for CNC machined parts?
Wall thickness depends on the material. For aluminum, use at least 0.5 mm. Plastics need at least 0.3 mm. Thicker walls help prevent bending or breaking during machining.
How do I avoid tool access problems in my design?
Design your part with open spaces and large radii. Avoid deep pockets and tight corners. Use standard tool sizes. You can ask your machinist to review your design before machining.