LKprototype
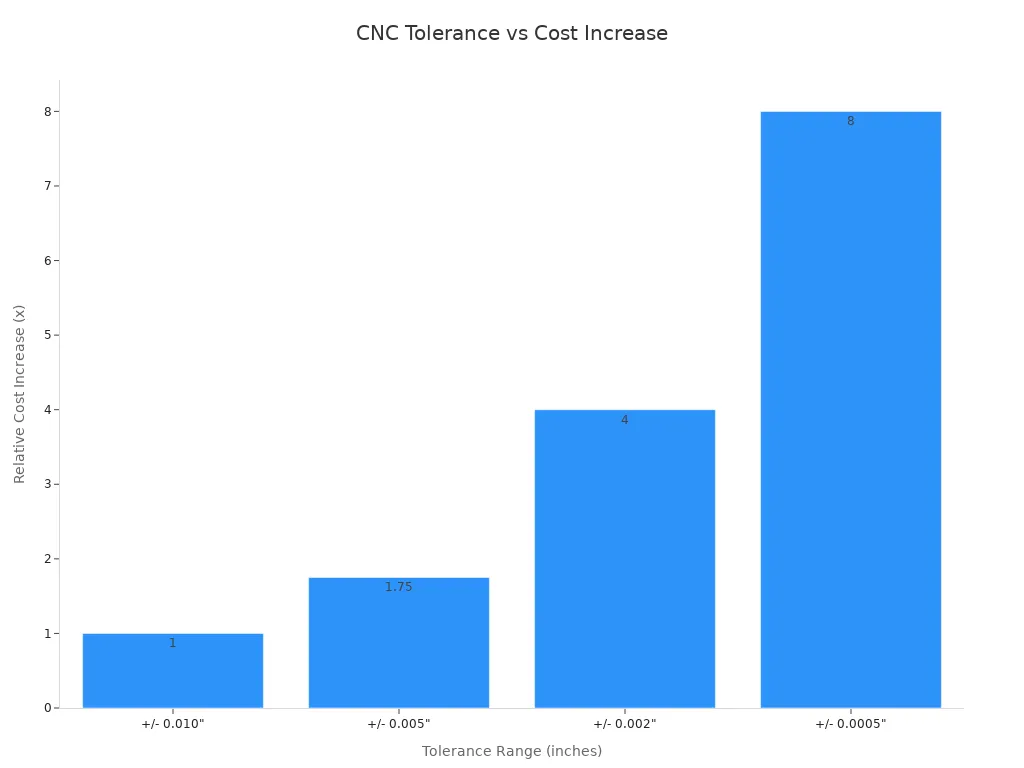
When you use CNC machining for prototypes, costs can change. The price depends on the material, how hard the part is to make, and how exact the measurements need to be. For example, if you use standard tolerances like ±0.1mm, the price stays low. But if you need very tight tolerances (less than ±0.01mm), the cost can be up to ten times higher. Look at the table to see how different things affect your choices:
Cost Driver | Low Impact | Medium Impact | High Impact |
|---|---|---|---|
Material | Aluminum 6061, Acetal | Stainless Steel 304, Mild Steel | Titanium, PEEK, Inconel |
Complexity | Simple block with holes | Multiple faces, threads | Thin walls, complex 3D contours |
Tolerances | Standard (±0.1mm) | Tight (±0.025mm) | Extremely Tight (< ±0.01mm) |
Volume | 1000+ Units | 100-500 Units | 1-10 Units (Prototypes) |
You need to think about how exact, fast, and cheap you want your part. If you keep your prototype design easy and make sure it is simple to machine, you can save money and get your part faster. Knowing these basics helps you make smart choices and not get surprised in your next CNC project.
Key Takeaways
Know that CNC prototype costs change with material, how hard the part is, and tolerances. Pick carefully to keep your spending low.
Make your design simple to save time and money. Using easy shapes and less detail helps make parts faster.
Pick materials that are cheap but still work well. Aluminum and regular plastics are good for fast and low-cost prototypes.
Talk to your supplier early so you do not get slowed down. Go over your design and materials to make things go smoother.
Watch out for tolerances. Only use tight tolerances when you really need them. This saves money and makes your part easier to make.
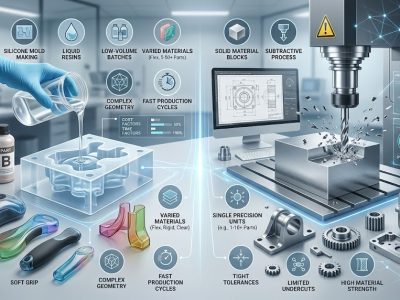
What Is CNC Machining for Prototypes?
CNC prototyping process overview
When you use cnc machining for prototypes, you follow steps. First, you make a 3D model with CAD software. This model shows what your part will look like. Next, you get the file ready for the cnc machine. You set up tool paths and pick cutting tools. The machine reads your design and cuts the material. You can use metal or plastic for your part. After machining, you check the part to see if it matches your design.
You can look at cnc prototyping steps and compare them to traditional manufacturing. The table below shows how they are different:
CNC Prototyping Steps | Traditional Manufacturing Steps |
|---|---|
1. Design 3D model using CAD software | 1. Tooling design for molds |
2. Slicing the 3D model into layers | 2. Mold manufacturing |
3. Machining process using cnc methods | 3. Material forming through shaping |
Tip: Custom cnc machining lets you make special prototypes fast. You do not need costly molds or long setup times.
Difference between prototyping and production machining
There are big differences between cnc prototyping and cnc production machining. When you make prototypes, you test ideas and see if the part works. You usually make only a few pieces. Each part costs more because you do not buy lots of material. You spend extra time setting up and fixing problems.
Production machining is not the same. You make many parts at once. The process is quicker and works better. You use better tool paths and buy lots of material, so the cost is lower. The table below shows these differences:
Aspect | CNC Prototyping | CNC Production Machining |
|---|---|---|
Cost | Higher per-unit costs due to low volume and unique setups | Lower per-unit costs due to high volume and cost distribution |
Process | Less optimized tool paths, focus on functional validation | Optimized tool paths for speed and efficiency |
Material Procurement | Higher costs due to small purchase quantities and specialty materials | Discounts from bulk purchases and minimal waste |
Labor Efficiency | More time spent on setup and troubleshooting | Increased efficiency through repetitive tasks |
You can use cnc machining for prototypes when you need a custom part quickly. If you want to try a new design, this method helps you get results fast without waiting for production tools.
CNC Prototype Cost – What to Expect
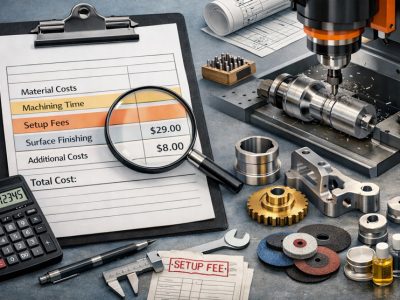
Cost factors: material, complexity, finish
When you look at cnc machining for prototypes, you will see that several things affect the cost. You need to think about what material you want, how complex your part is, and what kind of finish you need. Here are the main factors that drive cnc milling cost:
Machining time is a big part of the cost. If your part has a lot of details or tight tolerances, the cnc machine will take longer to finish.
Material choice changes the price. Aluminum and plastics cost less, but titanium or PEEK will raise the price.
Complex parts need more setup and may use special equipment. This increases cnc milling cost.
Surface finish matters. A smooth or polished finish takes extra time and adds to the cost.
Setup costs are fixed, so making only one prototype can be expensive.
Typical price ranges for common prototypes
You can use this table to see what you might pay for different prototypes. The price depends on the material and how hard the part is to make.
Prototype Type | Price Range (USD) |
|---|---|
Simple plastic prototypes | $20–$80 |
Aluminum CNC prototypes | $50–$200 |
Stainless steel prototypes | $80–$300 |
PEEK or engineering plastic prototypes | $100–$500 |
Complex multi-side machining prototypes | $200–$800+ |
Most cnc machining costs for a single part fall between $100 and $1,000. Simple plastic prototypes start at $100. If you need a complex metal part with tight tolerances, the price can go over $1,000.
How to reduce CNC prototype cost
You can take steps to reduce cnc milling costs without losing quality. Try these tips:
Simplify your design. Fewer details mean less milling time and lower cnc milling cost.
Use standard parts when you can. This avoids custom tooling and saves money.
Pick materials that balance price and function. Cheaper materials can still work for many prototypes.
Match the cnc machine to your project. The right machine keeps costs down.
Set tolerances that fit your needs. Tighter tolerances raise cnc milling cost.
Minimize manual finishing. Automated processes cost less.
Make parts in batches. This spreads setup costs over more prototypes.
Work with your supplier early. They can help you find ways to reduce cnc milling costs.
Tip: Custom cnc machining gives you flexibility, but you can lower prototype cost by planning ahead and choosing the right options.
Lead Time for CNC Prototypes
Factors affecting prototype turnaround time
You may want your prototypes fast, but many things can slow it down. The material you pick can change how long it takes. Some materials, like stainless steel, need slower milling and more tool changes. If you choose a rare material, you might wait longer for it to arrive. The shape of your part matters too. Simple shapes are quicker. Complex parts need more setup and programming. The table below shows what can affect your wait time:
Factor | Description |
|---|---|
Material Availability | Hard-to-find materials can delay your project. |
Machine & Operator Availability | Busy shops may have long wait times. |
Tooling Requirements | Custom tools or fixtures add extra days. |
Post-Processing & Finishing | Steps like anodizing or heat treatment can add weeks. |
Quality Control & Inspection | Careful checks take time but ensure accuracy. |
Communication Overhead | Slow replies during quoting or design changes can cause delays. |
Shipping & Logistics | Delivery time depends on distance and shipping method. |
Reliance on Single Suppliers | If one shop has a problem, your whole project can stop. |
Note: Simple parts are usually made faster. Complex designs or special finishes can take much longer.
Rush jobs & expedited options
You can get cnc prototypes faster if you pay more. Many shops offer rush jobs for an extra fee. This means you get your part sooner, but it costs more. Lead time starts after you say yes to the quote and send all the details. Some shops can finish rapid tooling in 48 hours. Most jobs take 3 to 4 weeks. If you need your part fast, ask about rush options.
Service Type | Turnaround Time |
|---|---|
Rapid Tooling | 48 hours |
Traditional Lead Time | 3-4 weeks |
You can pay extra for rush service.
Lead time starts after you approve the quote and send all specs.
Average lead times by part type
How long you wait for cnc prototypes depends on the part and industry. Standard parts usually take 1 to 3 weeks. Custom or tricky parts can take 5 to 8 weeks or more. Aerospace and medical parts need more tests, so they take longer. Automotive and electronics parts can be quicker, but it depends on the design and how many you need. The table below shows average wait times:
Part Type/Industry Sector | Average Lead Time |
|---|---|
Standard Parts | 1 to 3 weeks |
Custom or Complex Parts | 5 to 8 weeks or longer |
Aerospace | Longer due to testing |
Automotive | Varies by volume |
Medical | Longer due to regulations |
Electronics | Quick with tight tolerances |
Energy and Oil & Gas | Longer for durable parts |
You can save money and get your part faster by planning ahead and picking simple designs. If you want to spend less, avoid rare materials and fancy finishes. Always talk to your supplier early to stop delays and extra costs.
CNC Prototype Tolerances Explained
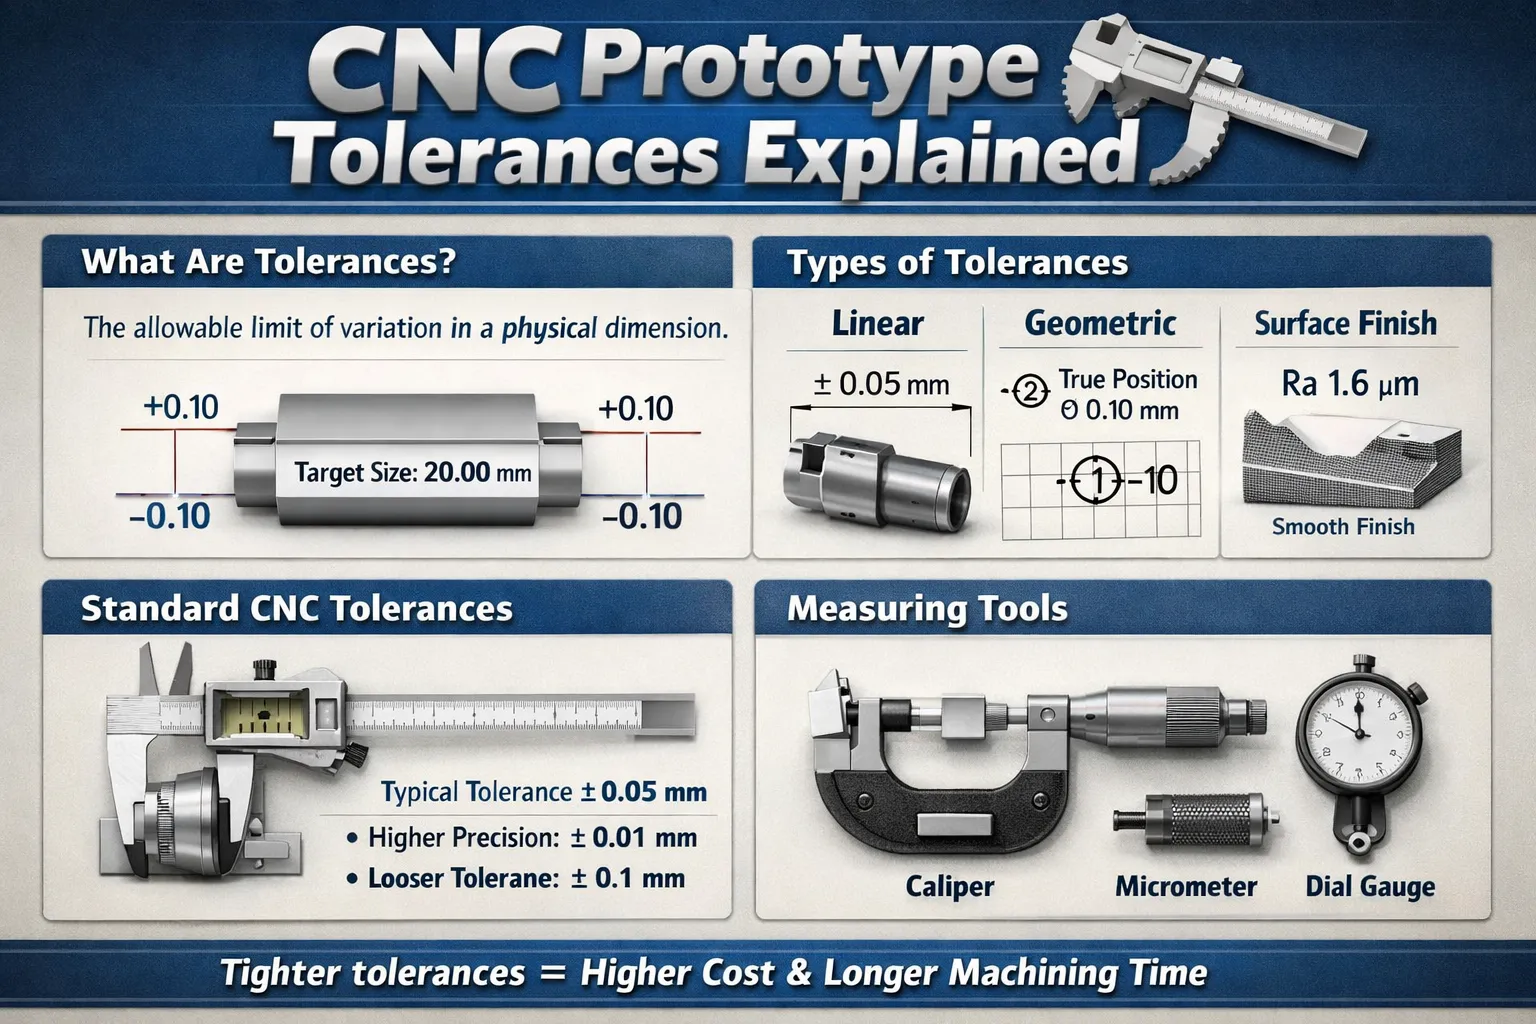
What tolerances to expect from CNC prototyping
You should know what tolerances you can get with cnc machining for prototypes. Tolerances tell you how close your part is to the design. Most metal prototypes can reach ±0.05 mm for normal use. If you need parts for aerospace or medical, you can get tighter tolerances down to ±0.01 mm. Plastics usually have bigger tolerances, about ±0.1 mm. Some special plastics like PEEK can reach ±0.05 mm if you control the process well.
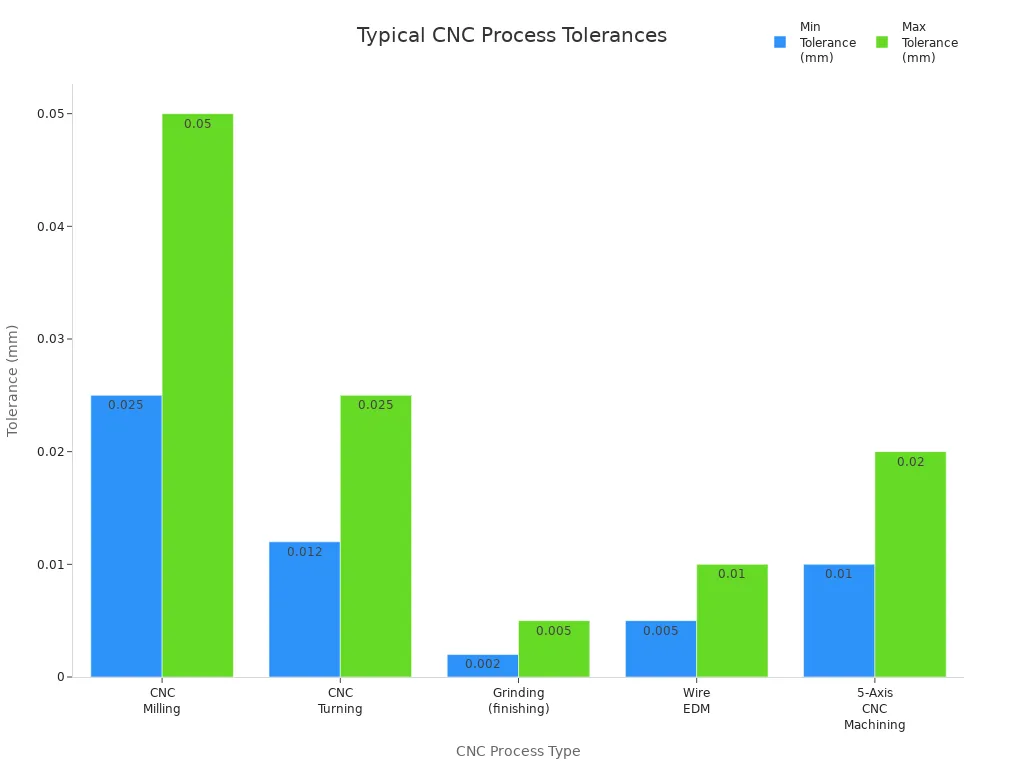
Here is a table that shows common tolerance ranges for different cnc processes:
CNC Process Type | Typical Tolerance Range |
|---|---|
CNC Milling | ±0.025–0.050 mm |
CNC Turning | ±0.012–0.025 mm |
Grinding (finishing) | ±0.002–0.005 mm |
Wire EDM | ±0.005–0.010 mm |
5-Axis CNC Machining | ±0.01–0.02 mm |
How design affects achievable precision
Your design choices change what tolerances you can get. Simple shapes help the machine stay accurate. If tools can reach all areas, it is easier to make the part right. Picking stable materials like 6061-T6 aluminum helps keep tight tolerances. Use tight tolerances only for important features. This keeps your part strong and saves money.
Factor | Impact on Precision and Tolerances |
|---|---|
Material Selection | Stable materials help you reach tight tolerances. |
Design for Manufacturability | Simple shapes and good tool access improve tolerance achievement. |
Application of Tolerances | Use tight tolerances only on critical dimensions. |
Knowing how tolerances and manufacturing work together helps you make better parts.
Tolerance choices change how easy your part is to make, how much it costs, and how fast you get it.
Inspection and quality control
You need to check your prototypes to make sure they meet the tolerances you want. Shops use many tools and machines to inspect parts. Basic tools like calipers and micrometers measure simple sizes. For tricky shapes, shops use coordinate measuring machines (CMMs). These machines check tight tolerances and hard-to-reach spots. Surface roughness testers help you see if the finish is good.
Description | |
|---|---|
Basic Measurement Tools | Calipers, micrometers, and depth gauges for basic linear dimensions. |
Height Gauges | Measure vertical dimensions from a reference surface. |
Go/No-Go Gauges | Quick tools to check if a feature's dimension is within tolerance limits. |
Coordinate Measuring Machines (CMMs) | Highly accurate machines for complex dimensions and GD&T verification. |
Optical Comparators | Project a magnified profile for visual comparison against drawings. |
Surface Roughness Testers | Measure surface texture to ensure roughness tolerances are met. |
Specialized Gauges and Fixtures | Custom tools for verifying specific complex tolerances. |
CMMs give you very exact measurements for tricky parts.
Dimensional inspection uses special tools to check sizes.
Surface finish inspection makes sure your part looks and feels right.
Non-destructive testing finds hidden problems without hurting your part.
Tip: Always ask your supplier about their inspection steps. Good quality control helps you get prototypes you can trust.
Comparing CNC Prototypes to Other Methods
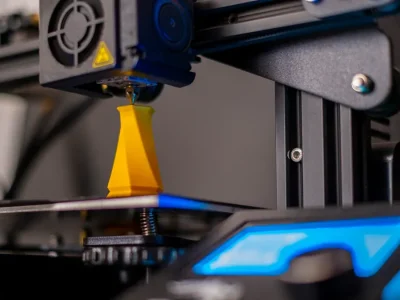
CNC vs 3D Printing
You might ask which is better for your prototype. CNC and 3D printing both make parts fast. They have different good points. Check this table to see how they match up:
Feature | CNC Machining | 3D Printing |
|---|---|---|
Single-piece Cost | Higher | Lower |
Small-batch Cost | Goes down with more parts | Stays about the same |
Material Waste | Makes chips | Almost none |
Surface Finish | Very smooth | Pretty smooth |
Lead Time | 3–5 days | 1–2 days |
CNC gives tighter tolerances, from ±0.001″ to ±0.005″. 3D printing has tolerances from ±0.004″ to ±0.02″. CNC is best if you want a strong part with a smooth look. 3D printing is good for quick and cheap prototypes.
Tip: Pick 3D printing for fast design checks. Use CNC when you need strong and accurate parts.
CNC vs Vacuum Casting
Vacuum casting and CNC both make nice prototypes. They work best for different jobs. Vacuum casting uses a mold and liquid resin to copy parts. You get smooth and even surfaces, almost like plastic made in a factory. Look at this table to compare:
Process | Surface Roughness (Ra) | Surface Quality | Best For |
|---|---|---|---|
CNC Machining | 0.8–3.2 μm (≤ 0.8 μm with polishing) | Clean, exact, some tool marks | Tight tolerances, working parts |
Vacuum Casting | 1.6–3.2 μm | Smooth, even, looks like factory plastic | Show models, good-looking parts |
Pick vacuum casting for show pieces or when you need many nice plastic parts. Choose CNC for tight tolerances or metal parts.
CNC vs Injection Mold Prototypes
You may need to pick CNC or injection molding for your prototype. Injection molding uses a mold to make lots of parts fast. The mold costs a lot to make. For small batches, CNC is more flexible and costs less at first. See this table:
Method | Cost-Effectiveness for Low Volume Production | Initial Investment | Flexibility in Design Changes |
|---|---|---|---|
CNC Machining | Lower | Easy to change designs | |
Injection Molding | Costs more for small batches | Higher | Hard to change designs |
Injection molding is best for big batches because each part gets cheaper. For small batches or if you want to change your design, CNC is better.
Note: If you want to test your design before making lots of parts, CNC machining helps you save time and money.
Materials for CNC Prototyping
Metals: Aluminum, Stainless Steel, Titanium
You can pick from many metals for your prototype. Each metal has its own benefits.
Aluminum is easy to machine and light. You can finish parts fast. It costs more than some other metals.
Steel makes strong and tough parts. It lasts a long time. Machining steel takes more work.
Stainless steel does not rust or corrode. You use it in harsh places. It is hard to machine.
Titanium is both light and strong. It is used in aerospace and defense. Machining titanium takes longer and costs more.
Copper alloys carry electricity well. You use them for electrical parts.
Brass is strong and does not corrode. You can machine brass easily.
Tip: Pick metals based on how strong, light, or rust-proof you need your prototype to be.
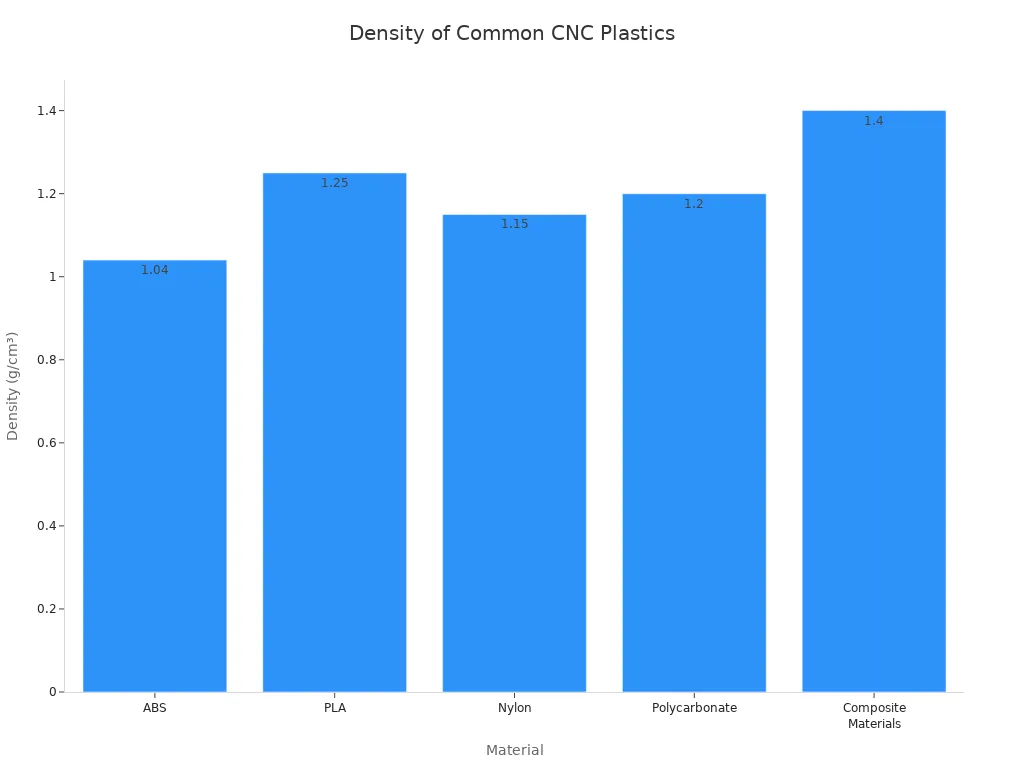
Plastics: Nylon, Delrin, ABS, PEEK
Plastics are also good for cnc prototypes. Plastics cost less and are flexible. The table shows common plastics and what they are good for.
Material | Properties | Applications |
|---|---|---|
ABS | Density: 1.04 g/cm³, Heat deflection: ≈ 105°C, Medium machining difficulty | Mechanical prototypes, consumer electronics housings |
PLA | Density: 1.25 g/cm³, Low machining difficulty | Educational models, display prototypes |
Nylon | Density: 1.15 g/cm³, Tensile strength: 75 MPa, Medium-high machining difficulty, moisture sensitive | Functional prototypes, gears, mechanical components |
Polycarbonate | Density: 1.2 g/cm³, Impact strength: 60 kJ/m², Medium machining difficulty | Electronic housings, optical prototypes |
Composite Materials | Density: 1.4–1.6 g/cm³, High machining difficulty | Aerospace, motorsports prototypes |
Note: ABS and Nylon are good for mechanical parts. Polycarbonate and composites are best for strong and tough prototypes.
How material choice impacts cost and lead time
Picking the right material is important for cnc prototyping. Easy-to-machine materials like aluminum and common plastics save you money. You get your parts faster. Hard metals like stainless steel and titanium cost more. They take longer to make. Rare materials mean you wait longer and pay extra.
Material Type | Machinability | Cost Impact | Lead Time Impact |
|---|---|---|---|
Aluminum Alloys | High | Low cost, quick machining | Shorter lead time |
Common Plastics | High | Low cost, quick machining | Shorter lead time |
Stainless Steels | Medium | Higher cost, slower machining | Longer lead time |
Copper Alloys | Medium | Higher cost, slower machining | Longer lead time |
Titanium | Low | Very high cost, slow machining | Significantly longer lead time |
Exotic Alloys | Low | Very high cost, specialized tools | Significantly longer lead time |
Composites | Low | Very high cost, specialized tools | Significantly longer lead time |
You save money and time with easy-to-machine materials.
Harder materials slow down production and cost more.
Aluminum 6061 is popular because it is cheap and easy to use.
Tip: Always choose materials that fit your project and budget. This helps you get the best cnc prototypes.
Design Tips and Best Practices for CNC Prototypes
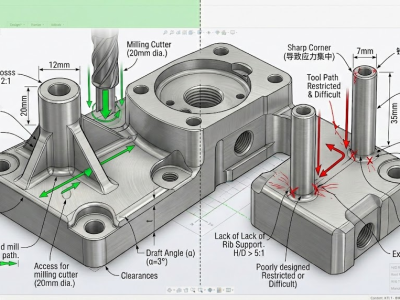
Simplify geometry to reduce machining time
You can make your prototype faster and cheaper with a simple design. Avoiding complex surfaces and tiny details helps the milling process go smoothly. Simple shapes mean fewer tool changes. Each part takes less time to make. Try these ideas to keep your design easy:
Use basic shapes. Do not use deep pockets or sharp corners.
Limit features that need special tools.
Design parts so you can mill them in one setup.
Combine parts if you can. This reduces assembly steps.
Pick standard sizes for holes and threads.
Using these tips cuts down on milling time. You also lower your costs. Standard parts and tools help the shop finish your order faster.
Tolerance stack-up and design for manufacture
Tolerance stack-up can cause problems when you put parts together. Small errors in each part add up. This can make your prototype hard to assemble or cause it to fail. Only ask for tight tolerances where they are needed. Tighter tolerances make milling harder and cost more.
Use tight tolerances only for important features.
Use standard tolerances for other areas.
Plan for how size errors can add up in your assembly.
Work with your supplier to balance function and cost.
Managing tolerances well helps you get reliable prototypes. You do not have to spend too much on milling.
Surface finish tips
Surface finish changes how your part looks and works. You can pick from different finishes. Each finish has its own cost and use. The table below shows common choices:
Finish Type | Typical Ra (µm) | Cost Impact | Application |
|---|---|---|---|
Rough Machined | 3.2–6.3 | Low | Early functional prototypes |
Standard Machined | 1.6–3.2 | Moderate | General functional parts |
Polished | 0.8–1.6 | High | Visual prototypes, assembly areas |
Bead Blasted | 1.6–3.2 | Moderate | Matte finish, better appearance |
Tip: Pick a rougher finish for early tests. This saves time and money. Fine finishes take longer and can cost up to 25% more. If you do not need a shiny look, a standard finish is usually best.
Frequently Asked Questions
How much does CNC prototyping cost?
CNC prototyping prices can be very different. The cost depends on the size and shape of your part. The material you pick also changes the price. In the USA, a three-axis machine costs about $35 to $50 per hour. Multi-axis machines cost more, about $75 to $120 per hour. In Europe, three-axis machining costs $30 to $40 per hour. Five-axis milling can cost $75 to $150 per hour. Most prototype parts cost between $100 and $1,000. If your part is complex or uses rare materials, it will cost more. Always ask for a quote to know the exact price for your project.
How long does CNC machining take for a prototype?
CNC prototype lead time depends on your design and material. Simple parts can be ready in a few hours. Complex parts or special materials take longer, sometimes weeks. Some shops, like 3ERP, can finish parts in just 5 days. You get faster results with common materials and easy designs. Always check with your supplier to find out how long your order will take.
What tolerances can CNC prototypes achieve?
CNC machining gives tight tolerances. Most metal prototypes reach ±0.05 mm. Plastics usually have tolerances of about ±0.1 mm. Some machines can make even tighter tolerances, like ±0.01 mm. Tighter tolerances cost more and take longer. Use tight tolerances only where you need them to save money.
What materials are best for CNC prototype parts?
You can choose from many CNC prototype materials. Metals like aluminum and steel work for most jobs. Ceramics help with heat resistance. Plastics such as nylon and polycarbonate are strong. Composites are light and tough. Each material fits different needs. The table below shows which materials work best for certain jobs:
Application Requirement | Recommended Materials |
|---|---|
Tight tolerances / low expansion | Stainless Steel, Acetal (Delrin), Aluminium |
Fast turnaround / high availability | Aluminium 6061, Stainless Steel 304, POM |
High heat resistance | PEEK, PPS, PEI |
Chemical resistance | PEEK, PTFE, PVDF |
UV stability (outdoor use) | PEEK, UV-stabilized Polycarbonate |
Impact resistance | Polycarbonate, ABS |
Electrical conductivity | Copper, Silver, PTFE |
Tip: Aluminum is easy to machine and costs less. Nylon and ABS are strong and good for many uses. Copper alloys work best for electrical parts.
You learned that cost, wait time, and tolerances affect CNC prototypes.
If you ask for tight tolerances, your part costs more. You might pay 15-40% extra and wait twice as long.
Asking for tighter tolerances than needed makes your part cost too much.
Using your resources well helps you get fast, good, and affordable parts.
To get the best part, check your design. Pick the right materials. Talk to a CNC supplier. Use the tips here to make your next prototype better.