LKprototype
Have you ever thought about making your product ideas real? Injection molding machines, specifically desktop models, could help you do it. These machines make small amounts of plastic parts fast and easy. Their small size works well for home workshops or tiny businesses. They also don’t cost too much money. Some companies say they save thousands by using injection molding machines. You can use them to test new designs or make custom items. Desktop injection molding is simple and easy to use. It’s a big help for small-scale manufacturing.
Key Takeaways
Desktop injection molding machines are cheap and great for small projects. They help you make custom parts without spending too much money.
Using desktop injection molding is easy and simple to learn. New users can quickly understand how to use these machines with basic lessons.
These machines are small and fit in tight spaces. They work well in home workshops or small business areas.
3D-printed molds save both time and money. They are fast to make and easy to change during testing.
Staying safe is very important when using these machines. Always wear safety gear and follow rules to keep your workspace safe.
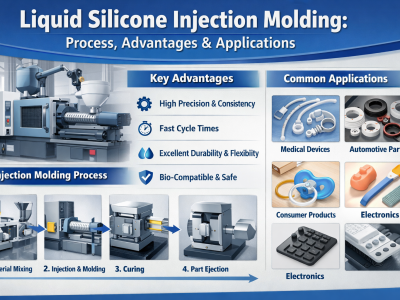
What is Desktop Injection Molding?

Definition and Process Overview
Desktop injection molding is a smaller version of regular injection molding. It’s made for creating plastic parts in small amounts. The process is simple and works like this:
Material Loading: Put plastic pellets into the machine’s hopper.
Melting: The pellets heat up and turn into liquid plastic.
Injection: The liquid plastic is pushed into a mold under pressure.
Cooling: The plastic cools down and hardens inside the mold.
Ejection: The mold opens, and the finished part comes out.
This method is fast and accurate, great for prototypes or custom items. Unlike other ways of making things, desktop injection molding lets you control everything. You pick the materials and manage the whole process.
Differences from Traditional Injection Molding
How is desktop injection molding different from bigger machines? Both use the same basic steps, but they have key differences. Here’s a quick look:
Aspect | Desktop Injection Molding | Traditional Injection Molding |
|---|---|---|
Size | Small and easy to move | Big and industrial |
Cheaper to buy and use | Expensive setup and tools | |
Production Volume | Best for small batches | Great for making many items |
Flexibility | Quick to change molds | Mold changes take longer |
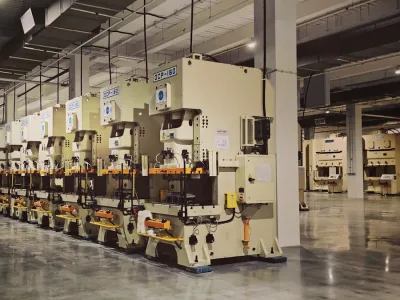
Desktop machines are great for small projects or testing ideas. Bigger machines are better for making lots of products. If you have limited space or money, a desktop machine might be perfect.
Components and Functionality of Desktop Machines
Desktop injection molding machines are small but very useful. Here are the main parts that make them work:
Injection Device: Melts the plastic and pushes it into the mold.
Clamping Device: Keeps the mold closed tightly during the process.
Hydraulic System: Provides the pressure to inject the melted plastic.
Electrical Control System: Lets you adjust heat, pressure, and timing.
The machine works in a simple order. First, the mold closes tightly. Then, melted plastic is injected into it. Pressure is kept steady as the plastic cools. Finally, the mold opens, and the part is removed.
These machines are easy to use, even for beginners. With some practice, you can make great parts right from your home or workshop.
How Does Desktop Injection Molding Work?
Mold Design and Preparation
The mold is the most important part of this process. It shapes the plastic into the part you want to make. When designing a mold, think about the size, shape, and details of your product. A good mold helps avoid mistakes and makes production smoother.
First, use CAD software to create a 3D model of your part. This lets you see how it will look and fix any problems before making the mold. Molds are usually made from strong metals like aluminum or steel. These materials can handle high heat and pressure.
Before using the mold, clean it well to remove dust or dirt. A clean mold gives better results and avoids defects in your parts. Also, add a release agent to the mold’s surface. This helps you remove the finished part easily without breaking it.
Material Selection and Loading
Picking the right material is very important for good results. Different plastics have special features like strength, flexibility, or heat resistance. Here’s a simple guide to help you choose:
Parameter | Description |
|---|---|
Shows how strong and durable the material is. | |
- Tensile Strength (MPa) | Tells how much weight the material can hold. |
- Impact Resistance (Joules) | Measures how well it handles sudden hits or forces. |
Thermal Properties | Checks if the material can handle heat during molding. |
- Melting Temperature (°C) | Must match the machine’s heating ability. |
- Heat Deflection Temperature (°C) | Shows how it performs in hot conditions. |
Processing Conditions | Affects how easy and fast the molding process is. |
- Melt Flow Index (g/10 min) | Tells how smoothly the plastic flows when melted. |
- Cooling Time (seconds) | Affects how quickly you can make each part. |
After choosing the material, pour the plastic pellets into the machine’s hopper. The hopper sends the pellets into the heating area, where they melt and get ready for injection.
Injection and Cooling Process
This step is where the real action happens. First, the melted plastic is pushed into the mold with high pressure. This makes sure the plastic fills every tiny detail of the mold.
Next, the cooling starts. The plastic hardens as it cools inside the mold. The cooling time depends on the material and how thick your part is. Engineers often use special software to set the best melt temperature, pressure, and cooling time. This saves time and avoids guesswork.
When the plastic is solid, the mold opens, and you take out your part. That’s it! With practice, you’ll get better at this and make great parts for testing or small production runs.
Demolding and finishing
Once the plastic part cools and hardens, it’s time to remove it from the mold. This step, called demolding, might sound tricky, but it’s pretty straightforward if you follow a few tips.
First, make sure the mold has cooled enough. If you try to open it too soon, the part might still be soft and could deform. Most desktop injection molding machines have a timer or indicator to let you know when it’s ready. Trust the machine—it’s designed to make this process easier for you.
When the mold opens, gently remove the part. Some molds have ejector pins that push the part out for you. If your mold doesn’t, you can use a small tool, like a plastic scraper, to carefully lift the part out. Avoid using sharp objects, as they can scratch or damage your mold.
After demolding, your part might need a little cleanup. This is where finishing comes in. Look for any extra plastic, called flash, around the edges. Flash happens when a tiny bit of melted plastic seeps out of the mold. You can trim it off with a craft knife or sandpaper.
If your part has rough surfaces or sharp edges, smooth them out during finishing. This step is especially important if you’re using the part for prototyping or a final product. A clean, polished part not only looks better but also works better in most applications.
Demolding and finishing might take some practice, but don’t worry. With time, you’ll get faster and more confident. Plus, this hands-on part of the process is where you really see your ideas come to life. It’s one of the most satisfying steps in desktop injection molding!
Key Features and Benefits of Desktop Injection Molding Machines
Cost-effectiveness for small-scale manufacturing
Running a small business or personal project means saving money. Desktop injection molding machines are affordable and work well. Big machines can cost tens of thousands, but these are cheaper. You also don’t need pricey molds or tools to get started.
These machines are great for making small batches of parts. Whether for prototypes or custom items, they save money while delivering quality. Labor costs are lower too since the process is simple and doesn’t need many workers.
Another advantage is skipping outsourcing. Instead of paying others, you can make parts yourself. This gives you control over production and saves even more money.
Ease of use and accessibility
Desktop injection molding machines are made to be easy to use. You don’t need special skills or years of training. The controls are simple, and most come with helpful guides or videos.
Setting up the machine doesn’t take long. Once ready, it works smoothly. Load the material, adjust settings, and let it run. If something goes wrong, fixing it is usually easy. Many machines have safety features and alerts to help you.
These machines are great for hobbyists and small businesses. You don’t need a big factory or fancy tools. With practice, you can make professional parts in your garage or workshop.
Compact design for limited spaces
Desktop injection molding machines are small and space-saving. They fit on tables or workbenches, perfect for tight areas. If you work in a small lab, workshop, or home office, they won’t take up much room.
Here’s why their small size is helpful:
They don’t take up much space, leaving room for other tools.
You can move them easily when needed.
They work well in small places like classrooms or labs.
Even though they’re small, these machines are powerful. They handle molding tasks well and keep your workspace tidy. They also use energy efficiently, which is great for small projects.
If space is a concern, these machines are a great choice. They prove that small tools can deliver big results.
Suitability for Low-Volume Injection Molding
If you work on small projects, these machines are amazing. Desktop injection molding machines are made for low-volume tasks. They are great for prototypes, custom parts, or small production runs. Let’s see why they work so well for this purpose.
Why Desktop Machines Are Great for Small Batches
Low-volume molding means making fewer parts, like dozens or hundreds. Desktop machines are perfect because they are cheap, flexible, and easy to set up. Unlike big machines that need costly molds and take time, desktop models let you start small and save money.
Here’s why they’re ideal for low-volume production:
Affordable Mold Choices: Use 3D printed molds instead of expensive metal ones. These molds cost less and are quicker to make, perfect for testing designs or small runs.
Fast Results: These machines can turn ideas into parts in hours. This speed is helpful when testing designs or needing parts quickly.
Easy Changes: If your mold needs updates, you can reprint it easily. This makes prototyping and small-batch production much simpler.
Data Supporting Low-Volume Use
Here’s some data showing why desktop machines are great for small tasks:
Feature | Description |
|---|---|
Holimaker offers studies to check customer needs | |
Prototyping Speed | Quick results using 3D printed molds |
Adaptability | Mold designs can be updated for production materials |
Key Findings | Details |
|---|---|
Cost Reduction | Save 80% to 90% with additive manufacturing for molds |
Break-even Analysis | Studied based on small product batches |
For example, Holimaker’s manual machine helped test a valve connector part. A 3D printed mold was used to check water pressure resistance. This saved both time and money.
Balancing Pros and Cons
Desktop injection molding has many benefits but also limits. 3D printed molds don’t last as long as metal ones. They may not handle high heat or pressure well, and cooling takes longer. But for small tasks, these trade-offs are worth it. You can test designs and make parts quickly, which is great for small-scale needs.
Why It’s Right for You
If you’re a hobbyist, small business owner, or designer, these machines are perfect. They let you make quality parts without needing a big factory. The process is simple, even for beginners. Whether you’re making prototypes, custom items, or limited products, these machines offer affordability, speed, and flexibility.
Applications of Desktop Plastic Injection Molding Machines
Prototyping and Product Development
Desktop injection molding machines are great for testing product ideas. They help you make real items quickly and cheaply. You can try new designs or improve old ones with ease.
Many businesses use these machines for fast prototyping. Here are some examples:
Company | What They Did |
|---|---|
Harris Corporation | Tested circuit boards using quick insert molding. |
Hydro-Logic Ltd. | Made a GPRS telemetry logger called FROG. |
Karbon Kinetics Ltd. | Built the lightest electric two-wheeler using rapid molding. |
EasiChef | Created unique kitchen tools with fast prototyping. |
These examples show how desktop machines save money and time. You can test designs, fix problems, and make your ideas real faster than ever.
Educational and Training Purposes
Desktop injection molding machines are great for schools and training. They are small, simple, and safe to use. This makes them perfect for classrooms and labs.
Teachers can show students how products are made step by step. Students learn about mold design and how materials change with heat and pressure. They get hands-on experience with real manufacturing tools.
These machines inspire students to be creative and solve problems. They teach engineering ideas in a fun and practical way. Their small size fits easily into learning spaces.
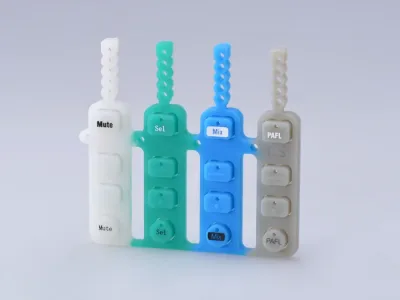
Hobbyist and DIY Projects
Hobbyists and DIY fans love desktop injection molding machines. They are easy to use, affordable, and flexible for home projects.
For example, the Injekto machine is popular with hobbyists. It works with both machined and 3D printed molds. 3D printed molds cost about $100, so experimenting is cheap. Safety features like dual buttons make it safe to use.
You can make toys, tools, or gadgets with these machines. They’re perfect for small projects without needing a factory. With a desktop machine, you can create unique items right at home!
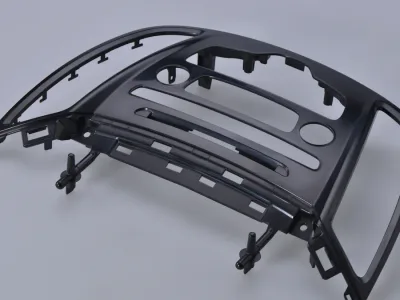
Custom product manufacturing
Desktop injection molding machines are great for making unique items. You don’t need a big factory or costly tools to use them. They help you create custom parts easily and test new ideas.
These machines are perfect for small batches of products. You can make items without spending too much money. For example, Elimold helps businesses make special products in small amounts. Their method focuses on creating unique items instead of mass production.
Here’s what these machines can do:
Test new designs quickly and easily.
Make small batches of special items.
Create models for learning or custom figurines.
Build small mechanical parts for specific uses.
Application | Example Products |
|---|---|
Prototyping | Quickly test new product ideas. |
Small-batch production | Make figurines, gadgets, or miniatures. |
Precision manufacturing | Build custom tools or mechanical parts. |
The process is simple. Design a mold, load the material, and let the machine work. You can test designs fast and fix any problems by changing the mold. This makes desktop injection molding great for custom projects.
These machines are small and fit in tight spaces like home offices. You can use 3D-printed molds to save money and try different designs. They’re ideal for hobbyists, small businesses, or anyone wanting to make custom items.
If you want to turn your ideas into real products, now is the time. Desktop injection molding machines make it easy, affordable, and precise to create unique items.
Choosing the Right Desktop Injection Molding Machine
Budget and Cost Considerations
Your budget is important when picking a desktop injection molding machine. Machines range from cheap to expensive. Choose one that fits your needs and budget. If you’re new to molding, a basic machine might be enough.
Spending more now can save money later. Better machines last longer and need fewer repairs. This means less trouble and more savings over time.
Here are some tips:
Start Small: Pick a simple machine if you’re just starting.
Think Ahead: A strong machine can save money in the future.
Skip Extras: Don’t pay for features you won’t use.
Match your budget with your needs to get the best deal.
Material Compatibility and Versatility
Not all machines work with every material. Some materials need special heat or handling. Check if the machine supports the materials you want to use.
Here’s a quick guide:
Material Type | Compatibility Status |
|---|---|
POM/Acetal/Delrin | Avoid using with PVC or TPV due to reactions |
PEEK | Works well with hard materials |
PEI | Good for rigid materials |
If you use many materials, pick a flexible machine. This lets you try different designs and uses.
Maintenance and Ease of Operation
A good machine should be simple to use and care for. You don’t want to waste time fixing or cleaning it. Look for machines with easy controls and clear instructions. Some models have alerts for maintenance or safety checks.
To keep your machine working well:
Watch Settings: Check pressure, temperature, and cooling time. These affect part quality.
Clean Regularly: Keep the machine clean and check for damage. This avoids problems and makes it last longer.
Follow Rules: Use the right process for each material to prevent issues.
Choose a machine that’s easy to handle and maintain. It will save you time and effort.
Technical specifications to consider
When picking a desktop injection molding machine, specs are important. They help you compare models and choose the right one. Let’s look at the key things to check.
First, see how the machine performs in real situations. Benchmarking is useful for this. It means checking if the machine’s expected results match what it actually does. Things like part shape, nozzle design, and material type can affect performance. Matching these to real-world needs avoids problems during molding.
Next, focus on specific performance checks. These show how well the machine handles different tasks. Use this table as a guide:
Evaluation Criteria | What It Checks |
|---|---|
Filling analysis | Makes sure the mold fills fully without gaps. |
Cooling analysis | Tests cooling to find uneven spots. |
Deflection analysis | Predicts bending from shrinkage or structure issues. |
Weld lines and air traps | Finds weak spots caused by weld lines or trapped air. |
Pressure and temperature | Tracks pressure and heat for the best molding conditions. |
Clamping force analysis | Checks if the mold stays tightly closed. |
Sink marks analysis | Spots dents from uneven cooling or shrinking. |
Gate location analysis | Improves gate placement to avoid weak areas. |
Material flow analysis | Ensures smooth and even material flow. |
Shrinkage and dimensional | Predicts size changes after cooling due to shrinkage. |
These checks are great for small projects or prototypes. They help you find problems early and save time. By focusing on these specs, you’ll pick a machine that works well for your needs.
Getting Started with Desktop Injection Molding
Setting up the machine
Setting up your desktop injection molding machine is easy. First, place it on a strong, flat table. This keeps it steady while working. Then, plug in the power and check all cables are secure.
Next, focus on preparing the mold. Protecting the mold is very important since it’s costly. Follow these steps to get started:
Tighten the clamping device to hold the mold firmly.
Make sure the mold is lined up correctly.
Add a release agent to the mold to help remove parts easily.
Experts suggest taking your time when setting up the mold. Being careful and following instructions can prevent mistakes. This will help your machine work smoothly and safely.
Operating the machine safely
Safety is very important when using these machines. They use high heat and pressure, so be cautious. Always wear gloves and safety glasses to protect yourself.
Before starting, check the machine’s settings. Ensure the temperature, pressure, and cooling time match your material. If unsure, read the manual for help.
While the machine is running, keep your hands away from moving parts. Many machines have safety features like two-button controls to avoid accidents. If you hear strange noises or the machine stops, turn it off and check for problems.
A clean and tidy workspace helps prevent accidents. Stay organized to work safely and efficiently.
Troubleshooting common issues
Sometimes, problems happen during molding. Knowing how to fix them can save time. Here’s a simple guide to common issues and solutions:
Problem | Cause | Solution |
|---|---|---|
Weak Knit Lines | Poor air vents. | Add vents where flow meets and make them bigger. |
Burn Marks on Parts | Trapped gas or bad venting. | Improve vents and move them to the burned area. |
Voids or Sinks | Shrinking material or not enough plastic. | Make walls thinner. |
Bubbles | Air trapped inside. | Move the gate or change the flow path. |
Real-life examples show how fixing problems helps. For example:
A medical company used better plastic to avoid damage.
An electronics company added monitors to keep shots consistent.
If something goes wrong, don’t worry. Take a moment to figure out the issue and try the solutions. With practice, you’ll get better at solving problems and making great parts.
Tips for Beginners
Starting with desktop injection molding might seem hard at first. But don’t worry—you’ll learn quickly with these easy tips:
1. Begin with Simple Projects
Don’t start with tough designs. Use basic molds and simple shapes. This helps you learn without feeling stressed. For example, make small things like keychains or simple models.
2. Understand Your Materials
Plastics act differently when molded. Learn about thermoplastics and their features. Some are easier to use than others. Books like Master Thermoplastic Molding at Home can teach you the basics and help you choose the right plastic.
3. Keep Your Area Neat
A clean workspace makes work easier. Organize your tools, materials, and machine. This saves time and helps you avoid mistakes.
4. Prepare Your Mold Well
The mold is the most important part. Clean it carefully and add a release agent before using it. This stops problems and makes removing parts easier. If you need help, A Step by Step Guide to Injection Molding explains how to prepare molds and recycle leftover material.
5. Always Stay Safe
Safety is very important. Wear gloves and goggles, and follow the machine’s rules. If you’re using thermoplastics, make sure your room has good airflow.
6. Try New Things and Learn
Don’t be scared to try new ideas. Test different plastics, change settings, and explore new designs. Mistakes will happen, but they help you improve.
Beginner Guides to Check Out
Here are two helpful guides for beginners:
Resource Title | What It Teaches |
|---|---|
Explains molding steps and how to recycle leftover material to save money. | |
Master Thermoplastic Molding at Home: A Beginner's Guide | Teaches thermoplastic basics and molding techniques in simple steps for beginners. |
These guides will help you feel ready to start your first project.
With time and practice, you’ll get better and make amazing parts. Take it slow, enjoy the process, and have fun!
Desktop injection molding machines are great for small projects. They are small, low-cost, and can do many tasks. These machines are perfect for testing ideas or making custom items. You can set one up easily at home or in a workshop. The steps are simple, and even beginners can get good results.
If you want to try new ways to make parts, now is a good time. These machines let you create things by hand in a fun and useful way. Why not try desktop injection molding? You might be amazed at what you can make!
FAQ
1. Can I use 3D-printed molds with desktop injection molding machines?
Yes, you can! 3D-printed molds are great for small projects. They are cheap and easy to change. Make sure the mold material can handle heat and pressure. Use strong filaments like PLA or ABS for better results.
2. How long does it take to make a part?
It depends on the design and material. Most parts take a few minutes to mold and cool. Simple shapes are faster, but tricky designs need more time. With practice, you’ll get quicker at making parts.
3. Are desktop injection molding machines safe to use?
Yes, they are! These machines have safety features like two-button controls. They also have alerts for temperature changes. Always wear gloves and goggles to stay safe. Keep your workspace clean and follow the manual’s rules.
4. What types of plastics can I use?
You can use plastics like ABS, PLA, or nylon. Each type has different strengths. For example, ABS is tough, and PLA is better for the environment. Check if your machine works with the plastic you choose.
5. Do I need special skills to operate these machines?
No, you don’t! These machines are easy for beginners to use. The controls are simple, and many come with helpful guides. Start with easy projects to learn. Over time, you’ll get better and make great parts.