LKprototype
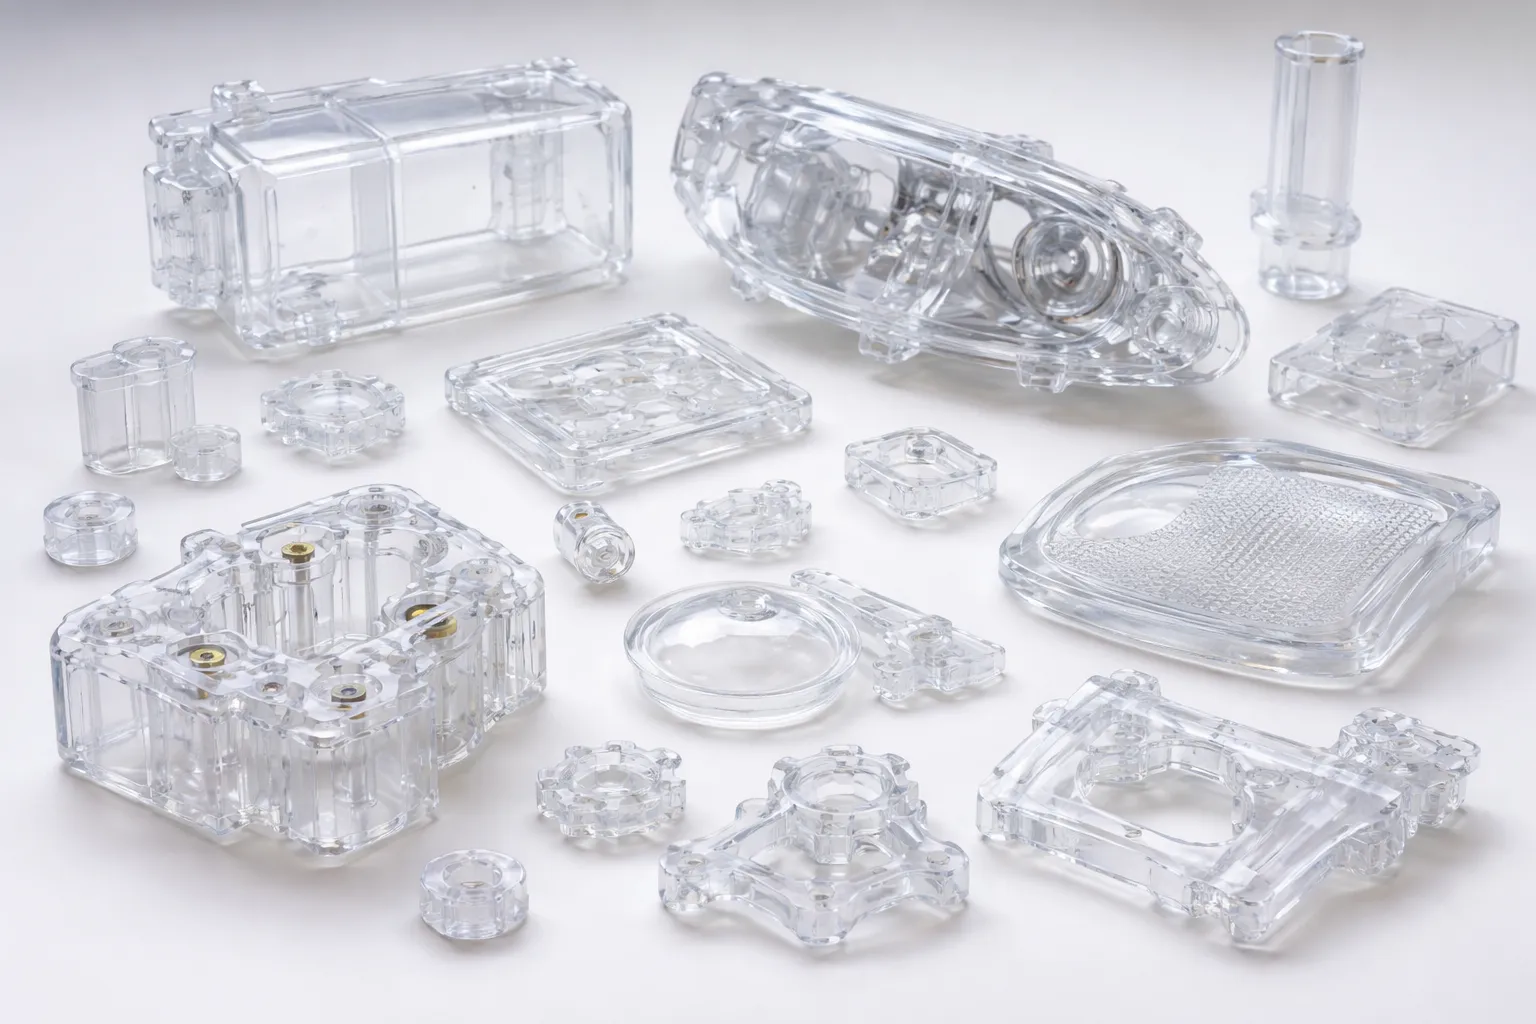
You can get optical clarity in clear vacuum casting parts by picking the right transparent resin, controlling the casting steps, and using good finishing methods. Transparent resins like water-clear polyurethane and VC-8744 Transparent give high optical clarity. Water-clear polyurethane also blocks UV light, so it works well for medical and prototype uses. The table below lists common resins and their properties:
Resin Type | Optical Clarity | UV Resistance | Applications |
|---|---|---|---|
Water-Clear Polyurethane | High | Yes | Prototyping, Medical Devices |
VC - 8744 Transparent | High | N/A | Consumer Goods, Automotive Components |
Finishing steps like polishing help you get the best results.
Key Takeaways
Pick a good clear resin, like water-clear polyurethane, to get high optical clarity in your vacuum cast parts.
Keep the air dry when casting to stop cloudiness and make sure your parts are very clear.
Polish and use clear coatings to make your vacuum cast parts look even clearer and smoother.
Check your molds and parts often to find any problems that could hurt how clear they look.
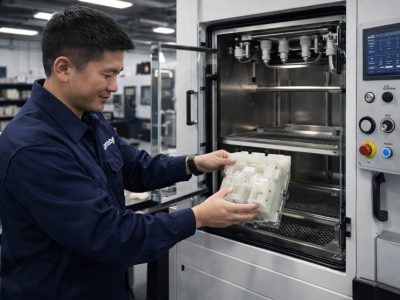
Vacuum casting works well for making small amounts and test pieces. It is faster and costs less than other ways.
Can Vacuum Casting Produce Optical Clear Parts? ⭐⭐⭐
You may ask if vacuum casting can make parts as clear as glass. The answer is yes. Vacuum casting uses special clear materials and careful steps. This helps make parts with high optical clarity. Many industries use this method for clear prototypes and small production runs.
You can compare vacuum casting to other ways by looking at its main features:
Key Features | Description |
|---|---|
Surface Finish | Vacuum casting makes smooth surfaces like injection-molded parts. |
Material Flexibility | Urethanes can copy many plastics, even clear ones. |
Prototyping | Gives very accurate models of final products. |
Vacuum casting is great because it gives a smooth surface. This smoothness lets light pass through without scattering. That makes the part look clear. You can pick from many urethane resins. Some resins are made to be very transparent.
New thermoplastics have made vacuum cast parts even clearer. These new materials help you get better clarity and shape. Many companies use vacuum casting for clear packaging, car lenses, and display covers.
You can check how clear a part is by measuring its optical transmittance. Scientists use a CCD spectrometer to see how much light goes through a sample. They compare the light with and without the part. This gives a standard way to check clarity for different casting methods.
Tip: For the clearest parts, keep humidity low during casting. High humidity can make parts less clear.
Vacuum casting also lets you make custom parts. You can make small batches or special shapes and still keep them clear. This makes vacuum casting a top choice for clear and optical parts.
Why Choose Vacuum Casting for Clear and Optical Parts
Advantages for Prototypes and Low-Volume Production
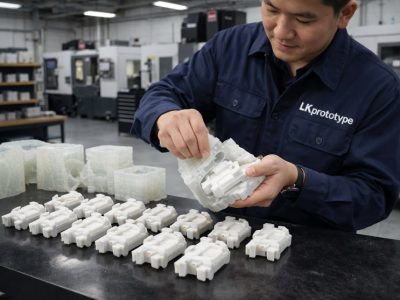
Vacuum casting is helpful when you need clear parts for testing or small orders. You can pick from many types of polymer resins. These include hard plastics, bendy elastomers, and see-through materials. This lets you make parts that look and feel like the real thing. The process gives you great accuracy and keeps the shape steady. The vacuum keeps bubbles and flaws away. This is important for making parts clear.
Here is a table that lists the main benefits:
Advantage | Description |
|---|---|
Remarkable Precision | Makes very accurate and detailed test parts with steady shapes. |
Diverse Material Options | Gives you many choices, including clear parts, for testing and checking how things work. |
Rapid Turnaround Time | The process is fast and can finish in days, so you can test ideas quickly. |
Enhanced Material Properties | The vacuum makes sure parts have no flaws and are very clear, which is needed for optical uses. |
You can save time when making new products. Silicone molds are made fast, sometimes in just one day. Vacuum casting is cheaper for small orders because silicone molds cost less and are quick to make.
When you compare it to old ways like machining, vacuum casting costs less for small orders since silicone molds are cheaper and faster to make.
You can make parts that look as good as ones made by injection molding. Even tiny details from your master model show up well. This makes vacuum casting good for small parts with lots of detail.
Typical Applications of Clear Vacuum Casting Parts
Clear vacuum casting parts are used in many fields. Car companies use them to test dashboards, grills, and lights. Electronics makers use vacuum casting for new cases, button panels, and covers. Medical device makers pick safe materials to test shapes and ideas. Aerospace engineers make light and strong parts with high accuracy. New machine companies use vacuum casting to make cheap, custom test parts.
Here is a table with common uses:
Industry | Application Description |
|---|---|
Automotive Prototyping | Good for testing dashboards, grills, and light parts. |
Electronic Manufacturing | Used for testing new cases, button panels, and covers. |
Medical Device Prototyping | Uses safe materials for testing shapes and ideas. |
Aerospace Component Modeling | Helps make light, strong parts with high accuracy. |
Industrial Machinery | Lets new companies make custom test parts for less money. |
Vacuum casting lets you get clear parts fast and at a low cost. You can test how things fit, see if they work, and show customers what the final part will look like.
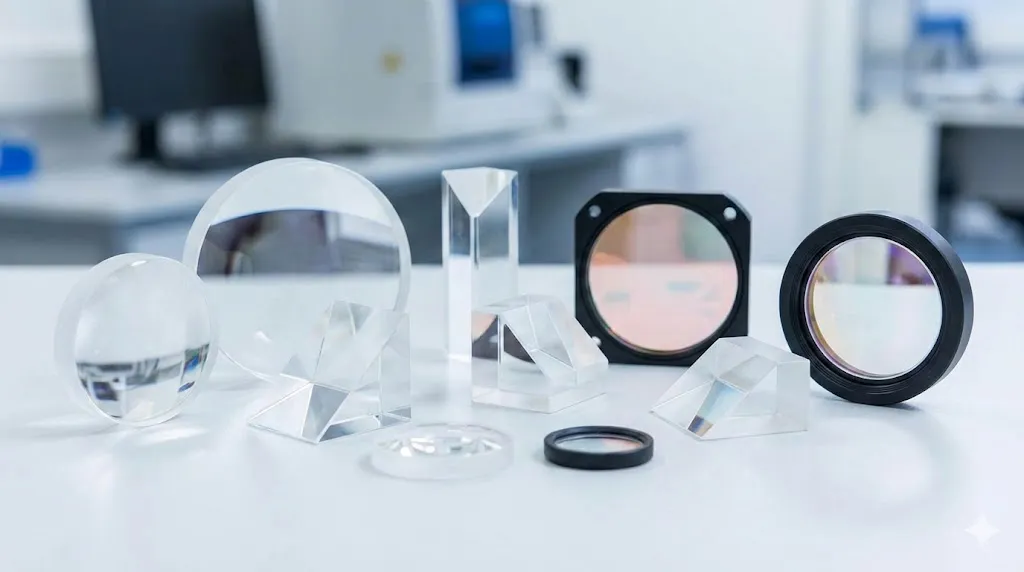
Materials and Mold Quality for Optical Clarity ⭐⭐⭐
Choosing Transparent and Optical-Grade Resins
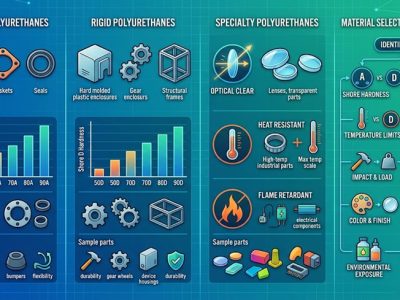
To get the best clear parts, you need to pick the right resin. There are many resins that work well for optical parts and prototypes. Each resin bends light in its own way. This is called the refractive index. Here are some common transparent and optical-grade resins you can use:
Poly(dimethylsiloxane) (PDMS): This resin works well for optical detection. Its refractive index is 1.4.
Polyurethanes: These resins have a refractive index from 1.4 to 1.6. They are often used for clear plastic parts.
Epoxy resins: Their refractive index is between 1.5 and 1.7. You can use them for optical jobs.
Cyclic Olefin Polymers (COP): These resins keep light clear because they have low optical losses.
Poly(methylmethacrylate) (PMMA): This resin is used a lot for optical things.
Polycarbonate (PC): This resin is clear and does not break easily.
Poly(styrene) (PS): You can use this resin for many optical uses.
Think about what your prototype needs before you pick a resin. Some resins are clearer. Others are stronger.
Two-Part Polyurethane Systems for Clear Parts
Two-part polyurethane systems help you make clear parts with good optical quality. You mix two liquids together. Then you pour them into a mold. The liquids react and turn solid. You get a clear plastic part that looks nice and lets light pass through. These systems are good for making test parts and small batches. They help you make parts that look like glass but are lighter.
Mold Surface Preparation and Silicone Mold Quality
You need to make sure your mold surface is very smooth for the best clear parts. Good silicone molds copy every detail from your master model. This is important for optical parts like lenses and covers. If your mold is smooth, your part will also be smooth. This helps light go through without scattering. Industry rules say mold quality is very important for optical parts. Always check your molds for any problems before you start casting. Good silicone molds give you the detail and finish you need for clear parts.
Tip: Always keep your molds clean and free from dust. Even tiny bits of dirt can hurt the clear finish.
Vacuum Casting Process for Optical-Quality Clear Parts
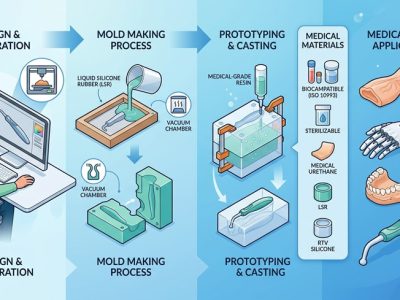
Master Model Preparation
First, you make a master model. This model is the example for your clear parts. Use tools that are very accurate to shape it. Pick a material like the final plastic part. The master needs a smooth surface. Any mistake on the master will show in your clear prototypes. Clean the model well before you go on. This helps you get a smooth surface and good optical clarity.
Silicone Mold Creation
Next, you make a silicone mold around the master. The mold must copy every detail. Pour liquid silicone over the master and let it harden. Make sure there are no bubbles in the mold. Bubbles can mess up the clear finish. A mold without bubbles gives you the best clear parts. Always look for problems in the mold before you use it.
Tip: Keep your silicone molds in a clean, dry spot. This stops dust and water from getting on your optical molds.
Resin Mixing, Degassing, and Pouring
Mixing and pouring resin is very important for clear parts. If you mix too fast, air gets trapped. Air bubbles make clear parts look cloudy. Always remove air from the resin before pouring. Use a vacuum chamber to pull out air. Pour the resin slowly into the mold. This helps stop bubbles and keeps the surface smooth.
Steps that help optical quality:
Mix resin slowly so you do not get bubbles.
Make sure the silicone mold has no bubbles for the best results.
Curing, Demolding, and Handling
Let the resin harden at the right temperature and humidity. This keeps your prototypes clear. Be gentle when you take the part out of the mold. If you rush, you can scratch the clear surface. After you take the part out, check for any problems. Keep finished parts away from sunlight and chemicals. This helps the clear finish stay strong.
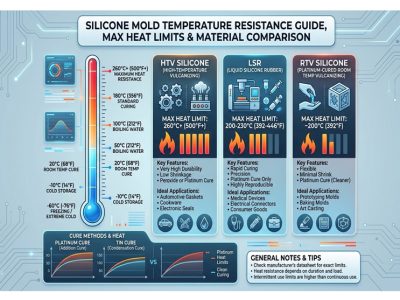
Here is a table that shows how different materials react to things like heat, humidity, chemicals, and sunlight during curing:
Material | Thermal Exposure | Humidity | Chemical and Solvents | UV Exposure |
|---|---|---|---|---|
PU8150 | Moderate | High | High | Moderate |
PU8260 | Moderate | Moderate | High | High |
PU8263 | Highly suitable | Moderate | Highly suitable | Highly suitable |
PX100 | Low | Moderate | Moderate | Low |
PX510 | Moderate | Moderate | Moderate | Moderate |
UP4280 | Highly suitable | Moderate | High | Moderate |
UPX5210 | Highly suitable | High | Moderate | Highly suitable |
If you follow these steps, you can get clear and smooth plastic prototypes.
Finishing Techniques for Clear Vacuum Casting Parts ⭐⭐⭐
Polishing and Clear Coatings
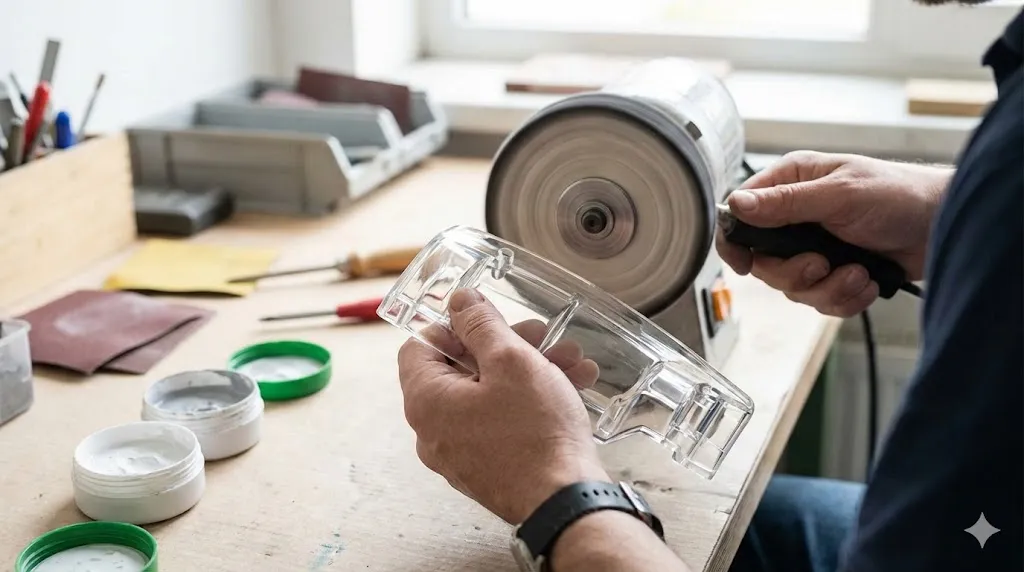
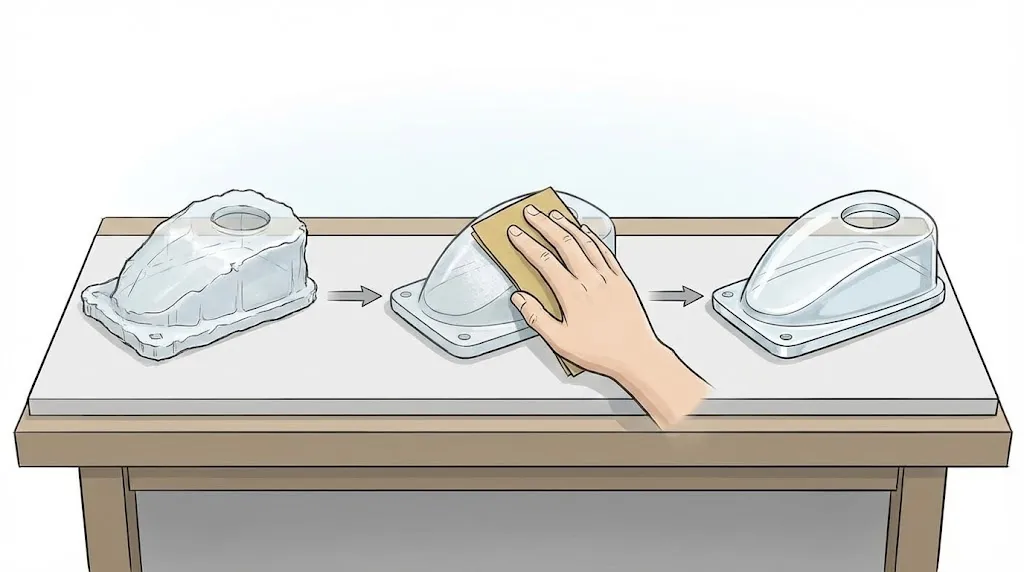
You can make your clear parts look better by polishing them. First, use fine sandpaper to smooth rough spots. Next, use a polishing compound to make the part shiny. This step helps remove small marks and makes the part clearer. You can also use clear coatings. Spray or brush a thin layer on the plastic. The coating fills tiny scratches and gives a glassy look. This keeps the surface safe and helps your parts stay new.
Tip: Clean your parts before you polish them. Dust can scratch the clear surface.
CNC Machining and Hand Polishing Alternatives
Sometimes you need your parts to be very exact. CNC machining can shape edges and surfaces very well. It works best for flat or simple shapes. For tricky spots, try hand polishing. Use a soft cloth and press gently. Hand polishing lets you reach small places and control the shine. Both ways help you get a smooth and clear finish on your plastic parts.
Laser Etching and Surface Enhancement
Laser etching lets you add details without making the part cloudy. You can put logos, numbers, or patterns on the surface. The laser works quickly and does not hurt the clear look. You can also use other ways to protect the surface. For example, add a UV-resistant layer to stop sunlight damage. This keeps your parts clear and stops yellowing. Always check your parts after each step to make sure they look right.
Finishing Method | Best For | Main Benefit |
|---|---|---|
Polishing | All transparent parts | Improves clarity |
Clear Coating | Large surfaces | Protects surface |
CNC Machining | Flat/simple shapes | High precision |
Hand Polishing | Small/complex areas | Custom finish |
Laser Etching | Marking details | Keeps optical quality |
Troubleshooting Optical Issues in Clear Vacuum Casting
Preventing Bubbles, Voids, and Inclusions
You want your clear vacuum cast parts to look great. Bubbles, voids, and inclusions can make them look bad. To stop bubbles, mix your resin slowly. If you mix too fast, air gets trapped. Use a vacuum chamber to pull out air before pouring. Make sure your mold is clean and dry. Even a little water can cause bubbles. Pour the resin gently into the mold. This helps keep the surface smooth and clear. If you see bubbles, check how you mixed and poured. You can also warm the resin a bit to help it flow.
Tip: Always check your tools for leaks. Air leaks can make tiny bubbles in your parts.
Eliminating Surface Imperfections
Surface imperfections can make your parts less clear. You need a smooth mold to get a smooth part. Polish your master model before making the mold. Clean the mold well before every use. Dust or dirt can stick to the surface and show up in the final part. After casting, look for scratches or marks. You can fix small flaws by polishing or using a clear coating. Good surface quality helps light go through without scattering.
Steps to make the surface better:
Use shiny master models.
Keep molds clean and dust-free.
Polish finished parts if needed.
Avoiding Yellowing, Haze, and UV Degradation
Yellowing and haze can make clear parts look old or dirty. You can stop these problems by watching the temperature and picking the right materials. Store your resins in a cool, dry place. Pick UV-resistant resins for outdoor use. Keep your processing temperatures steady. If you see haze, dry your materials well and polish your molds. You can also change cooling times to help clarity. Experts say to use even wall thickness and smooth mold finishes to make parts clearer.
Here is a table with common problems and how to fix them:
Issue | Recommended Solution |
|---|---|
Yellowing | Keep the right processing temperatures, use UV-resistant resins, and store materials the right way. |
Cloudiness | Dry materials well, polish molds better, keep cooling even, and change injection steps if needed. |
Design Considerations | Use even wall thickness, rounded corners, draft angles, smooth mold finishes, and steady cooling to make parts clearer. |
Note: Always check your parts for yellowing or haze after casting. Early checks help you fix problems before they get worse.
Best Practices for Consistent Optical Quality
Quality Control and Inspection Methods
You have to check your clear vacuum cast parts to make sure they are good. First, look at the surface. Hold the part up to a light. See if you find haze or bubbles. Sometimes your eyes cannot see tiny problems. You can use special tools to help you. These tools are:
Optical comparators
Video systems
Inspection microscopes
Laser inspection instruments
These tools show small flaws that can change how light moves through the part. You can also test how much light goes through the material. Many companies use a chart to compare their results with industry standards:
Material Type | Optical Clarity | Light Transmission | Additional Properties |
|---|---|---|---|
PMMA/Acrylic | High | Excellent | Mechanical rigidity, thermal stability, UV resistance |
Clear Urethanes | Over 90% | >90% | Ideal for lenses, covers, fluid containers |
If your part matches these numbers, you know it is high quality.
Tip: Always write down your inspection results. This helps you see changes and make your process better.
Process Consistency and Environmental Control
You need to keep your process the same to get good results every time. Make sure your workspace has steady temperature and humidity. If the air changes, you can get bubbles or the resin may cure too fast. Clean your tools and molds before you use them. Dust and dirt can mess up the clear finish.
Make a checklist for each step. Write down the time, temperature, and mixing speed. This helps you find problems if something does not work right. When you control your workspace and follow the same steps, you get clear and strong parts each time.
Note: Even small changes in your process can change how clear your parts are. Watch carefully and change things if you need to.
Vacuum Casting vs Alternative Methods for Clear Parts ⭐⭐⭐
Vacuum Casting vs CNC Machined Clear Plastics
You might wonder how vacuum casting and CNC machining are different for clear parts. Vacuum casting helps you make many copies fast. You use a silicone mold to shape each part. CNC machining starts with a solid plastic block. A machine cuts away pieces to make the shape.
Vacuum casting is good for small groups of parts. You can make up to 50 parts before the mold wears out. CNC machining is better if you need very exact sizes. It gives higher accuracy. If you want tight measurements, CNC machining is best. The look of vacuum cast parts depends on the master model. If the master is smooth, your parts will be clear. CNC machining can leave tool marks, but you can polish them off.
Here is a table to help you compare:
Feature | Vacuum Casting | CNC Machining |
|---|---|---|
Best For | Low-volume production | High precision, prototypes |
Dimensional Precision | Moderate | High |
Surface Finish | Depends on master model | May need polishing |
Cost per Part | Lower for small batches | Higher for each part |
Volume Range | 1–50 parts | 1–10 parts |
If you want lots of clear parts quickly, vacuum casting is a good pick. If you need the most exact parts, CNC machining is better.
Vacuum Casting vs Injection Molding
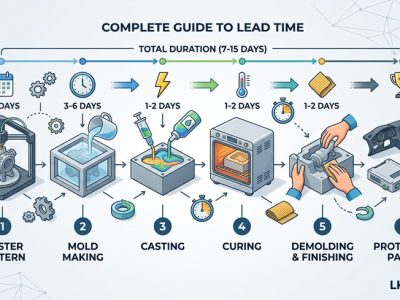
Vacuum casting and injection molding both make clear plastic parts, but they are used for different things. Vacuum casting uses silicone molds. Injection molding uses metal molds. You can start vacuum casting with fewer parts. Injection molding needs more parts to save money.
You get vacuum cast parts faster. The wait time is usually 7 to 15 business days. Injection molding takes more than 20 business days. Here is a table that shows the difference:
Process | Lead Time (Business Days) | Minimum Order Quantity |
|---|---|---|
Vacuum Casting | 7–15 | Lower |
Injection Molding | > 20 | Higher |
Vacuum casting is best for test parts and small batches. Injection molding is better for big orders. The quality of vacuum cast parts depends on the master model. If the master is perfect, your parts will look great. Injection molding gives you steady results for large numbers.
Note: Vacuum casting costs more for each part if you need hundreds or thousands. Injection molding saves money when you make a lot of parts.
FAQ – Clear Vacuum Casting Parts
Here are some common questions you may have about clear vacuum casting parts:
Can vacuum casting make transparent or flexible parts?
Yes, you can use vacuum casting to create both transparent and flexible parts. You can choose clear polyurethane for lenses or see-through covers. You can also pick flexible materials for grips, seals, or soft-touch parts.How does vacuum casting compare to 3D printing for clear parts?
Vacuum casting gives you a smoother surface and better material strength than most 3D printing methods. You also get a lower cost per part when you make small batches. This makes vacuum casting a smart choice for prototypes and short runs.What causes bubbles or haze in clear cast parts?
Bubbles often come from trapped air during mixing or pouring. Haze can happen if the mold is not clean or the resin is not dry. You can prevent these problems by mixing slowly, degassing the resin, and keeping your workspace clean.How clear can vacuum cast parts get?
You can achieve optical clarity close to glass if you use the right resin and follow good process steps. Polishing and clear coatings can make your parts even clearer.How many clear parts can you make from one silicone mold?
You can usually make 20 to 50 clear parts before the silicone mold wears out. The number depends on the resin and the shape of your part.
Tip: Always store your clear parts away from sunlight. UV light can cause yellowing over time.
Can you add color to clear vacuum cast parts?
Yes, you can tint clear resins with special dyes. This lets you make colored transparent parts for displays or lighting.
If you have more questions, you can ask your vacuum casting supplier. They can help you choose the best materials and methods for your project.
Conclusion – When Vacuum Casting Is the Right Choice for Clear Parts
You want to make clear parts that look great and work well. Vacuum casting gives you a smart way to do this, especially when you need small or medium batches. You can use this method for prototypes, product testing, or custom parts.
When you decide if vacuum casting fits your project, look at these key factors:
Decision Factor | Description |
|---|---|
Production Volume | If you need a low or medium number of parts, vacuum casting works best. For high numbers, choose injection molding. |
Budget Constraints | Vacuum casting costs less to start. You do not need to spend a lot on tools or molds. |
Design Flexibility | If you want to change your design, vacuum casting lets you do this easily and without high costs. |
You also get many other benefits with vacuum casting:
Material versatility: You can pick from many types of plastics and rubbers.
High-quality surface finish: Silicone molds give you smooth, clear surfaces with little extra work.
Precision and detail: You can copy fine details and complex shapes with high accuracy.
Speed and efficiency: You get your parts fast, which helps you test ideas or show customers quickly.
If you want clear parts with a smooth finish and need to keep costs low, vacuum casting is a strong choice.
You should use vacuum casting when you want to test new designs, make small batches, or need clear parts with fine details. This method helps you save time and money while giving you high-quality results. Always check your needs for volume, budget, and design changes before you choose. With the right steps, you can achieve optical clarity and make your project a success.
You can make clear vacuum casting parts by following some main steps. First, pick good materials like advanced polyurethane resins. These help the part look clear and let light pass through. Vacuum casting helps take out bubbles. This makes working prototypes that let lots of light through. Make your master model smooth with optical machining. This gives the best surface for clear parts. Be careful with molds and cut off extra plastic for smooth edges. After casting, polish the part to make it even clearer. Keep working on your process to get better clear plastic and optical parts.
Always remember, making a good vacuum cast prototype means you must control each step. Pay close attention to light, the surface, and finishing steps to get the clearest parts.
Advancement Type | Benefits |
|---|---|
Advanced Polyurethane Resins | Very clear, does not turn yellow, safe for people |