LKprototype
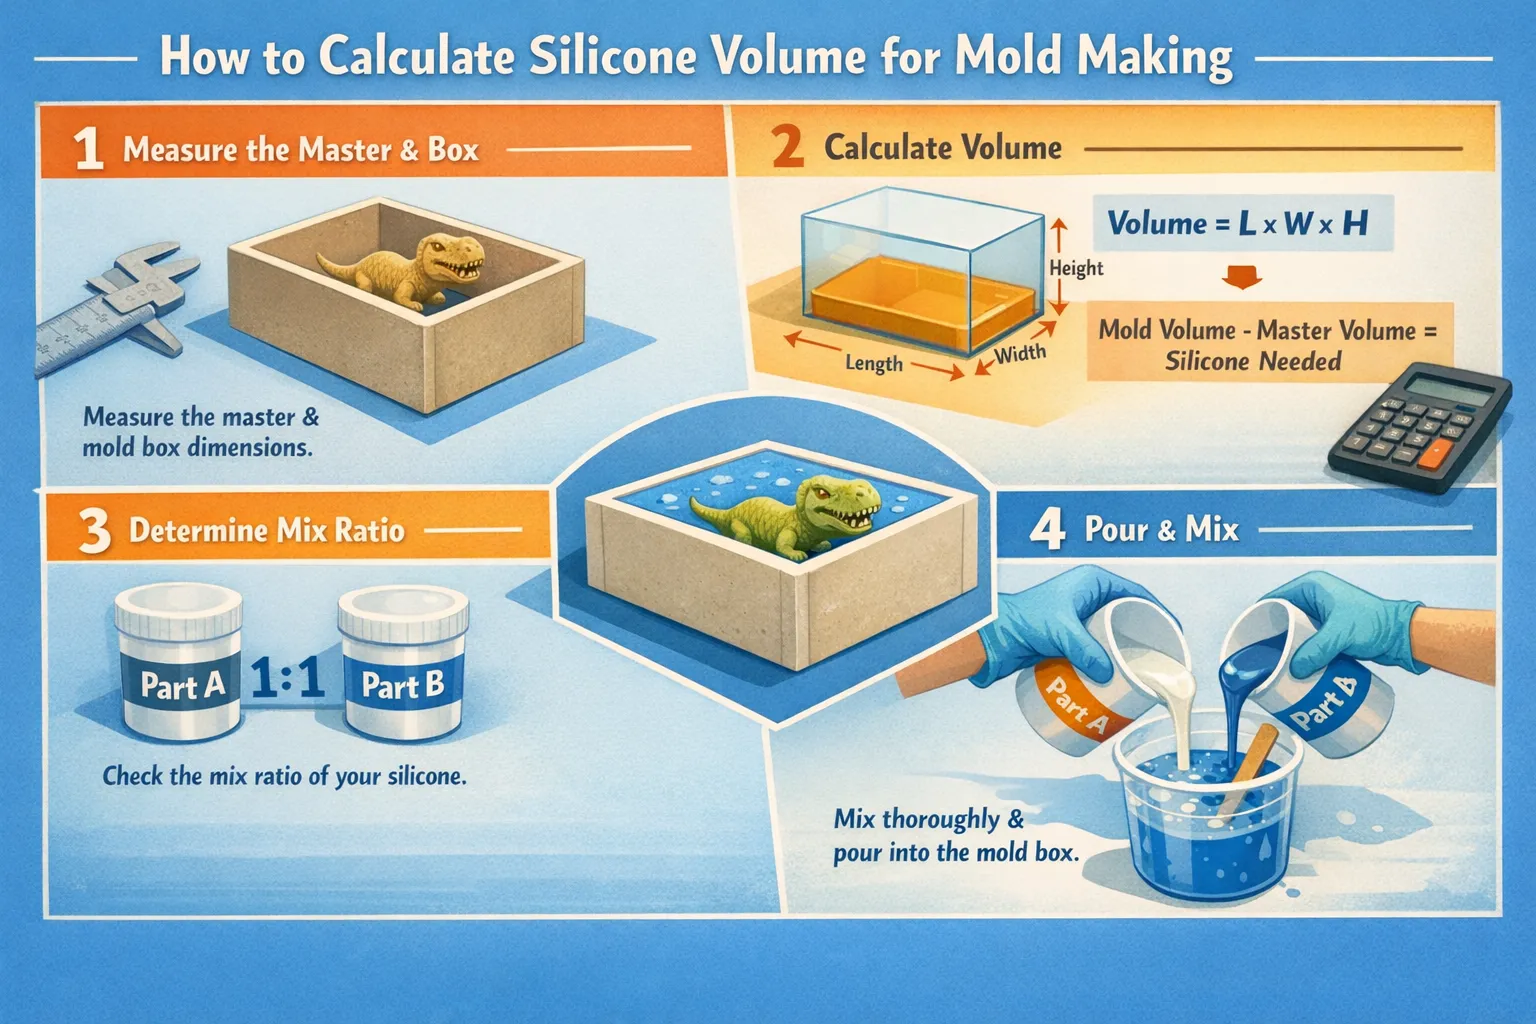
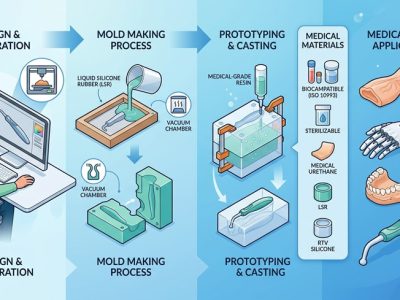
Accurate measurements stop you from wasting silicone and help you calculate silicone volume for mold effectively. They also ensure your mold works correctly. You can find silicone volume using a simple formula: Required Material Volume equals Mold Container Volume minus Model Volume. For regular shapes, use these formulas:
Shape | Formula |
|---|---|
Square/Rectangle | Volume equals length times width times height |
Cylinder | Volume equals π (3.14) times radius squared times height |
Follow these steps to get the right amount of silicone each time.
Key Takeaways
It is very important to measure carefully. Measure your mold container and model two times so you do not make mistakes.
Use the correct formulas for simple shapes. For rectangles, volume is length times width times height.
Add 5-10% more silicone to your total. This extra amount helps make sure you have enough for your project.
For strange shapes, try the water displacement method. Put your model in water to find its volume easily.
Check your unit conversions before you start. This stops mistakes and helps you mix the right amount of silicone.
Quick Answer – How Much Silicone Do You Need? ⭐⭐⭐
You want to know the answer fast before you mix silicone. Here is an easy way to find out how much silicone you need for your mold.
First, measure inside your mold container. Next, measure your model’s size. Take away the model’s volume from the container’s volume. This number shows how much silicone you need to fill the space around your model.
Tip: Always check your measurements two times. Small mistakes can cause big problems later.
If you use a regular mold size for hobbies, you may only need a little silicone. Many people use tubes of silicone caulking for small molds.
A normal tube of silicone caulking has 10oz of molding material.
For most small things, one tube is enough.
You should also think about what changes the amount of silicone you need. The table below lists the main things to look at:
Factor | Description |
|---|---|
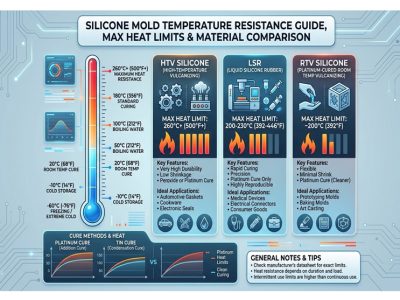
Shrinkage | LSR can shrink by 2.5% to 3% after cooling. Mold temperature, plastic temperature, and pressure can change this. |
The Parting Line | The design of the parting line helps air escape and avoids bubbles. |
Exhaust | Good air flow during filling stops defects like white edges. |
Cold Runner System | This system saves material and labor by using all the silicone without waste. |
Mold Materials | Harder mold materials can change how much silicone you need. |
Temperature Control | Even heat in the mold helps the silicone cure the same everywhere. This affects how much you need. |
You can use these steps and tips to figure out silicone volume for mold projects quickly. Always add a little extra silicone so you do not run out. This way, you will not waste material or time.
What You Need to Calculate Silicone Volume
Tools and Materials
You need some tools to measure your model and mold container. These tools help you get good results when you calculate silicone volume for mold making. Here is a list of what you should use:
Ruler or measuring tape
Caliper (for small or detailed models)
Calculator
Notebook and pen
Water (for the displacement method)
Graduated cylinder or measuring cup
Sine plate and roll pin (for advanced, precise measurements)
Tip: Use a caliper for small or detailed parts. It gives better numbers than a ruler.
A calculator helps you do math fast. A notebook lets you write down numbers so you remember them.
Measuring the Model and Mold Container
You must measure both the model and the mold container before mixing silicone. First, gather all your tools. Next, follow these steps for the best results:
Write the length, width, and height of your model.
Measure inside your mold container.
Put these numbers into your calculator.
For extra accuracy, set up a sine plate at the right angle.
Put a roll pin in the corner of the sine plate.
Measure from the surface plate to the top of the roll pin.
Add this number to your earlier math to find the exact size.
Use a ruler for simple shapes. For tricky models, try the water displacement method. Fill the container with water, put your model inside, and see how much water spills out. This shows the model’s volume.
Note: Always measure two times to avoid mistakes. Good measurements help you save silicone and money.
Now you have what you need to calculate silicone volume for mold projects with confidence.
Silicone Volume Calculation Methods
Formula Method (Regular Shapes)
You can use easy math to find out how much silicone you need for molds with regular shapes. These shapes are things like cubes, cylinders, spheres, and cones. Each shape uses a different formula to find its volume. The table below shows the main formulas you will use:
Shape | Volume Formula |
|---|---|
Sphere | V = (4/3) × π × r³ |
Cone | V = (1/3) × π × r² × h |
Cube | V = a³ |
Rectangular prism | V = a × b × h |
Cylinder | V = π × r² × h |
Right square pyramid | V = (1/3) × Area of base × h |
Frustum | V = (1/3) × h × (b₁ + b₂ + √(b₁ × b₂)) |
You have to measure the length, width, height, or radius of your model and mold container. Write these numbers down before you start your math.
Subtracting Model Volume
To calculate silicone volume for mold, you need to take away the model’s volume from the mold container’s volume. This step tells you how much space needs to be filled with silicone. Here are the steps to follow:
Measure your mold container and your model.
Use the right formula to find the volume for each one.
Take away the model’s volume from the container’s volume.
Add 5-10% more silicone for waste.
If you want to know the mass, multiply the volume by the density of the silicone.
Tip: Always round your final number up. This helps you make sure you do not run out of silicone when you pour.
You can also weigh your silicone before and after pouring to check your math. This way works well for big projects. If you use these steps, you will get a good result every time.
Calculating Silicone for Irregular and Complex Molds ⭐⭐⭐
If your object has a strange shape, you need a new way to measure. Normal math does not work for things with curves or holes. The water displacement method helps you find the real volume. This way works for any model, even if it looks weird.
Water Displacement Method (Step-by-Step)
You can use water displacement to measure any odd-shaped object. This method is easy and does not need hard math. Here is what you do:
Get a big measuring cup or graduated cylinder. It must be large enough for your model.
Pour water in until it covers your model. Do not let water spill out.
Write down the first water level. Call this "a."
Put your model in the water. Make sure it sinks all the way.
Write down the new water level. Call this "b."
Take away "a" from "b." This number is your model’s volume.
The water displacement method shows how much space your model uses. You do not have to guess or use hard math. This is good for models with curves or holes.
The water displacement method helps you:
Measure the volume of odd shapes.
Skip hard math.
Get better results for tricky models.
Multi-Part Mold Volume Calculation
Some molds have more than one part. For example, a mug with a handle needs two parts. You must figure out the silicone for each part.
First, find the volume of the mold container. Use the right formula for the shape:
For rectangles: Volume = length × width × height
For cylinders: Volume = π × radius² × height
Next, measure your model’s volume.
Subtract the model’s volume from the container’s volume. This tells you how much silicone you need for one part.
Do this again for each mold part.
You can also use projected area for hard shapes:
For rectangles: Projected Area = length × width
For circles: Projected Area = π × radius²
When you figure out silicone volume for mold projects with many parts, check each part. This stops you from running out of silicone and helps your mold fit together.
Tips for Accurate Silicone Measurement
Adding Extra Silicone (Waste Allowance)
You should always add a little extra silicone. This extra is called a waste allowance. It helps you not run out during pouring. Small mistakes can happen when you mix or pour. Air bubbles, spills, or leftover silicone in your cup can lower the amount you have.
A good rule is to add 5% to 10% more silicone. For example, if you need 100 milliliters, prepare 105 to 110 milliliters. This small increase gives you a safety margin. You will not need to stop and mix more silicone in the middle of your project.
Tip: Always round up your final measurement. It is better to have a little extra than not enough.
Avoiding Common Calculation Mistakes
You can avoid problems if you know what mistakes people make. Here are some errors people make when they calculate silicone volume for mold projects:
Using the wrong mixing ratios can stop the silicone from curing.
Not waiting long enough for the silicone to cure.
Mixing in a cold or wet room slows down curing.
Stirring too fast adds air bubbles.
Pouring silicone too quickly traps air.
Skipping vacuum degassing leaves bubbles in the mold.
Letting dust or dirt fall into the silicone.
Using a damaged mold or the wrong release agent.
Mixing pigments unevenly causes color streaks.
Allowing temperature changes during curing can cause shrinkage.
You can follow these best practices to get better results:
Use a scale to measure silicone by weight for the right mixing ratio.
Mix until you see one even color with no streaks.
Use a wide, flat stick to scrape the sides and bottom of your mixing container.
Make sure the silicone is at room temperature (about 23°C) for the best results.
Use the formula Volume = Mass/Density if you want to check your math.
Note: Careful measuring and mixing help you make strong, bubble-free molds every time.
Quick Reference Silicone Volume Chart & Calculator ⭐⭐⭐

You can save time if you use a quick chart or calculator. These tools help you check your math before mixing silicone. They make it easier to plan and buy the right amount.
Silicone Volume Conversion Table
Sometimes you need to change units like cubic inches, milliliters, or liters. Use this table to switch your measurements fast:
Unit | To Cubic Inches (in³) | To Cubic Centimeters (cm³) | To Liters (L) | To Gallons (US) | To Milliliters (mL) | To Cubic Feet (ft³) |
|---|---|---|---|---|---|---|
Cubic Inches (in³) | 1 | 16.387 | 0.016387 | 0.004329 | 16.387 | 0.0005787 |
Cubic Centimeters | 0.0610237 | 1 | 0.001 | 0.0002642 | 1 | 3.5315e-05 |
Liters (L) | 61.0237 | 1000 | 1 | 0.2642 | 1000 | 0.0353147 |
Gallons (US) | 231 | 3785.41 | 3.78541 | 1 | 3785.41 | 0.133681 |
Milliliters (mL) | 0.0610237 | 1 | 0.001 | 0.0002642 | 1 | 3.5315e-05 |

Tip: Always check your unit conversions two times before you calculate silicone volume for mold projects.
Common Mold Size Examples
You can look at these examples to guess how much silicone you need for popular mold sizes. This helps you plan and not run out.
Mold Type | Internal Dimensions | Volume Requirement |
|---|---|---|
EDFA Silicone Rubber Mold | 1.25", 1.5", 2" | 8 mL, 15 mL, 20 mL |
Standard Mold | N/A | 20 mL, 30 mL, 50 mL |
Rectangular Mold | 2-1/8" x 1", 3" x 2" | See formula below |
Here are some easy calculation examples:
For a square or rectangle:
Formula: Length × Width × Height
Example: 9" × 4" × 2" = 72 in³ (container), 42 in³ (model), so 72 - 42 = 30 in³ silicone needed.
For a round mold:
Formula: π × Radius² × Height
Example: 2" radius × 2" radius × 3.14 × 3" = 37.68 in³ (container), 26.45 in³ (model), so 11.23 in³ silicone needed.
You can use a silicone volume calculator online for quick answers. Type in your measurements and get the result fast.
If you want the best results, measure your model and container carefully. Use the conversion table to change units if you need. This helps you get the right amount of silicone every time.
FAQ – Silicone Mold Volume Calculation
You may have questions when you start making silicone molds. Here are answers to the most common questions about how to measure and mix the right amount of silicone.
1. What is the easiest way to calculate silicone volume for mold making?
You can use a simple formula for regular shapes. Measure the length, width, and height of your mold box. Multiply these numbers to get the total volume. Then, measure your model and subtract its volume from the box. This gives you the space you need to fill with silicone.
For odd shapes, try the water displacement method. Place your model in a container and pour water over it. The amount of water used shows how much silicone you need. This method helps you avoid waste.
2. How do I know which formula to use for my mold?
Check the shape of your mold. Use the table below for quick reference:
Mold Type | Formula | Example Calculation |
|---|---|---|
Square/Rectangle | Length x Width x Height | 9" x 4" x 2" = 72 cubic inches |
Subtract part volume | 72 - 42 = 30 cubic inches | |
Total RTV needed | 30 cubic inches x 21g = 630g RTV | |
Round | Pi x Radius² x Height | Diameter 4" (Radius 2"), Height 3" |
3. What factors change how much silicone I need?
The size and shape of your model
The type of mold (one-piece, two-piece, brush-on)
The kind of silicone rubber you use
4. How do I add a safety margin?
Add 5% to 10% extra silicone to your total. This covers spills or small mistakes.
5. How do I convert volume to weight?
Check your silicone’s technical data sheet. Divide your volume by the number of cubic inches per pound listed. This tells you how much silicone to mix.
Tip: For a rectangular mold, add a ¾” border around your model for support.
If you follow these steps, you can calculate silicone volume for mold projects with confidence.
Conclusion – Calculate Once, Cast with Confidence
You now have the tools to make your mold projects successful. When you calculate silicone volume for mold making, you save time, money, and effort. Careful measurement helps you avoid waste and ensures your mold works as planned.
Before you start casting, always double-check your calculations. You can use these simple steps:
Measure the length, width, and height of your mold box.
Estimate the space your model takes up inside the box.
Try filling the mold box with rice or water to check your math.
Use a calibrated beaker to measure the volume of water or rice for accuracy.
You can also follow this step-by-step process for even better results:
Fill your mold cavity with water.
Pour the water into a measuring cup to see the exact volume.
Write down the number so you know how much silicone to mix.
Tip: Always add a little extra silicone to cover small mistakes or spills. This keeps your project on track.
You can use the quick reference chart or an online calculator for fast answers. These tools help you plan for future projects and avoid running out of material.
Accurate measurement gives you confidence. You can pour your silicone knowing you have enough for the job. Careful planning means you only need to calculate once. Your molds will turn out strong and bubble-free every time.
If you follow these steps, you will get great results and enjoy the process. Happy casting!
You can figure out silicone volume for mold making by following easy steps and using simple formulas. Always check your measurements two times and add a little extra silicone to be safe. You can use a quick reference table or a calculator for your next projects. For the best results, do these things:
Pick good tools for your project.
Look at your work to check for problems.
Measure every side and part.
Test your materials and see how they work.
To stop waste, look at this table:
Strategy | Impact on Waste Reduction | Best Practice |
|---|---|---|
Optimized Mold Design | Makes less scrap and works better | Use hot runners and put gates in smart spots |
Process Optimization | Stops using too much material | Change injection pressure and cooling |
Recycling & Reuse | Helps the environment and saves money | Use regrind and recycle in a closed loop |
Careful measuring helps you not run out or waste silicone. You can pour your mold and feel sure every time.
FAQ
How do you measure silicone for an odd-shaped model?
You can use the water displacement method. Fill a container with water, note the level, then submerge your model. The difference in water level shows your model’s volume. This helps you know how much silicone you need.
Can you reuse leftover silicone from a previous project?
No, you cannot reuse cured silicone. Once it sets, it will not melt or mix again. Always mix only what you need for each project to avoid waste.
What if you mix too little silicone?
If you run out of silicone while pouring, your mold may not form correctly. Always prepare 5–10% extra silicone. This safety margin helps you finish your mold without gaps.
Do you need to degas silicone before pouring?
Yes, degassing removes air bubbles. You can use a vacuum chamber for best results. If you do not have one, pour slowly from a height to reduce bubbles.