LKprototype
You must handle vacuum casting mold undercuts with good planning. Using the right methods helps a lot. Fixing undercuts lets you take out your part easily. It also keeps your mold safe. Many makers have problems like:
Air bubbles happen if degassing or venting is not done well
Parts do not cure right if time is too short or heat is wrong
Mold can bend if you choose the wrong silicone hardness
Parts stick if you forget release agents or use bad mold designs
You can beat these problems with smart actions and expert advice.
Key Takeaways
Think about your mold design before you start. This helps you avoid hard undercuts. It makes taking out parts easier. It also keeps your mold from breaking.
Pick flexible silicone for molds with undercuts. This lets the mold stretch a little. It helps you take out parts without breaking them.
Put the right mold release agents on the mold. Make sure you spread it evenly. This stops parts from sticking. It also makes taking out parts smooth.
Remove air bubbles from your silicone the right way. This step is very important. It helps you get a strong and smooth part.
Check your molds after every use. Look for any damage or problems. Doing this often helps your molds last longer.
Understanding Undercuts
What Are Undercuts?
Vacuum casting lets you use undercuts without much trouble. Silicone molds are soft and can bend. This means you do not need extra tools like in injection molding. But if your 3D model has deep or tricky undercuts, you need to add tear-strips or use more than one silicone mold piece.
Undercuts are shapes that stick out or curve back on a part. These shapes make it hard to pull the part out of the mold. Holes, grooves, or hooks can lock the part in place. Silicone mold vacuum casting works well with these shapes. Silicone is soft and can stretch. This helps you make cool and useful designs.
Why Undercuts Matter in Silicone Molds
Undercuts are important when you design silicone molds. Simple undercuts are easy to remove from the mold. Harder undercuts can make it tough to take out the part. You might need special tools or extra steps.
Simple undercuts are easy to remove.
Hard undercuts may need special tools.
Good undercut design makes better parts.
Silicone molds are special because they can bend and stretch. You can make parts with shapes that hard molds cannot do. Silicone is strong and can stretch over undercuts. The part keeps its shape. If you plan your undercuts, your parts look better and work better.
Remember, undercuts are helpful but need good planning. If you do not plan, you can break your mold or part. Always think about how your design will make it easier to take out the part.
Preparing for Mold Undercuts
Identifying Undercuts on Your Model
You need to spot undercuts on your model before you start making your mold. This step helps you avoid problems when you remove your part from the mold. Look at your part from every angle. Check for shapes that hook, curve, or stick out. These areas can trap your part inside the mold.
Here are some ways you can identify undercuts:
Hand-loaded inserts help block features that make your part hard to remove. You place these inserts in the mold by hand. This method works well for prototypes or small runs.
Telescoping shutoffs let sections of your mold slide into each other. This design forms undercuts without extra moving parts.
Optimized part design makes your job easier. Add draft angles and keep wall thickness even. This step helps you avoid tricky undercuts and makes your part easier to cast.
You should always plan for undercuts before you pour silicone. This planning saves you time and keeps your part safe.
Planning Parting Lines and Gaps
You must plan your parting lines and gaps to handle undercuts. The parting line is where your mold splits. If you move this line to cross an undercut, you can pull your part out more easily. Sometimes, you need to use flexible silicone or add side-actions to help with removal.
Technique | Description |
|---|---|
Move the parting line | Adjust the parting line to cross the undercut. This works well for outside undercuts on your part. |
Stripping undercuts | Use flexible silicone so your part can bend during removal. This needs special angles on your part. |
Side-actions or lifters | Add side-actions that slide in and out of the mold. These help with deep undercuts but add cost. |
Once you remove all your clay, use a small paint brush dipped in lighter fluid to clean away any extra clay and grime. This gives you a clean surface. Then you can add clay cavities. These cavities help you release the mold with less surface tension and give you something to grip for demolding.
If your part has large undercuts, you can use rubber bands or mold straps. These tools help keep your mold seams lined up. They also stop your part from shifting during casting. Always check your part and mold before you start. Careful planning makes your part easier to remove and keeps your mold in good shape.
Mold Design for Undercuts
Flexible Silicone Selection
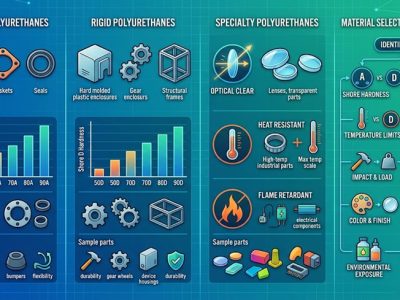
You need to choose the right silicone for your mold design. Flexible silicone works best when your part has undercuts. The flexibility lets you stretch the mold over tricky shapes and release your part without damage. Look at the geometry of your part before you pick your silicone. If your part has deep grooves or hooks, flexible silicone helps you remove it easily.
Flexible silicone molds are great for parts with complex patterns. You can bend and stretch the mold to get your part out. This makes vacuum casting easier and safer for your mold. You should always check the hardness of the silicone. Softer silicone bends more, but it may wear out faster. Harder silicone lasts longer, but it can make it tough to remove your part if you have many undercuts.
Tip: If your part has many side-actions or deep undercuts, use a silicone that can stretch without tearing. This keeps your mold safe and helps you get a clean part every time.
You should also think about the wall thickness of your part. Thin walls can warp if the silicone is too soft. Try to keep your part walls between 1 and 1.5 mm. This helps your mold design stay strong and makes demolding easier.
Multi-Part Molds and Inserts
Sometimes your part has shapes that a single mold cannot handle. You need to use multi-part molds or removable inserts. These help you cast parts with large undercuts or complex features. You can split your mold into two or more pieces. This lets you open the mold and remove your part without breaking it.
You can use side-actions to help with deep undercuts. Side-actions are parts of the mold that move in and out. They let you release your part from tight spots. You can also add inserts to your mold design. Inserts create holes or special shapes inside your part. You remove the insert after casting, and your part comes out clean.
Here is a table with design tips for handling undercuts:
Design Modification | Description |
|---|---|
Uniform Wall Thickness | Keep your part walls even (1-1.5 mm) to stop warping and sink marks. |
Incorporate Draft Angles | Add a draft angle (1-2 degrees) to vertical walls for easy demolding. |
Manage Bosses and Undercuts | Make bosses with walls less than 60% of the main wall. Ask your manufacturer for help with complex parts. |
Vacuum casting molds use flexible silicone. This lets you flex the mold and remove your part, even with undercuts.
You can add cores and inserts to your mold design. These help you make bigger holes and special shapes inside your part.
Side-actions work well for parts with deep undercuts. You can move these parts of the mold to release your part safely.
Always plan your mold design before you start casting. This saves you time and keeps your mold and part in good shape.
Vacuum Casting Mold Undercuts
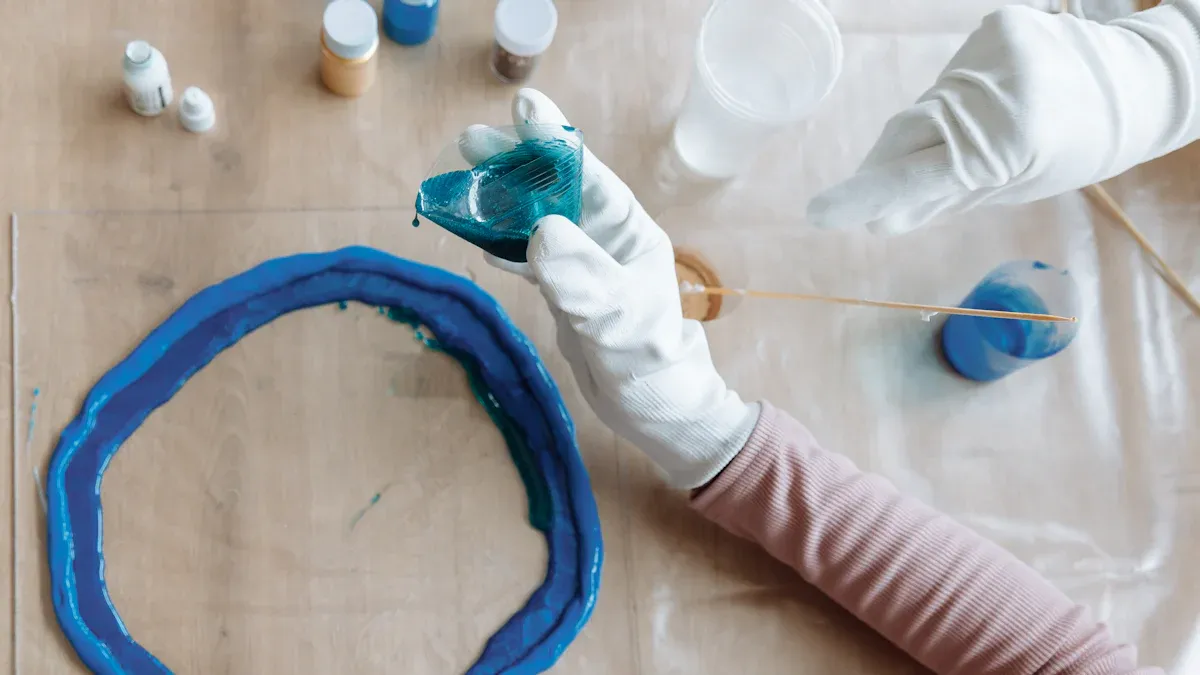
Degassing and Pouring Techniques
You must be careful with degassing and pouring. Air bubbles can mess up your part. They also make the mold weak. Getting rid of air is the first step. This helps you get a smooth and strong part. When you pour silicone, air can hide in deep grooves. Air can also get trapped around side-actions. If you do not get this air out, bubbles will show up. These bubbles can ruin your part.
First, put your mixed silicone in a vacuum chamber. The vacuum pulls out the air bubbles. As the pressure drops, the silicone will foam up. Wait for the bubbles to rise and pop. After degassing, bring the pressure back to normal. This step squeezes any leftover air. It also stops more bubbles from forming when curing. For big undercuts, keep extra resin above the mold. This extra resin fills the undercut spots when pressure returns.
Here is a table with best ways to degas silicone in molds with undercuts:
Best Practice | Description |
|---|---|
Restore Atmospheric Pressure | After degassing, bring the chamber back to normal pressure. This compresses any trapped air. |
Use a Header for Undercuts | Keep extra resin above large undercuts. This resin fills gaps as pressure returns. |
Allow Air to Expand | The vacuum makes trapped air in undercuts expand and escape. This helps remove hidden bubbles. |
How you pour the silicone is important too. Pour slowly from one corner of the mold. Let the silicone flow around the part and side-actions. This helps push out air and fill every spot. You can use pressure casting after pouring. This step squeezes out small bubbles. It also makes the mold stronger. Multi-part molds help you reach tricky shapes. They also make it easier to take out your part. Vacuum casting mold undercuts need slow pouring to stop air pockets and weak spots.
Degassing gets rid of air bubbles for a smooth finish.
Pour slowly so silicone fills every undercut and side-action.
Use pressure casting to make the mold strong and dense.
Multi-part molds help with tricky shapes and safer demolding.
If you skip these steps, you may get bubbles or weak spots. Your part might even get stuck. Always think about the casting process when you design. Try not to add undercuts or hard shapes that make mold-making tough.
Using Release Agents for Demolding
Mold release is very important for vacuum casting mold undercuts. If you do not use the right mold release, your part can stick. This can break your part or the mold. Mold release also stops surface bubbles. It makes it much easier to take out your part, even with side-actions or deep grooves.
There are different types of mold release. Each one works best for certain needs. Here is a table to help you choose:
Release Agent | Description | Application |
|---|---|---|
Heavy-duty release agent | Works well for long production runs and tough plastics. | Keeps release consistent and clean. |
Food-grade compliant release | Safe for food molds, medical parts, and packaging. | Meets safety and hygiene standards. |
Dry mist formulation | Good for parts that need painting or bonding after molding. | Gives a light, even coat for high-finish parts. |
General-purpose product (E206) | Works for many molding materials and daily use. | Easy to use for both manual and automated spraying. |
Urethane-specific (E236) | Best for complex shapes and intricate patterns. | Helps remove parts without damage, even with tricky undercuts. |
You can also use talcum powder as a mold release. Studies show talcum powder stops parts from sticking. It also helps stop surface bubbles. Sprinkle a thin layer of talc on the mold before pouring. This makes it easier to take out your part. It also keeps the surface smooth.
Tip: Always put mold release on evenly. Too much can cause problems. Too little can make it hard to take out your part.
Some advanced ways to handle vacuum casting mold undercuts are split molds, sliders, and collapsible cores. These work with mold release to help you remove the part safely. Side-actions also help with deep undercuts. When you use the right mold release and design, you get better results. You will have fewer casting problems.
Remember, the right mold release and good planning make vacuum casting mold undercuts much easier. You protect your mold. You get a clean part. You also avoid mistakes like sticking or surface bubbles.
Demolding Undercuts
Safe Demolding Steps
You need to follow careful steps when removing parts with undercuts from silicone molds. Rushing this stage can damage your cast or the mold itself. Here is a simple guide to help you through the demolding process:
Gently flex the sides of the mold box to loosen the silicone.
Slowly peel the silicone away from your cast part.
If the fit feels tight, ease the part out bit by bit. Do not pull hard or force it.
Tip: Take your time. Silicone can stretch, but too much force can cause tears or loss of detail.
You should always check the mold for any signs of wear after each use. This helps you spot problems early and keep your molds working longer.
Troubleshooting Common Issues
Sometimes, you may face problems when demolding parts with undercuts. Here are some common issues and how you can fix them:
Difficult mold design can make removal hard. Try to improve the design or use more flexible silicone.
Surface roughness may cause sticking. Make sure your mold surface is smooth before casting.
Improper use of release agents leads to sticking. Always apply the right amount and type of release agent.
Silicone materials can sometimes stick to the part. Adjust your molding process by changing temperature or pressure.
Note: Repeated use of silicone molds with undercuts can cause them to tear or lose detail over time. You may notice that your molds do not last as long or produce sharp details after many uses.
By following these steps and tips, you can protect your molds and get better results every time you cast.
You can deal with mold undercuts in silicone mold vacuum casting by using some simple steps. Experts say you should:
Make your part’s shape easier to lower undercuts.
Use release agents, release tape, or mold dividers to help take out your part.
Get help from experts if your part has hard shapes.
Making your process better gives you good results. Each step helps your casting get better:
Technique | Outcome |
|---|---|
Controlled pour | Less air gets trapped and the surface is smoother |
Initial peel | You can take out your part safely and keep details |
Progressive release | Your part keeps its small features and the mold stays good |
Keep working on your process. You will have fewer problems and your parts will look better each time.
FAQ
What is the best silicone hardness for molds with undercuts?
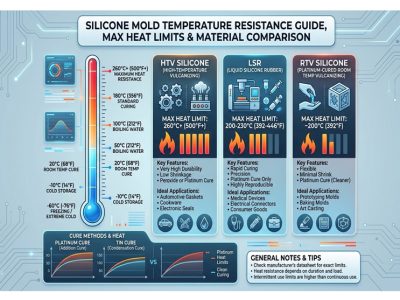
You should choose silicone with a Shore A hardness between 20 and 30. This range gives you enough flexibility to remove parts with undercuts without tearing the mold.
How do you prevent air bubbles in deep undercuts?
Pour silicone slowly and use a vacuum chamber for degassing. You can tilt the mold to help air escape from tricky spots. Always check for trapped air before curing.
Can you reuse silicone molds with undercuts?
You can reuse silicone molds many times if you handle them gently. Always apply release agent and avoid pulling too hard. Inspect your mold after each use for tears or wear.
What should you do if your part sticks in the mold?
Try flexing the mold gently and use a little more release agent next time. If the part still sticks, review your mold design for tight spots or rough surfaces.
Tip: Always clean your mold after each use to keep details sharp and prevent sticking.