LKprototype
When you start making silicone molds, you will notice that the silicone mold parting line is crucial in the casting process. You must consider where to place the silicone mold parting line, as this decision facilitates the removal of your prototype from the silicone mold. It also contributes to achieving a smooth and aesthetically pleasing surface. A well-thought-out design allows you to create prototypes that function effectively and possess the correct size and shape. If you aim for strong or high-quality prototypes, careful planning of your silicone mold and tooling is essential. Crafting custom silicone molds enables better quality checks during vacuum casting. By employing creative ideas and technical skills, you can achieve the best results from your silicone mold and casting process.
Key Takeaways
Plan the silicone mold parting line with care. This helps you remove prototypes easily. It also gives a smooth surface finish. Keep the parting line away from places people will see. This keeps your final product looking nice. Use registration features to line up mold halves the right way. This stops misalignment and makes sure casting is correct. Try not to use undercuts or tricky shapes in your design. This makes molding easier and lowers the chance of mistakes. Always check your mold setup for gaps and alignment before you start casting. This helps you avoid leaks and flash.
WHAT IS A TWO PART SILICONE MOLD AND WHY DOES THE PARTING LINE MATTER
WHAT IS A SILICONE MOLD PARTING LINE
When you use silicone mold vacuum casting, you will notice the parting line. This is where the two sides of the mold come together. The line shows the split between the top and bottom of the mold. You need to pay attention to this line. It helps you take your prototype out of the mold easily. Where you put the parting line decides how much you see the seam on your finished part. If you place the parting line well, splitting the mold is easier. Many people use tape on the edge of the parting surface. This helps make a clean and straight line.
WHY PARTING LINE DESIGN IS CRITICAL FOR VACUUM CASTING
You should focus on the parting line design. It is important for vacuum casting to work well. A good parting line stops problems like extra material called flash. It keeps the mold cavity neat. Careful design can lower labor costs and help mass production go faster. The parting line also controls how silicone moves and seals in the mold. If you do not plan the parting line well, you may get leaks or weak spots in your prototypes. For gaskets and seals, the parting line must match the parting surface. This stops fluids from leaking. Good design gives you better quality and more reliable silicone molding.
HOW PARTING LINES AFFECT CASTING QUALITY AND DEMOLDING
The parting line affects the quality of your vacuum casting. If you put the line in the wrong place, you may get defects like flash, warping, or misalignment. These problems can make your parts look bad and not work right. Try to put the parting line on edges that are not cosmetic. This keeps your parts looking nice. The right placement helps the mold flex. This makes it easier to remove your prototype and keeps it safe from damage. For parts with undercuts, a smart parting line lets you take out the part without breaking it. If you follow these steps, you get high-quality, accurate, and working custom silicone mold parts every time.
Tip: Always check where you put the parting line before you start molding. This small step can save time and help your parts fit better.
Common Defect | Cause |
|---|---|
Excessive Flash | Bad precision at the parting line or weak mold clamping force |
Warping and Deformation | Poor mold structure or uneven temperature |
Misalignment | Mold halves not lined up right |
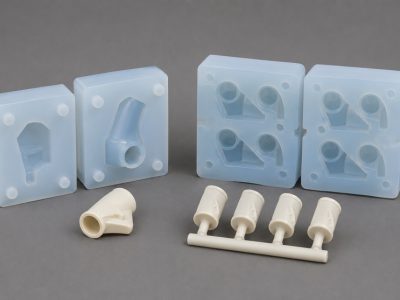
UNDERSTANDING THE STRUCTURE OF A TWO PART SILICONE MOLD

HOW TWO PART SILICONE MOLDS ARE CONSTRUCTED
You need to collect all the materials first. Get your prototype, Smooth-On silicone, paper cups, sticks, cardboard, a glue gun, mold release, sulfur-free clay, tin foil, clay tools, latex-free gloves, and a newspaper box. Each item helps you make a strong silicone mold. Use sulfur-free clay to shape the first half of the mold. This clay does not react with silicone. It helps the mold cure well. If you use clay with sulfur, the silicone might not set. Your mold could fail if this happens.
You can pick different types of silicone for mold making. Oomoo-30 works for simple shapes. MoldStar-15 is better for parts with lots of details. MoldStar-15 is more flexible. This helps you remove tricky shapes from the mold.
MOLD HALVES, REGISTRATION FEATURES, AND PARTING LINE
A two part silicone mold has two halves. These halves fit together. Registration features like keys or bumps keep the halves lined up. These features stop the mold from moving during vacuum casting. The parting line is where the halves meet. You want this line to be straight and clean. Good registration features help you get accurate parts. They also lower the chance of misalignment.
Tip: Always use mold release on your prototype and clay. This keeps things from sticking and makes it easier to take out your casting.
THE ROLE OF THE PARTING LINE IN THE VACUUM CASTING PROCESS
The parting line is important in vacuum casting. It lets you open the mold and remove your casting without damage. If you place the parting line well, you get better quality and less flash. You also make the process faster and easier. A smart parting line helps you make prototypes and custom silicone mold parts that look good and work well. When you know how a silicone mold is built, you get better results and more accurate castings.
KEY DESIGN PRINCIPLES FOR SILICONE MOLD PARTING LINES
ANALYZING PART GEOMETRY BEFORE DESIGN
Always look at your part’s shape first. The shape of your prototype changes where you put the silicone mold parting line. Simple shapes make vacuum casting easier. Complex shapes need more planning and care. Check this table to see what matters:
Factor | Description |
|---|---|
Mold Complexity | Simple parting lines cost less and make production faster. |
Mold Design Geometry | The shape and direction of your part help you pick the parting line spot. |
Aesthetics and Functionality | Put parting lines where they do not hurt how your part looks or works. |
Design for Stress Points | Watch out for places where a bad fit can cause problems. |
SELECTING THE BEST PART ORIENTATION
Pick the right way to place your part in the silicone mold. How you set your part decides how the mold opens and closes. This makes it easier to take out your part after vacuum casting. Good placement stops seams from showing and keeps your silicone molding neat. If you use liquid silicone, careful placement stops flash and makes your part look better.
MINIMIZING UNDERCUTS AND COMPLEX FEATURES
Keep your design simple if you can. Undercuts and tricky shapes make silicone molding harder. Try these ideas for tough parts:
Multi-step parting lines follow your part’s shape and help with hard designs.
Complex parting lines zigzag to fit undercuts.
Side actions or sliding cores let you mold features that a basic two-part silicone mold cannot do.
3D printed inserts give you more control over the parting line in custom silicone mold projects.
Remember, harder parting lines cost more and take longer for vacuum casting.
DESIGNING FOR EASY DEMOLDING
You want to take your part out of the silicone mold without breaking it. Put the parting line where the mold can open easily. For box-shaped parts, put the line at the widest spot. This helps the silicone bend and makes demolding simple. Keep the parting line away from places that change how your part looks or works. A simple parting surface keeps your mold strong and stops it from bending.
Key Consideration | Explanation |
|---|---|
Priority given to demolding convenience | Put the parting line so you can remove your part easily and with less sticking. |
Balancing appearance and functionality | Hide the parting line to keep your part looking good and working well. |
Mold processing and strength considerations | Simple parting surfaces make the mold stronger and easier to work with. |
CONTROLLING FLASH AND SEAM VISIBILITY
You want your vacuum casting parts to look nice and clean. Flash is extra silicone that leaks out along the parting line. You can control flash and seams by using the right ways to remove your part and mold release.
Method | Description |
|---|---|
Demolding | Peel silicone away slowly and trim flash only if needed. Separate along the parting line. |
Mold Release | Use a light coat of mold release and let it dry before casting. This helps with tricky shapes. |
Compression Molding | Some flash may show up, but careful trimming keeps seams less visible. |
If you follow these steps, you will get strong, accurate prototypes that work well. Good silicone molding habits help you make reliable parts every time you use vacuum casting.
STEP-BY-STEP PARTING LINE DESIGN PROCESS

IDENTIFYING THE OPTIMAL PARTING SURFACE
You need to choose the best place for the silicone mold parting line before you start vacuum casting. Look at your prototype and think about these points:
Do not put the parting line on sealing surfaces or spots that wear out fast.
Try to keep the line away from areas that show on the final part.
Decide if you want to focus on how the part looks or how it works.
For simple shapes, the best spot is easy to see. For complex parts, take more time to plan.
Work with your molding team early to pick the right spot.
A good parting surface helps you get high quality and functional prototypes from your silicone mold making process.
CREATING THE SPLIT LINE
You must create a split line that helps the two halves of the silicone mold fit together well. Follow these steps for better vacuum casting results:
Use registration keys to keep the mold halves lined up during molding.
Build your mold box at least one inch bigger than your part on all sides. This gives the silicone enough space.
Make sure the clay base for the first half of the mold stays flat and even.
These steps help you avoid problems during silicone molding and improve dimensional accuracy.
DESIGNING GATES, VENTS, AND POURING CHANNELS
Gates, vents, and pouring channels control how the silicone flows during vacuum casting. Here is what you should do:
Place gates close to the thickest part of your part. This helps fill the mold and reduces pressure loss.
Keep the gate short to make the flow smooth.
Use impingement gates to direct silicone against the mold wall. This stops swirls and air bubbles.
Add vents to let air escape and avoid air traps.
Make sure the resin flows from the gate to the vent grooves.
Good gate and vent design gives you better molding results and higher quality custom silicone mold parts.
SETTING UP THE SILICONE MOLD BOX
Set up your silicone mold box with care. Make sure it is clean and dry before you pour the silicone. The box should be strong enough to hold the silicone during vacuum casting. Check that your prototype sits in the right spot and does not move. A well-built box keeps the silicone in place and helps you make functional parts.
VERIFYING THE MOLD BEFORE CASTING
Always check your silicone mold before you start casting. Look for gaps, leaks, or misalignment. Make sure the registration keys fit and the parting line is clean. Test the mold by closing it and checking for a tight seal. This step helps you avoid problems and get the best results from your silicone molding process.
Tip: Careful planning and checking at each step will help you make strong, accurate, and good-looking parts with vacuum casting.
BEST PRACTICES FOR HIGH-QUALITY VACUUM CASTING MOLDS
KEEPING THE PARTING LINE AWAY FROM COSMETIC SURFACES
You want your parts to look nice and smooth after vacuum casting. The silicone mold parting line can leave lines you can see or feel. This is important for things people use or see a lot. You should put the parting line on edges or places that are hard to notice. This keeps the main surface looking good and helps your silicone molding look better.
The parting line can make lines you see on open areas.
If people will look at the part, you must be careful.
Design teams like to hide the line where it is hard to see.
BALANCING MANUFACTURABILITY AND APPEARANCE
You need to make your part easy to build and still look good. Design for Manufacturability helps you pick the best spot for the parting line. If you only care about looks, making the mold can get harder. You should think about the parting line early in your design. Seams on corners are easier to hide, but seams on flat spots stand out. If you balance both, you get a strong part that looks nice.
Tip: Put the parting line where it matches the shape and does not mess up how light shines on it.
HANDLING COMPLEX GEOMETRIES
Hard shapes need extra care in silicone molding. You must check how thick each part is and how heat moves through the silicone. You should look at where the parting line goes and how much flash is okay. Protect small details by making it easy to take out the part. Talk about trimming and cleaning before you start. Think about how you will pack and move the part so you do not scratch or change it.
Pick the right line of draw to stop extra flash.
Make sure the mold fits tight so nothing leaks out.
Watch how fast the mold cools and how hard you press it to stop problems.
IMPROVING DIMENSIONAL ACCURACY
You want your vacuum casting parts to fit and work right. Silicone molding helps you get the right size and shape. You should check the mold for spaces and if the halves match before you cast. Registration keys help keep the mold lined up. Careful planning and checking at each step make your part the right size.
Step | Benefit |
|---|---|
Check mold fit | Better accuracy |
Use registration | Stop the mold from moving |
Plan for shrinkage | Keep parts the right size |
REDUCING POST-PROCESSING WORK
Vacuum casting makes parts with smooth sides and sharp shapes. Silicone molding helps you skip extra work like sanding or trimming. You get strong parts and do not need to fix them much. Good accuracy and nice surfaces mean you spend less time fixing your parts.
Note: If you design your mold well and put the silicone mold parting line in the right place, you will not need to do much extra work after casting.
COMMON PARTING LINE PROBLEMS AND HOW TO SOLVE THEM
When you use vacuum casting, you might see problems at the silicone mold parting line. If you know about these problems, you can make your silicone molding better and avoid mistakes.
EXCESSIVE FLASH
Excessive flash is when extra silicone leaks out at the parting line. You will see thin, unwanted edges on your finished part. This happens if the silicone is runny and gets into small spaces. Sometimes, heat during molding makes the gaps bigger. If the mold halves do not fit well, you can also get flash.
How to solve it:
Make sure your mold halves fit tightly before vacuum casting.
Use registration keys to keep the mold lined up right.
Trim off any flash right after you take out the part, while the silicone is still soft.
Tip: Always check your silicone mold parting line for gaps before you pour.
SILICONE LEAKAGE DURING CASTING
Silicone leakage can mess up your vacuum casting part. Leaks happen if the mold halves move or do not seal well. You might see silicone dripping out of the mold box.
How to solve it:
Make die-locks or keys to stop the mold from moving.
Hold the sides of the mold with rubber bands or clamps.
Seal the mold edges with silicone caulk, but leave the fill port open.
AIR TRAPS AND INCOMPLETE FILLING
Air traps and incomplete filling are common in vacuum casting. Air bubbles can get stuck in the silicone, or the mold might not fill all the way. You may see bubbles in clear parts or missing details.
How to solve it:
Put vents at the highest spots of your mold to let air out.
Pour silicone slowly and use a vacuum chamber to get rid of bubbles.
Place gates near thick walls to help the silicone flow better.
DIFFICULT DEMOLDING
Sometimes, it is hard to take your part out of the silicone mold. You might get tear lines or broken parts if the design is bad or there are deep undercuts.
How to solve it:
Design your part with even wall thickness and no sharp undercuts.
Use flexible silicone for tricky shapes.
Spray mold release to make demolding easier.
PARTING LINE MISALIGNMENT
If your mold halves do not line up, your part will not be the right size. Misalignment can cause seams, warping, or even missing pieces.
How to solve it:
Use strong registration features to keep the mold lined up.
Check the fit before every vacuum casting cycle.
Change old molds to keep your silicone molding correct.
Note: Fixing these problems helps you get better results from your silicone molding and vacuum casting projects.
TWO PART SILICONE MOLD DESIGN CHECKLIST
PARTING LINE PLACEMENT CHECKLIST
You should start your silicone molding project with good planning. Use this checklist to help you put the parting line in the best spot for vacuum casting:
Make sure you know the silicone material and how hard it is.
Look at shrinkage data from your supplier. Do not guess for important parts.
Choose the right color, filler, and other things for your silicone.
Decide if your part needs extra heating after molding.
Add shrinkage compensation to the mold cavity. Use special compensation for key features.
Try not to change wall thickness suddenly in your design.
Put gates away from places that seal or need measuring.
Think about how silicone will move and shrink during vacuum casting.
Add vents and overflow spots to let air out.
Keep the mold temperature steady and the cavity balanced.
Use a steel-safe design for important sizes.
Keep fixed and closing sizes separate in your silicone molding.
Set tolerances that match rubber standards.
Measure samples after they cool, cure, and get ready.
Track measurements by cavity number.
Test the part in the real assembly before making many.
Tip: Always check your silicone molding setup before pouring. This helps you stop mistakes in vacuum casting.
VACUUM CASTING QUALITY CHECKLIST
You want your silicone molding to make good parts. Use this checklist to get better vacuum casting results:
Look at the silicone mold for cracks or open spots.
Make sure the mold halves fit together tightly.
Check that registration keys match up.
Make sure the parting line is clean and straight.
Use the right amount of mold release spray.
Keep the mold box clean and dry.
Pour silicone slowly so you do not get bubbles.
Use a vacuum chamber if you can.
Let the mold cure all the way before taking out the part.
Cut off flash right after you remove the part.
Step | Why It Matters |
|---|---|
Tight fit | Stops leaks and flash |
Clean parting line | Makes parts look better |
Slow pour | Reduces air bubbles |
COMMON DESIGN MISTAKES TO AVOID
You can stop many problems in silicone molding and vacuum casting by watching for these mistakes:
Putting the parting line on surfaces people see.
Not using shrinkage data for your silicone.
Picking the wrong silicone hardness for your part.
Forgetting to add vents or overflow spots.
Changing wall thickness too quickly.
Not checking the mold fit before casting.
Not using registration keys.
Taking the part out of the mold too fast.
Note: Careful planning and checking at every step will help you get the best results from your silicone molding and vacuum casting projects.
FAQS ABOUT TWO PART SILICONE MOLD PARTING LINE DESIGN
WHAT IS THE BEST PARTING LINE FOR A TWO PART SILICONE MOLD
You should place the parting line where it makes molding and demolding easy. The best spot often follows the largest, flattest surface on your part. You want to avoid putting the line on areas that people will see or touch. For most silicone molding projects, you can use the natural edges or corners of your part. This helps you hide the seam and makes your part look better.
HOW DO YOU REDUCE FLASH IN VACUUM CASTING
You can reduce flash by making sure your silicone mold fits tightly. Use strong registration keys to keep the mold halves in place. Always check for gaps before you start molding. Apply a thin layer of mold release to help the silicone separate cleanly. Trim any flash right after you finish vacuum casting, while the silicone is still soft.
Tip: Clean your mold and check the parting line before every use. This keeps your silicone molding neat.
CAN COMPLEX PARTS USE A STRAIGHT PARTING LINE
You can use a straight parting line for simple shapes. For complex parts, you may need a curved or zigzag line. This helps you avoid undercuts and makes demolding easier. If you try to use a straight line on a tricky shape, you might damage your part or the silicone mold. Always match the parting line to the shape of your part for the best results in silicone molding.
HOW DO YOU CHOOSE THE BEST PART ORIENTATION
You should look at your part and decide which way makes molding and demolding easiest. Place the part so the largest surface faces up. This helps you pour silicone smoothly and reduces air bubbles. Good orientation also keeps the parting line away from important surfaces. You can sketch your part and test different positions before you start silicone molding.
WHEN SHOULD MULTIPLE PARTING LINES BE USED
You should use multiple parting lines if your part has deep undercuts or very complex shapes. This lets you remove the part without breaking the silicone mold. For most silicone molding projects, one parting line is enough. If you need more, plan your design carefully and add extra registration features to keep the mold lined up.
Situation | Number of Parting Lines | Why Use It? |
|---|---|---|
Simple shape | 1 | Easy molding and demolding |
Complex with undercuts | 2 or more | Protects details, easy removal |
You play a key role in vacuum casting success when you plan your silicone mold parting line with care. Use the steps and best practices from this guide to improve your projects. Try new ideas and learn from each casting.
Keep exploring different mold designs. You will see better results and stronger parts.
Review your mold setup before each cast.
Test new techniques to find what works best.
FAQ
What is the main purpose of a parting line in silicone molds?
You use the parting line to split the mold into two halves. This line lets you open the mold and remove your part without damage. You also control where seams appear on your finished part.
How do you fix a visible seam on your cast part?
You can trim the seam with a sharp knife or fine sandpaper. Work slowly and check your progress often. For best results, place the parting line on less visible areas during mold design.
Can you reuse a two part silicone mold?
Yes, you can reuse your silicone mold many times if you handle it with care. Clean the mold after each use. Store it in a cool, dry place to keep it in good shape.
Why does my mold leak during vacuum casting?
Your mold may leak if the halves do not fit tightly. Check for gaps or worn edges. Use rubber bands or clamps to hold the mold together. Seal any small gaps with silicone caulk before casting.