LKprototype
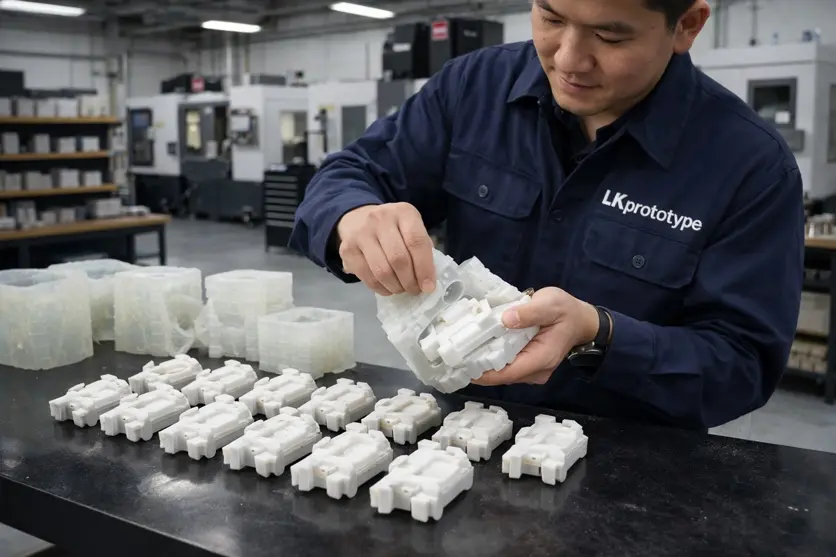
Silicone molding for low volume production is a cost-effective manufacturing solution widely used for prototyping and small batch production. Compared to traditional injection molding, low volume silicone molding offers faster lead times, lower tooling costs, and greater flexibility for custom parts.
You can pick silicone molding for low volume production. It is good when you want cheaper ways to make prototypes or custom parts. Silicone molding lets you change things easily and get quick results. You may use methods like compression molding, vacuum casting, or injection molding. These ways are great for making small batches and short runs. Silicone molding for low volume production fits small batches. It helps you save money, learn the process, and choose the best tooling.
Key Takeaways
Silicone molding is a cheap way to make prototypes and custom parts in small amounts.
This process lets you change designs quickly. It is good for testing ideas before making a lot of parts.
Silicone molds can make parts with small details. These parts are used in many industries like medical and automotive.
Using silicone molding can help save time and money. It works better than old ways of making things, especially when you need only a few parts.
Always pick the right silicone and resin materials. This helps your final products work well and look good.
Silicone Molding for Low Volume Production
What Is Silicone Molding for Low Volume Production
Silicone molding is used when you need a few parts fast and cheap. It uses a silicone mold to shape soft or liquid stuff into hard parts. You make a custom silicone mold by pouring liquid silicone over a master pattern. When the silicone dries, you take out the pattern and use the mold to make more parts. This way works well for custom silicone mold production, especially for small batches. Custom silicone molds are good for making prototypes, testing, or even final products. Silicone molding lets you change designs easily and saves money.
Low Volume Silicone Molding vs Traditional Manufacturing
You might wonder how silicone molding is different from traditional manufacturing. The biggest difference is in the steps and how fast it is. Silicone molding for low volume uses a custom silicone mold and is set up quickly. Traditional manufacturing needs expensive metal tools and takes longer. The table below shows the main differences:
Step | Silicone Molding (LSR) | Traditional Manufacturing |
|---|---|---|
1 | Uncured silicone is mixed in two containers, A and B. | Material is made in bulk before molding. |
2 | Automated injection settings are changed for each job. | Manual settings may be used, depending on the process. |
3 | Mold cavities are heated and clamped before injection. | Molds are often pre-heated, but clamping may vary. |
4 | Heat and pressure cure the silicone, then automated demolding happens. | Curing can take longer and is often different. |
5 | Secondary steps are often automated and happen right after molding. | Secondary steps may be done by hand and later. |
Silicone molding gives a smooth finish and fine details. You get parts that are almost as exact as injection molding. You also save money on tools, so it is great for small batches and low to medium amounts.
When to Use Silicone Molds in Low Volume Production
Pick silicone molding when you need custom silicone mold production for prototypes, tests, or small runs. Many industries use silicone molds for low-volume jobs. The table below shows common uses:
Industry/Scenario | LSR Applications | SSR Applications |
|---|---|---|
Medical | Catheters, valves, feeding tubes | Surgical tool grips, dental molds |
Baby pacifiers, medical-grade teething rings | Thicker medical support pads | |
Biocompatible seals, soft-touch instrument grips | ||
Wearable health and diagnostic devices | ||
Transportation | Electrical connector seals, vibration-damping pads | Engine bay grommets, dust covers |
Under-hood gaskets for high-temperature resistance | Thicker insulation mats, cabin seals | |
Electronics & Lifestyle | Keypads, buttons, switch covers | Protective sleeves for chargers or cables |
Smartwatch bands, wearable shells | Large molded grips for gaming products | |
Baby & Kitchenware | Baby bottles, nipples, spoons | Jar seals, thick cutting mats |
Silicone bakeware, spatulas | Oven mitts, heat-resistant handle sleeves |
You can use a custom silicone mold for electronics, medical parts, or car parts. Custom silicone molds help you test ideas and make changes before full production. You get good quality parts without spending a lot like with old methods.
Why Choose Silicone Molding for Low Volume Production
Cost-Effective Tooling for Prototype and Bridge Production
If you want to save money when making prototypes, silicone molding is a smart choice. You do not have to buy expensive metal tools. Silicone compression molding uses soft molds that cost less and are made faster. This makes silicone molding a good way to make small batches. You can try out your ideas and change them without wasting money. Many companies use silicone molding for bridge production. This means you can make a few parts before buying big tools.
Tip: Use silicone molding if you want to save money and time when you need only a few parts or want to try a new design.
Flexibility for Prototypes and Custom Parts
Silicone molding lets you change your design fast. You can make custom parts without waiting long. Here are some reasons why silicone molding is flexible:
Silicone compression molding can make parts with more detail.
You do not have to order a lot of parts at once.
Multi-cavity molds let you test many designs at the same time.
You can pick from many types of silicone for different needs.
Silicone molding helps you make prototypes quickly and react to market changes.
You get the parts you want, when you need them, without extra cost or waiting.
Advantages of Soft Tooling and Rapid Tooling
Soft tooling and rapid tooling make silicone molding even better for small jobs. Here are some benefits:
Soft tooling costs less and is easy to change.
You can get your parts fast, sometimes in just a few days.
Silicone compression molding is great for making prototypes and testing ideas.
You can change your molds quickly if you need to.
Lead times are short, so you can launch your product faster.
Rapid tooling also helps you save money. You do not waste material or time. This makes silicone molding a smart choice for small batches.
Silicone Mold Manufacturing Process
Tooling Preparation and Prototype Tooling Design
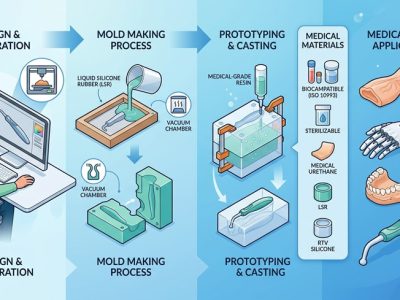
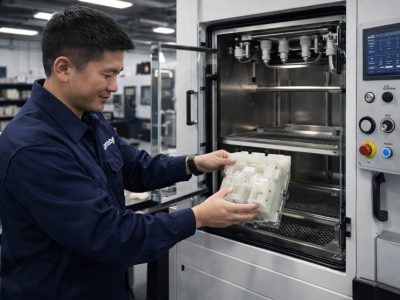
You begin by making a master model. You can use 3D printing or CNC machining for this. The master model shows the shape you want. Next, pour liquid silicone over the master model. Add vents and gates to help the resin flow. Mold locators help line up both halves of the mold. This step helps make sure parts are accurate. Silicone compression molding gives the right shape and details. This process is good for small batches and low-volume jobs.
Make a master model.
Add vents and gates to the mold.
Use mold locators to line up the mold.
Pick the best silicone for your part.
Set up for silicone compression molding.
Material Selection for Silicone Molds
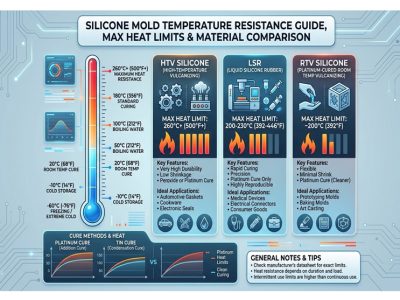
You need to pick the right silicone for your mold. Addition cure and condensation cure silicones are common types. Addition cure silicone makes strong molds and works well for compression molding. Condensation cure silicone is easier to use but does not last as long. Think about the size, shape, and use of your part. For custom silicone mold projects, match the silicone to your resin or casting material. Good material choice helps your mold last longer and work better.
Mold Making and Silicone Casting Setup
Setting up silicone mold making takes care. Pour liquid silicone over the master model and let it cure. The soft silicone mold lets you remove parts without breaking them. Silicone mold making works for complex shapes and undercuts. Silicone compression molding is good for high-detail parts. Vacuum casting removes bubbles and gives a smooth finish. The table below shows different casting techniques for silicone mold making:
Technique | Vacuum Environment | Compatible Materials | Surface Quality | Typical Applications |
|---|---|---|---|---|
Gravity Casting | No | Resins, plaster, wax | Fair, bubbles likely | Small replicas, crafts |
Vacuum Casting | Yes | Urethane resins, PU | Excellent | Functional prototypes, models |
Pressure Casting | Optional | Resins, polyurethane | High | Structural parts, low-volume runs |
Rotational Casting | No | Resins, silicone, wax | Even, hollow parts | Toys, thin-walled models |
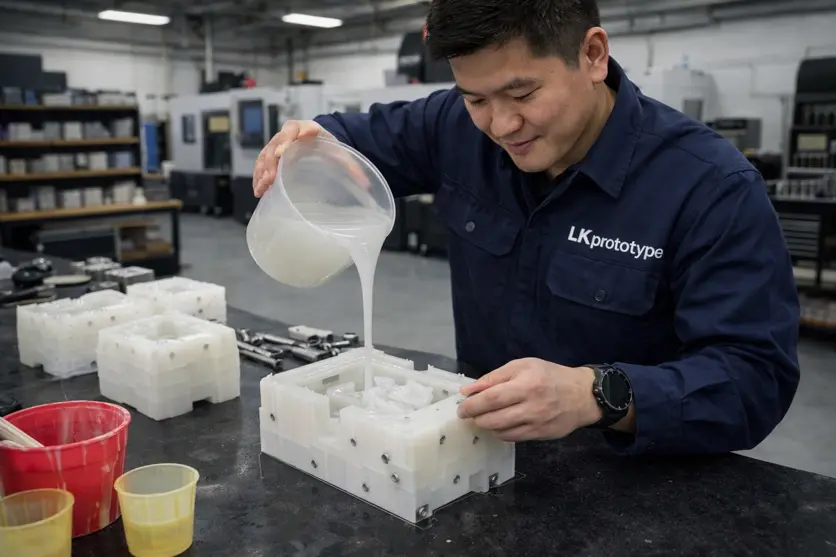
Casting, Curing and Demolding Process
Pour your resin into the silicone mold. For vacuum casting, use a vacuum to take out air bubbles. This gives a smooth and strong part. Cure the silicone mold and resin with heat. After curing, open the mold and take out the part. The soft silicone mold makes it easy to remove parts. You can trim or polish the part to finish it. Silicone mold making lets you repeat these steps for small batches. Silicone compression molding and custom setups help you get good parts fast.
Tip: Silicone mold making is great for quick changes and testing new ideas. You can see results fast and change your design if needed.
Silicone Molding Techniques for Low Volume Manufacturing
Vacuum Casting with Silicone Molds
Vacuum casting is a main way to use silicone molding for small jobs. You need a silicone mold and a vacuum chamber for this process. First, pour resin into the custom silicone mold. Then, the vacuum takes out air bubbles. This method is good for making prototypes and models that look nice. It gives parts smooth surfaces and fine details. Many people pick vacuum casting for small batches.
Here is a table that lists the main good and bad points of vacuum casting with a silicone mold:
Benefits | Limitations |
|---|---|
Cost-effectiveness for small batches | Limited material options |
Faster turnaround times | Tooling lifespan |
Design flexibility | Less precision and detail |
No need for high-volume production runs | Lower strength parts |
Vacuum casting with a silicone mold helps you get parts fast. You can test your ideas before trying other silicone molding techniques.
Silicone Compression Molding
Silicone compression molding is another important silicone molding technique. You put uncured silicone into a heated custom silicone mold. The press closes, and heat and pressure shape the part. This way works for both prototypes and making real products. You get strong and flexible parts with a nice surface. Silicone compression molding gives you quick results and the same part each time.
You can use silicone compression molding for many things. It works for seals, gaskets, and medical parts. You can also make parts with tricky shapes. This method lets you change designs easily. You do not need to buy expensive tools. Silicone compression molding is good for small batches and low-volume jobs.
Low Volume Injection Molding Comparison
Low-volume injection molding uses a silicone mold or soft tooling. You inject material into the mold using pressure. This process makes high-quality parts. You can see how it compares to other silicone molding techniques in the table below:
Technique | Vacuum Environment | Compatible Materials | Surface Quality | Typical Applications |
|---|---|---|---|---|
Vacuum Casting | YES | Urethane resins, transparent PU | Excellent, near injection molding | Functional prototypes, appearance models |
Gravity Casting | No | Resins, plaster, wax | Fair, bubbles likely | Small replicas, crafts |
Pressure Casting | Optional | Resins, polyurethane | High, improved strength | Structural parts, low-volume production |
Low-volume injection molding gives you more material choices and stronger parts. You can use it for both prototypes and real products. This method is best when you need more accuracy than other silicone molding techniques.
Tip: Try different silicone molding techniques to see what works best for your project. Each way has special benefits for small batches and low-volume jobs.
Cost of Silicone Molding for Low Volume Production

Tooling Costs and Soft Tooling Investment
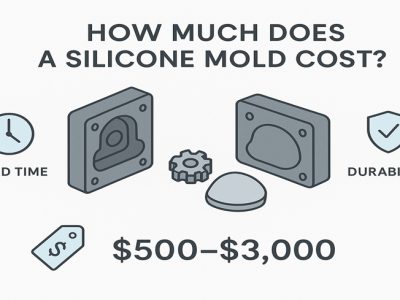
You have to think about tooling costs for your project. Making a custom production mold for silicone molding can cost from $1,500 to over $10,000. If you only want a simple or small sample mold, it might just cost a few hundred dollars. Silicone casting for prototypes or small runs is often cheap. You can look at the table below to compare soft tooling and hard tooling:
Feature | Soft Tooling | Hard Tooling |
|---|---|---|
Cost | Usually costs less and fits small budgets | Costs more at first but is better for big jobs |
Flexibility | Easy to change quickly | Not easy to change, made for long use |
Production Volume | Good for making a small or medium number of parts | Best for making lots of parts |
Lead Time | Parts are ready faster | Takes longer to make because it is more complex |
Precision | Not as exact as hard tooling | Very exact and accurate |
Material Limitations | Only works with some materials | Works with many materials and tough jobs |
Soft tooling helps you spend less money, especially for low-volume injection molding.
Material Costs and Resin Selection
Material costs can be different depending on what you pick. The price for silicone molds changes if your mold is tricky, what material you use, and how many parts you want. Some resins, like urethane, cost more but work well. Transparent PU needs extra steps to look clear, so it costs more. Filled composites or low-melting alloys also cost more because they need special care. You should pick a resin that fits your part and your budget.
Production Volume Impact on Unit Price
How many parts you make changes the price for each one. Silicone casting molds for prototypes or small runs are not pricey, sometimes just a few hundred dollars. If you need more parts, you will need more molds. RTV silicone molds can make 15 to 30 parts, but some can make up to 100. If you make more parts, you need more molds, so your total cost goes up. If you work with contract manufacturers, making more parts usually makes each part cheaper. Low-volume injection molding is good for small batches, but other ways may be better for huge numbers.
Post-Processing and Finishing Costs
You should remember post-processing costs. After molding, you might need to paint, polish, or coat your parts. These steps make your total price higher, especially if you want your parts to look nice for customers or ads. For models that show what your part looks like, finishing can cost a lot. Low-volume injection molding often needs less finishing, but you should still plan for these extra steps.
Tip: Always add post-processing to your budget so you do not get surprised by the final cost.
Prototype Tooling and Rapid Tooling Explained
What Is Prototype Tooling
You use prototype tooling when you want to test your ideas without spending a lot of money. This type of tooling costs much less than traditional tooling. You can make a few parts quickly and see if your design works. Many startups and small businesses choose prototype tooling because it helps them save money and move fast. You do not need to wait weeks or months. You can get your first parts in just a few days.
Prototype tooling is best for short runs and quick changes. You can try different designs and fix problems before making a lot of parts. The tools do not last as long as hard tools, but you get more freedom to change your design. You can use prototype tooling to check how your part looks and works before you spend more money on big production.
Tip: Use prototype tooling if you want to test your design or need only a small number of parts.
Rapid Tooling vs Hard Tooling
You might wonder how rapid tooling is different from hard tooling. Here are the main points:
Rapid tooling gives you tools in hours or days. Hard tooling takes weeks or months.
Hard tooling lasts longer and works well for big jobs. Rapid tooling is better for short runs.
Rapid tooling helps you make changes fast. Hard tooling is best when you know your design will not change.
Rapid tooling fits low volume production because you can get parts quickly and change your design if needed. Hard tooling works best for making thousands of parts with the same design.
Silicone Mold Tooling for Low Volume Production
When you pick silicone mold tooling for low volume production, you need to think about cost, speed, and how many parts you want. Silicone molds cost less and set up faster than metal molds. They work well for prototypes and short runs. You can use them with many materials.
Here is a table to help you compare silicone tooling and aluminum tooling:
Consideration | Silicone Tooling | Aluminum Tooling |
|---|---|---|
Cost | More affordable for prototypes | Higher initial costs |
Setup Time | Generally quicker setup | Longer setup time |
Durability | Less durable, good for short runs | More durable, good for long runs |
Material Compatibility | Good for various materials | Limited to specific materials |
You should also think about these steps:
Tooling and mold design
Material selection
Lead time
Production flexibility
If you want to make a small batch or test a new idea, silicone mold tooling gives you the speed and savings you need.
Silicone Molding vs Injection Molding for Low Volume Production
Cost and Lead Time Comparison
When you look at silicone molding and low-volume injection molding, you will see big differences in price and speed. Silicone molding usually costs less if you only need a few parts. You can make a simple prototype mold for about $200 to $800. A custom silicone production mold might cost from $1,500 up to $10,000. These molds can make 15 to 30 parts before they wear out. That is why silicone molding is smart for short runs.
Low-volume injection molding molds can sometimes cost under $100, but most of the time, they cost more than silicone molds at first. You also need to think about how fast you get your parts. Silicone molding lets you get your first parts in just a few days. Low-volume injection molding usually takes 1 to 3 days to make parts, but setup can take longer if you need special molds.
Silicone molding saves money for small batches.
Low-volume injection molding costs more at first but is better for bigger jobs.
Silicone molding is faster for prototypes and quick changes.
Tip: If you want to spend less and get parts fast, pick silicone molding for your first samples.
Quality and Surface Finish Differences
You want your parts to look nice and work well. Silicone molding gives smooth surfaces and shows small details. This is good for prototypes and small jobs. You can see tiny shapes and get a nice finish right from the mold.
Low-volume injection molding can give even better finishes, especially with aluminum molds. Special machines can make cool textures and very exact shapes. But you might pay more and wait longer for these molds.
Silicone molding: smooth finish, great detail, best for testing.
Low-volume injection molding: very high-quality finish, more texture choices, better for final products.
Best Use Cases for Each Process
You need to choose the right way for your project. The table below shows when to use each method and what is good about it:
Method | Best Use Cases | Advantages |
|---|---|---|
Silicone Molding | Prototyping and small production runs | Saves money, easy to make molds, strong enough |
Low-volume injection molding | High volume projects | Faster cycles, saves money if you make many parts |
Silicone molding is best when you need a few parts quickly and want to test your idea. Low-volume injection molding is better for bigger jobs where you need lots of parts and want to save money over time.
Note: Always pick the process that fits your needs. For quick changes and small batches, silicone molding is best. For bigger jobs and final products, low-volume injection molding gives you more value.
Applications of Low Volume Silicone Molding
Functional Prototypes and Engineering Testing
You can use a silicone mold to make prototypes. These help you test your ideas before making lots of parts. First, you make a master model, often with 3D printing. Then, you cover this model with silicone to make a mold. This lets you pour resin and make parts that act like real ones. You can see if your design works and find problems early. Prototypes are important for checking if your product is good enough. You can do tests to see how parts work under stress or in real life. Silicone molds help you make detailed prototypes for many jobs.
You can make test parts to check for problems.
You can make small batches for consumer or medical products.
You can use a silicone mold to make prototypes and improve your design.
Type of Prototype/Test | Description |
|---|---|
Detailed Prototypes | Silicone molds are good for making detailed prototypes for many industries. |
Functional Test Parts | Used to test how parts work before making lots of them. |
Small-Batch Production Components | Good for making a few parts, like for consumer or medical products. |
Tip: Use a silicone mold to test your product and change it fast.
Consumer Electronics and Medical Parts
You can use a silicone mold to make real parts for electronics and medical devices. Silicone molds help you make parts that are just like the final ones. In electronics, you can make buttons, cases, and connectors for testing. In medical jobs, silicone is safe for people and can be cleaned easily. This makes it great for making medical devices. Vacuum casting with a silicone mold gives smooth and detailed parts. You can make prototypes for showing your product without spending a lot on tools.
You can use a silicone mold to make parts for medical devices.
You can make prototypes for electronics that look and feel real.
You can get smooth parts for testing and showing to others.
Note: Silicone molds help you make parts for medical and electronic products quickly and for less money.
Automotive and Industrial Components
You can use a silicone mold to make real parts for cars and machines. You can make prototypes for gaskets, seals, and covers. These parts need to work in tough places. Silicone molds help you test each part before making a lot of them. You can make small batches for tests or first builds. You can check if your parts fit and work right. Silicone molds help you make parts that keep things safe and working well.
You can make prototypes for car seals and vibration pads.
You can use a silicone mold to make parts for machines.
You can test how real parts work in real places.
Tip: Use a silicone mold to make parts for car and machine tests without waiting for expensive tools.
Challenges in Silicone Molding for Low Volume Production
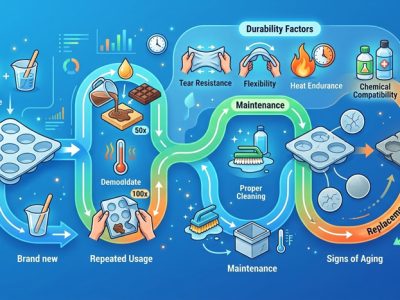
Mold Durability and Lifespan
You need to know that silicone molds do not last forever. Each time you use a mold, it wears out a little more. Most silicone molds can make 15 to 30 parts before they start to break down. If you use the mold for more parts, you may see cracks or tears. High temperatures and strong chemicals can make molds wear out faster. You should check your molds often. If you see damage, you need to make a new mold to keep your parts looking good.
Tip: Store your silicone molds in a cool, dry place. This helps them last longer.
Material Compatibility Limitations
You cannot use every material with silicone molds. Some resins and plastics do not work well with silicone. Sticky or very hot materials can damage the mold. If you use the wrong resin, your part may not cure right or may stick to the mold. You should always check if your material matches the type of silicone you use.
Here is a quick table to help you:
Material Type | Silicone Mold Compatibility |
|---|---|
Urethane Resin | ✅ Good |
Epoxy Resin | ⚠️ Sometimes |
Hot-Melt Alloys | ❌ Not Recommended |
Some Plastics | ⚠️ Test First |
You should test new materials with a small mold before making many parts.
Quality Control and Repeatability
You want every part to look and work the same. With silicone molding, you may see small changes from part to part. Air bubbles, uneven pouring, or mold wear can cause problems. You need to watch your process closely. Use the same steps each time to help your parts stay the same.
Check your molds for damage before each use.
Mix and pour your resin the same way every time.
Use a vacuum chamber if you want fewer bubbles.
Note: Good quality control helps you get better results and saves you time.
How to Choose the Right Silicone Molding Supplier
Experience in Prototype Tooling and Vacuum Casting
You want a silicone mold maker who knows how to do prototype tooling and vacuum casting. A good silicone mold maker should let you pick from many materials like ABS, PC, PP, PA, and POM. You also need to choose what the mold is made of, like silicone, aluminum, or stainless steel. Good suppliers make sure parts are the right size, usually within ±0.1–0.3 mm. They can give you different looks, like shiny, rough, painted, or with labels. How many parts you need matters too. The best silicone molding service can make 1 to 100 parts from one mold. You should ask how long it takes to get your parts. Most suppliers finish molds and parts in 5 to 15 days. Always check if they give you safety papers like RoHS, REACH, or UL.
Criteria | Description |
|---|---|
ABS, PC, PP, PA, POM, and more | |
Mold Material | Silicone (RTV), aluminum, stainless steel |
Tolerance | ±0.1–0.3 mm |
Surface Finish | Polished, textured, painted, labeled |
Batch Size | 1–100 units per mold |
Lead Time | 5–15 days including mold creation |
Compliance Docs | RoHS, REACH, UL if needed |
Cost Transparency and Engineering Support
Pick a silicone molding service that tells you all the costs. A good silicone mold maker shows you what each part of the price is for. This helps you plan your money and not get surprised. Find a silicone mold maker who helps with engineering. They answer your questions and help you pick the best way to make your parts. You get help with design, materials, and how to set up the mold. This makes your project easier and helps you get better parts.
Tip: Ask for a full price list and talk to the engineers before you choose.
Lead Time and Production Capacity
You need to know how fast your supplier works. Lead time means how long it takes to get your molds and parts. A good silicone molding service can finish small orders in 5 to 15 days. You should also check how many parts they can make at once. The right silicone mold maker can handle your order, whether you need just a few or up to 100 parts. Fast lead time and enough space to make parts help you finish your project on time.
Note: Always ask how long it takes and how many parts the supplier can make for you.
You can pick silicone molding for low-volume jobs to save money. This way is good for making prototypes and custom parts. It helps you get the results you want and change things if needed. You should learn about each step, how much it costs, and what tools you need.
Remember: Planning well helps you not make mistakes.
Next Steps:
Look at different molding ways and see which is best.
Ask suppliers if they have done this before.
Find out how long it takes and how much it costs before you choose.
FAQ
What is the typical lifespan of a silicone mold?
You can expect a silicone mold to last for 15 to 30 parts. If you use gentle materials and handle the mold with care, you may get more uses.
Can you use silicone molding for food-safe or medical parts?
Yes, you can. You must choose medical-grade or food-safe silicone. Always check with your supplier for certification before making these parts.
How fast can you get parts with silicone molding?
You can receive your first parts in as little as 5 to 15 days. This includes the time to make the mold and cast the parts.
What materials can you cast in silicone molds?
You can use many materials like urethane resin, polyurethane, and some epoxies. Always test new materials with a small mold first.
Is silicone molding good for making complex shapes?
Yes! Silicone molds work well for complex shapes, undercuts, and fine details. You can create parts that are hard to make with other methods.