LKprototype
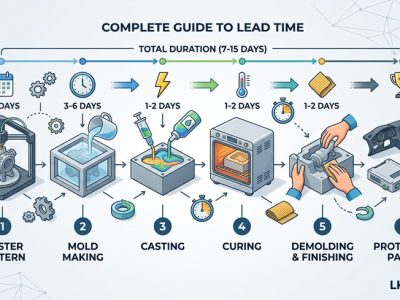
You might wonder how long vacuum casting takes. For most projects, you can expect a typical lead time of 7 to 15 days. If you need parts quickly, some suppliers offer rush options in as little as 2 to 3 days. When you order up to 20 parts, the process may take up to 15 days. Knowing the vacuum casting lead time matters for your project planning because:
Efficient lead times let you respond quickly to market demands.
You can reduce total manufacturing costs.
You improve collaboration with your suppliers, which leads to better results.
Key Takeaways
Most projects take 7 to 15 days for vacuum casting. If you need parts fast, rush options can take only 2 to 3 days.
The time needed depends on part complexity, quantity, and finish. Simple designs and fewer parts make things go faster.
It is very important to talk well with your supplier. Share your design details early to stop delays and keep the project moving.
Knowing each step of vacuum casting helps you plan better. If you know how long each stage takes, you can manage your project well.
Picking the right materials can make things work better. Fast-curing materials help make parts quicker and give better results.
Vacuum Casting Lead Time Overview
Typical Timeframes
It is important to know how long vacuum casting takes. Most suppliers need 7 to 15 days for small batches. Some reports say it can take 7 to 14 days. The time depends on how complex your part is. If you want a better surface or have a tricky design, it can take 15 to 25 days.
Each step changes the total vacuum casting lead time:
Stage | Timeframe |
|---|---|
Master Pattern Creation | 1 to 3 days |
Silicone Mold Fabrication | 5 to 7 days |
Casting Process | 1 to 2 weeks |
Total Lead Time | 1 to 3 weeks |
Tip: If your part is simple and does not need special finishes, the lead time is shorter.
Many things affect these lead times:
Part complexity: Hard shapes or tiny details need more time.
Quantity: Bigger orders take longer to finish.
Finish requirements: Fancy finishes or special colors add days.
You can compare vacuum casting with other ways. For example, 3D printing makes prototypes in hours or a few days. Vacuum casting is better for small batches with nicer finishes.
Fast-Track Options
Sometimes you need parts very fast. Some suppliers have rush services for vacuum casting. These fast-track choices can give you parts in 2 to 3 days if the shape is simple. If your design is easy, you can get parts in 72 hours.
Here is a list of fast-track lead times:
Turnaround Time | Conditions |
|---|---|
72 hours | Rush service for simple geometries |
3-5 days | Rush service for simpler geometries |
5-7 days | Standard lead time after mold completion |
5-15 days | Standard lead time depending on complexity |
Note: Ask your supplier if rush options are possible for your project.
If you want steady vacuum casting lead times and flexible delivery, LKPrototype has good options. You can find more about their vacuum casting service at LKPrototype Vacuum Casting Service.
Vacuum Casting Process Breakdown
If you know each step in the vacuum casting process, you can plan better. Each stage changes how long your project will take.
Master Pattern
The first step is making a master pattern. This pattern gives your parts their shape and details. You can use different ways and materials to make it. The way you choose changes how fast you finish this step.
Here is a table that shows common ways and how they change lead time:
Method | Material Used | Lead Time Impact |
|---|---|---|
3D Printing | Quick turnaround for low-to medium-volume production | |
Silicone Mould | Shorter lead times compared to injection moulding |
If you pick 3D printing, you get your master pattern fast. CNC machining is also quicker than older ways. Most projects finish this step in 1 to 3 days.
Mold Making
After you make the master pattern, you start mold making. This step is important in the vacuum casting process. You pour silicone around the master pattern to make a mold. The mold copies every detail.
Mold making usually takes 1 to 2 days. Some things can change this time:
If your part is big or has lots of details, it takes longer.
Some materials cure faster than others.
If you want a smooth finish, it adds time.
If you need many parts, you need more molds.
You can talk to your supplier about these things to keep your vacuum casting process on track.
Casting & Curing
Casting starts after the mold is ready. You pour liquid resin into the mold under vacuum. This step removes air bubbles and makes the part strong and smooth. How long curing takes depends on the material and the room.
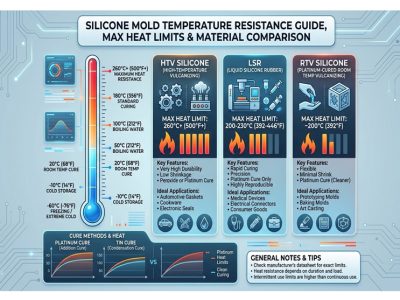
Temperature and humidity change the casting process. Here is a table that shows how different conditions change curing times:
Material Type | Effect of Cold Temperature | Effect of Heat | Effect of Humidity |
|---|---|---|---|
Urethane Rubbers, Plastics and Foams | Increases pot life and delays cure time; may not cure at all in extreme cold | Reduces pot life and cure time | Can cause bubbles or foaming if humidity is high |
Latex Products | Prolongs evaporation process, especially in high humidity | Accelerates cure in dry conditions | Slows evaporation and cure process |
Epoxy Materials | Increases pot life and delays cure time; may not cure at all in extreme cold | Reduces pot life and cure time | N/A |
You need to keep the temperature and humidity steady in your workspace. If you do, you finish casting faster. Most casting and curing steps take 1 to 2 weeks, depending on your material and part design.
Finishing Steps
The last step in the vacuum casting process is finishing. You trim, polish, paint, or add texture to your parts. Each way of finishing changes how long it takes.
Here is a table that shows how finishing changes the vacuum casting process:
Finishing Technique | Impact on Lead Time |
|---|---|
Trimming and Flash Removal | Precision trimming and polishing can add time to ensure dimensional accuracy. |
Painting and Dyeing | Custom color matching may require additional time for painting or dyeing processes. |
Polishing and Buffing | Buffing for clear finishes can extend lead time, especially for consumer products. |
Surface Texture Enhancement | Additional processes for enhancing surface texture can increase overall project time. |
If you want a simple finish, you save time. If you want a special look or color, you add days to your vacuum casting process.
Tip: Ask your supplier for a summary of each step. This helps you plan your vacuum casting process and avoid delays.
Vacuum Casting Process Summary Table
Here is a table that shows each stage and how long it takes:
Stage | Estimated Duration |
|---|---|
Master Pattern | 1–3 days |
Mold Making | 1–2 days |
Casting & Curing | 1–2 weeks |
Finishing Steps | 1–5 days |
Total Lead Time | 7–15 days |
You can use this table to guess your vacuum casting lead time. Every stage in the vacuum casting process matters. If you know the casting process, you can plan better and get your parts on time.
Factors Impacting Vacuum Casting Lead Time
Part Complexity
You should think about how complex your part is. Parts with tricky shapes or small details take longer to make. If your part has sharp corners or thin walls, the mold can wear out faster. You might need a new mold after making 20 to 30 parts. It is also important to keep the right size. Polyurethane resins shrink a little when they cure, so your part might get a bit smaller. Check your design for things that could slow down the process.
Factor | Description |
|---|---|
Silicone molds wear out after about 20–30 uses, so you need new ones for hard shapes. | |
Dimensional Accuracy | Polyurethane resins shrink 0.2–0.5% when curing, which can change the size of your part. |
Cost Considerations | Making lots of parts costs more per piece than CNC machining or injection molding. |
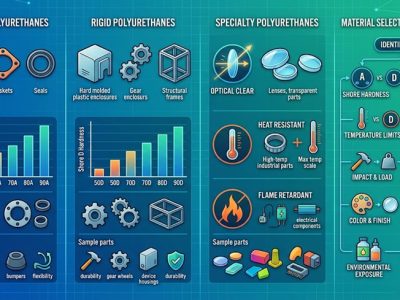
Material Choice
The material you pick changes how fast you finish. Polyurethane casting is quick because silicone molds cure fast. You can use vacuum casting for small batches and get parts in about 10 days. Some materials cure faster than others. Polyurethane resin is strong and flexible, so you get tough parts quickly. Silicone rubber is good for molds because it lets parts come out easily. Epoxy resin lasts a long time and resists chemicals, but it can take longer to cure. Polyurethane foam is light and stands up to heat, which is good for special jobs.
Polyurethane casting is fast.
Silicone rubber molds help you get parts out quickly.
Epoxy resin is good for strong products but takes longer to cure.
Polyurethane foam is great for insulation and layered parts.
Quantity
How many parts you need changes the lead time. If you want a lot of the same part, you can use one silicone mold for many castings. Reusing molds helps you make more parts faster. You get your parts sooner and can change your design if needed. Vacuum casting works best for small batches. You can finish your first parts quickly, which helps you meet your deadlines.
Typical Batch Size | Implications for Production Scheduling |
|---|---|
Up to 25 replicas per mold | Good for bigger batches and easy to plan. |
10–12 replicas for high-quality molds | Needs more planning and takes longer. |
Finish Requirements
The finish you want changes the process and time. If you want a simple finish, you save time. If you want special colors, painting, or textures, it takes longer. Talk to your supplier early about what finish you need. This helps you plan and avoid waiting. Fancy finishes or extra polishing add more days, so know what you want.
Tip: Pick finishes that fit your project. Simple finishes help you get your parts faster.
Project Planning Tips for Vacuum Casting
Minimizing Delays
You can keep your vacuum casting project on time with some easy steps. Use a vacuum chamber before pouring to get rid of air bubbles. This makes the process faster and smoother. Always check your molds and make sure they are set up right. This helps your parts come out correct and saves time. Pick materials that work well with vacuum casting. Good materials move and harden fast, so you finish sooner. If you want smooth parts, get your molds ready and use good materials. Sanding and polishing after casting also help you make nice prototypes.
Here are some ways to stop common delays:
Common Causes of Delays | Solutions to Avoid Delays |
|---|---|
Air bubbles in silicone molds | Pour carefully, use a vacuum, and use compressed air |
Tip: You can save time by planning each step and checking your materials before you start.
Supplier Communication
You should talk to your supplier often. Clear talks help you avoid mistakes and keep your project moving. Share your design files and what finish you want early. Ask your supplier for updates at each step. You can use project tools to watch your project. Some companies use special systems and tools to keep orders on time.
Evidence | Description |
|---|---|
Project Management Team | Skilled people who meet delivery needs |
Integrated Systems | Tools to track order progress |
Lean-Manufacturing Tools | Ways to make project management work better |
Note: Good talks help you get great prototypes and keep your project on track.
Handling Changes
You might need to change your design or order during the project. Tell your supplier about changes right away. Fast updates help you avoid delays and keep your project on time. If you change materials or finishes, ask how this changes the timeline. Always check how changes affect the whole project. You can use tracking tools to see how changes change each step.
Tip: Stay flexible and keep your supplier updated. This helps you finish your project on time.
If you know each step, you can plan your vacuum casting project. Talking about the design early helps you find problems fast. Checking the quality makes sure your parts are right and on time. Good planning and talking clearly help you finish on schedule. Use the tables and tips here to help you plan. Most vacuum casting projects need 7 to 15 days, so stay organized to keep things moving.
Talking about the design early stops slowdowns.
Checking quality makes sure parts are right and saves time.
Good planning and talking help you finish on time.
FAQ
How does vacuum casting help with prototyping?
Vacuum casting helps you make good parts for prototyping. You can test your ideas before making lots of products. The parts look and feel like real products. This process saves time and helps you find design problems early.
Can you use vacuum casting for different prototyping materials?
You can pick from many materials for vacuum casting. You can choose soft, hard, clear, or colored resins. This lets you match how your prototype looks and works. You can try different materials before making the final product.
Why is vacuum casting popular for prototyping small batches?
Vacuum casting is good for making small batches fast. You do not need to buy expensive tools. You can change your design between batches. This makes prototyping quicker and costs less. You also get parts with nice finishes for your prototypes.
How fast can you get prototyping parts with vacuum casting?
You can get parts in 2 to 3 days with rush service. Most projects take 7 to 15 days. This quick speed helps you test your ideas fast. You can keep your project on schedule and meet deadlines.
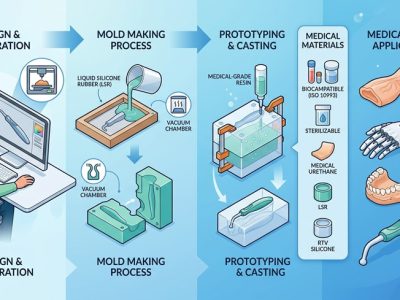
What are the main steps in vacuum casting for prototyping?
First, you make a master pattern for your prototype. Next, you make a silicone mold. Then, you cast the parts and let them cure. Last, you finish the parts by trimming or painting. Each step changes how long your project will take.