LKprototype
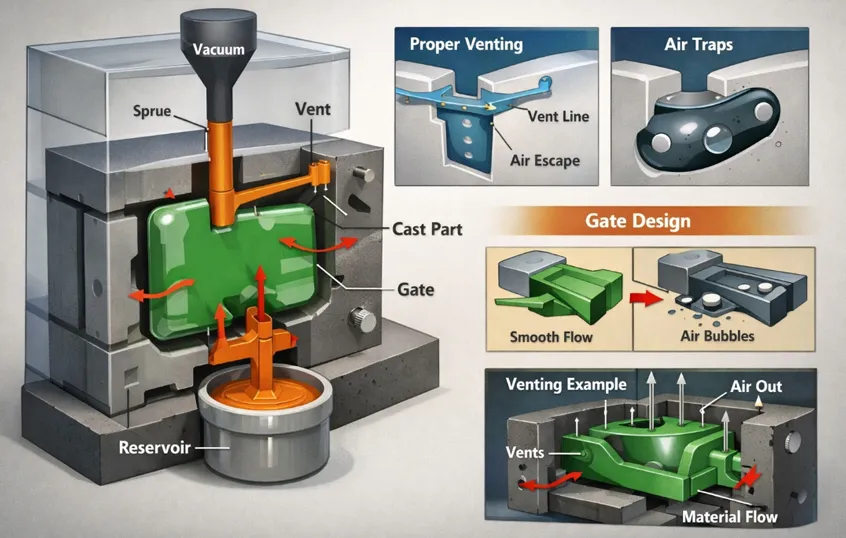
You can stop air bubbles and air traps in vacuum casting gate design by using simple steps that make mold setup and airflow better. These steps are:
Mix the materials well so air does not get trapped.
Use enough vacuuming to remove all the air.
Make the mold with good gate placement and venting.
Keep the casting temperature steady for smooth resin flow.
If you follow these methods, you will have fewer air problems and get better results. For expert help, visit vacuum casting service.
Key Takeaways
Mix resin slowly and evenly. This helps stop air bubbles from forming when casting.
Use vacuum degassing before you pour. It removes trapped air and makes the part better.
Put gates close to thick parts of the mold. This helps the resin flow right and keeps air from getting stuck.
Add good venting, like slits and tubes. This lets air escape during casting.
Check your molds often for problems. Change gate and vent designs to make casting better.
Why Air Bubbles and Air Traps Occur in Vacuum Casting
What Causes Air Bubbles in Vacuum Casting
Air bubbles can show up in your cast parts for a few reasons. These bubbles often start when you mix the resin and hardener. If you mix too fast or for too long, air gets stuck inside. Pouring resin too quickly can also pull air into the mold. Sometimes, if there is too much moisture or humidity, bubbles will form. If you do not use the right temperature, air pockets can stay in the part.
Air gets in during mixing, especially if you mix too much.
Pouring resin fast can trap air.
Moisture or high humidity makes bubbles.
Wrong curing temperatures keep air from escaping.
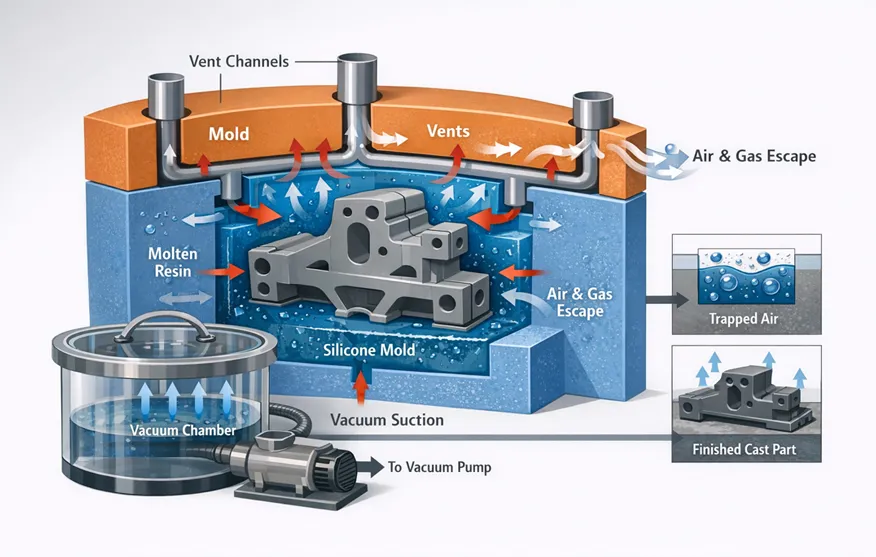
Before pouring resin, you should preheat and degas it. This step takes out most of the air bubbles and helps the resin move better. The vacuum pulls air out of the chamber, mold, and resin. This gives you a smoother finish and better accuracy than other casting ways.
Why Air Gets Trapped in Silicone Molds
Air can get stuck in silicone molds if you do not pour carefully. If you pour from high up or in many places, you might trap air. Pouring from one spot and letting the silicone flow slowly helps stop bubbles. Tilting the mold box and using compressed air can also help remove bubbles during the first pour. Vacuum degassing is another way to get rid of trapped air and make your parts look better.
Factor | Description |
|---|---|
Draft Angles | Good angles help you remove parts and stop air traps. |
Venting | Proper venting lets air out when you pour. |
Gating | Good gating helps resin flow evenly and stops air from getting trapped. |
Effects of Air Bubbles on Casting Quality
Air bubbles can cause lots of problems in your finished parts. You might see small holes or rough spots on the outside. These problems make your parts weaker and can cause them to break. Air bubbles also mean you waste more material and have to throw away more parts. If you want strong, smooth, and good parts, you need to control air bubbles with good vacuum casting gate design and venting. For more tips and expert help, check out this vacuum casting service.
Vacuum Casting Gate Design Principles
Importance of Proper Gate Design in Vacuum Casting
You must think about gate design to stop air bubbles. Good vacuum casting gate design helps resin move smoothly. It fills the mold and does not leave empty spots. A tapered sprue keeps the liquid steady and stops air from getting in. You should not let resin move too fast. Fast resin makes the flow rough and traps air. Ceramic filters slow down the resin and catch bad stuff. Pressurized systems are good for heavy metals. They keep air from getting inside the mold.
Tapered sprue keeps liquid steady.
Velocity limits stop rough flow.
Ceramic filters catch bad stuff.
Pressurized systems block air from getting in.
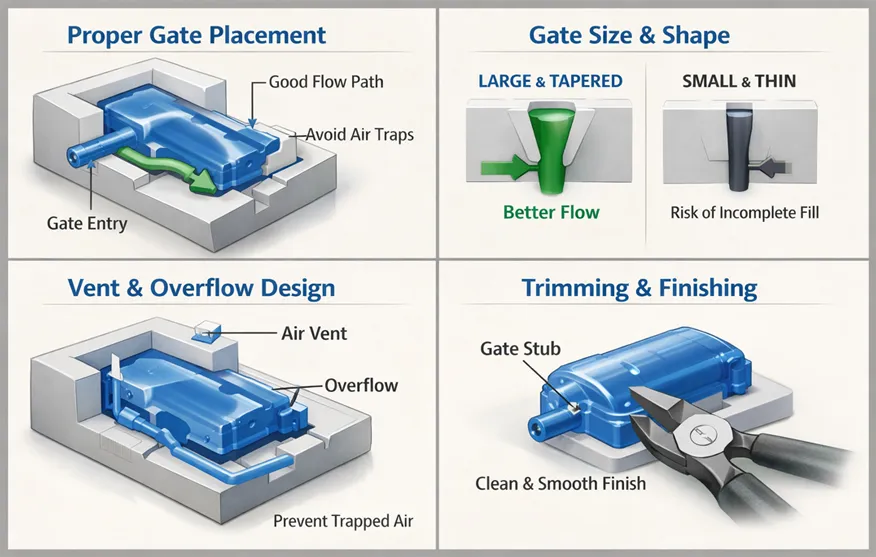
Gate Placement and Size Optimization
Where you put the gate is important. Gates should be placed so resin can reach every part of the mold. If gates are too small, resin cannot move well and air gets trapped. Big gates let resin move fast but can waste material. You need to pick the right size and spot for the gate. Try to put gates at thick parts of the mold. This helps resin fill the mold and keeps air out.
Tip: Put gates at the lowest part of the mold. Gravity will help pull resin in and push air out.
Runner Design and Resin Flow Control
Runner design tells resin where to go in the mold. Runners should be straight to guide resin easily. Do not make sharp turns or sudden changes. Smooth runners help resin move evenly and stop air from getting stuck. Ceramic filters in runners slow down resin and catch bad stuff. This makes your cast parts better.
Runner Feature | Benefit |
|---|---|
Straight runners | Smooth resin flow |
Ceramic filters | Catch bad stuff, slow resin |
No sharp turns | Stop air from getting stuck |
Common Vacuum Casting Gate Design Mistakes
People often make mistakes with vacuum casting gate design. If you put gates far from thick parts, resin will not fill the mold well. Gates that are too small or too big cause problems. If you forget ceramic filters, bad stuff and air get inside. Not following velocity limits makes rough flow and air bubbles. You can stop these mistakes by learning best ways and asking experts. For more help, visit the vacuum casting service page.
Vacuum Casting Venting Design and Airflow Control
Why Venting Is Critical for Vacuum Casting
You need venting to get rid of air in your mold. Air can cause bubbles and weak spots in your cast parts. Venting lets air escape so resin fills every space. Mr. Ross used brass tubing and an exacto knife to make vents in his mold. This helped air leave and stopped bubbles from forming. Venting is a simple step that makes your parts stronger and smoother.
Air escapes through vents, reducing bubbles.
Vents help resin fill the mold completely.
Simple tools like tubing and knives can create vents.
Types of Venting Used in Silicone Molds
You can use different venting methods in silicone molds. Venting improves the quality of your casting and prevents air from getting trapped. Vents are cheap and easy to add. You can make slits that lead outside the mold. Start slits in corners or places where air might get stuck. This helps air escape and gives your parts a better finish.
Vent Type | Description |
|---|---|
Slits | Thin cuts leading outside for air removal |
Tubing | Brass tubes guide air out of the mold |
Corner Vents | Placed in corners to catch trapped air |
Strategic Vent Placement for Air Removal
You must place vents in smart spots to remove air quickly. Good venting design channels air to evacuation points. Multiple vents give air more ways to escape. Put vents at last-fill areas, which you can find with flow simulation. Use different vent types like peripheral, overflow, or porous metal for complex molds. Computational fluid dynamics helps you see where air traps form. Place vents at parting lines and spots where air gathers.
Channel air to evacuation points.
Use multiple vents for better air removal.
Place vents at last-fill areas and parting lines.
How Venting Improves Resin Flow and Reduces Air Traps
Venting makes resin flow better and cuts down air traps. Vacuum degassing works faster when bubbles form and escape through vents. Nucleation mediums help bubbles form, making air removal easier. Capillary separation systems filter out tiny bubbles. Effective degassing and venting lower the number of voids in your cast parts. You get stronger, smoother, and more reliable results.
Tip: Combine venting with good vacuum casting gate design for the best casting quality. For expert help, visit the vacuum casting service page.
Mold Gate Placement and Vent Layout Best Practices
Optimizing Mold Gate Placement
You need to place gates in the right spots to help resin flow and reduce air bubbles. Gates should sit near thick sections of your mold. This lets resin fill these areas first and pushes air out. You can use simulation tools to map how resin moves. These tools show you where air might get trapped. You can then adjust gate placement for better results. Try to keep gates away from thin or narrow parts. This prevents resin from rushing and trapping air.
Best Practice | Description |
|---|---|
Strategic Vent Placement | Put vents where air gets trapped, like last-fill areas or deep cavities. |
Use of Simulation Tools | Map material flow to find air-trap zones and place gates effectively. |
Tailored Vent Dimensions | Match vent size to resin viscosity for best air removal and no flash. |
Balancing Gate Position and Vent Position
You must balance gate and vent positions for smooth resin flow. Gates push resin in, while vents let air escape. Place vents opposite gates or at the highest points in the mold. This setup helps air move out as resin flows in. You can use multiple vents for complex shapes. Make sure vents are not too big or too small. Adjust vent depth and width to match the material’s viscosity. This prevents flash and lets air escape easily.
Tip: Use simulation tools to check your gate and vent layout before casting. This saves time and reduces defects.
Designing Flow Paths to Avoid Air Pockets
You can design flow paths that guide resin and stop air pockets. Adjust mold design to help resin move smoothly. Set the right injection speed so resin fills the mold without trapping air. Make sure your vents work well and let air escape during casting. Fine-tune injection parameters for best results. You can also design vent channels that lead air out of the mold. Improve feeding of resin into shrinking areas to minimize trapped air.
Design vent channels for easy air escape.
Make sure mold systems allow gases to leave.
Improve feeding of resin into tight spots.
If you follow these best practices for vacuum casting gate design, you will see fewer air bubbles and stronger parts. For expert help and more tips, visit the vacuum casting service page.
How to Prevent Air Bubbles in Vacuum Casting
Mold Design Strategies for Air Bubble Prevention
You can stop air bubbles by planning your mold well. Keep the vacuum level steady during casting. This helps you avoid air pockets and keeps the part strong. Make your mold with the right wall thickness. Add vents where air might get stuck. Punching vents before casting lets air out and stops bubbles.
Strategy | Description | Issues Addressed |
|---|---|---|
Maintain Optimal Vacuum Levels | Keep the vacuum pressure steady to stop air from getting trapped. | Air Bubbles, Inconsistent Density |
Proper Mold Design | Make molds with the right wall thickness and vents for good filling. | Weak Spots, Incomplete Castings |
Plan where to put vents so air can escape.
Use computer tools to find spots where bubbles might form.
Change wall thickness to help resin move better.
Tip: If you want expert help with mold design, check out this vacuum casting service for advice on stopping bubbles.
Process Adjustments to Reduce Air Entrapment
You can change your process to lower the chance of bubbles. Mix the resin slowly and evenly so you do not trap air. Pour the resin at a steady speed and keep the temperature the same. Use vacuum degassing before pouring to take out bubbles. Put gates and vents in the right places so air can leave as resin fills the mold. Follow the best ways for vacuum casting gate design to help resin flow and stop problems.
Mix resin gently so air does not get in.
Pour resin slowly and keep the temperature even.
Use vacuum degassing to remove bubbles before casting.
Material Selection and Degassing Techniques
Pick good materials for your casting. Elastomers and thermoplastics with good properties give you better parts. Some additives make parts stronger and help stop air from getting trapped. Degassing methods, like vacuum degassing, take out bubbles before you pour. This step gives you smoother, stronger parts with fewer problems.
Note: Always pick materials that fit your casting job and use the right degassing steps for the best results.
Vacuum Casting Troubleshooting Guide
Identifying Air Bubble Defects
You can find air bubble defects by checking for small holes or rough spots. Weak areas in your cast parts may show bubbles. Bubbles often appear near thick sections or corners. Cloudy patches or tiny voids mean air got trapped during casting. Use a flashlight to look inside clear parts. Sometimes, bubbles make parts break easily or lose strength. Keep notes on where defects show up most. This helps you see patterns and fix your process.
Tip: Check parts right after you take them out of the mold. Early checks help you spot air bubble problems before they hurt your production.
Fixing Gate and Vent Design Problems
You can fix gate and vent design problems by making some changes. Keep the mold temperature steady to stop air bubbles. Use conformal cooling or baffle circuits for even cooling in thick areas. This lowers air getting trapped. Put vents along the far edges opposite the gate for rectangular molds. Use ejector pin vents with 0.5-1 mm space to let air out. Place gates to help smooth resin flow, especially at thick sections. Try submarine gates carefully so you do not trap air. Fan gates can cut down turbulence and help resin move smoothly.
Strategy | Description |
|---|---|
Venting Channels | Make 0.025-0.050 mm deep slots at flow path ends so air can escape. |
High Point Vents | Put vents at high points and flow endpoints for better air removal. |
Gate Design | Use fan gates to lower turbulence and submarine gates with care. |
If you want expert advice on vacuum casting gate design, visit the vacuum casting service page.
Improving Mold Design for Better Casting Results
You can improve mold design by adding vents and picking better gate spots. A supplier making polypropylene dashboard panels added 0.02 mm vents along the parting line and ejector pin vents. This cut defects by 40% without slowing production. A medical device company lowered vent depth to 0.03 mm and added vacuum venting, cutting scrap rates by 35%. An aerospace manufacturer used porous metal vents and picked better gate spots, reducing voids by 30%.
Add vents along the parting line and use ejector pin vents.
Lower vent depth and add vacuum venting for fewer defects.
Pick better gate spots and use porous metal vents for stronger parts.
Note: Small changes in mold design can make casting quality much better. Test new vent and gate layouts to see what works best for your parts.
You can prevent air bubbles and air traps by following smart vacuum casting gate design and venting steps. Always check your gates and vents before casting. Use the troubleshooting tips to fix problems fast. Apply these methods for strong, smooth parts every time. If you want to learn more, visit the vacuum casting service page for expert advice.
FAQ
What is the best way to prevent air bubbles in vacuum casting?
You should mix resin slowly, use vacuum degassing, and place gates and vents correctly. These steps help you avoid air bubbles. For expert advice, visit the vacuum casting service page.
How do I know if my mold needs more vents?
Check your cast parts for bubbles or rough spots. If you see defects, your mold may need more vents. You can use simulation tools to find air trap zones.
Can I use any resin for vacuum casting?
You need to choose resins that work well with vacuum casting. Some resins flow better and trap less air. Always check the manufacturer’s recommendations for best results.
Why does gate placement matter in vacuum casting?
Gate placement controls how resin fills the mold. Good placement helps resin reach all areas and pushes air out. Poor placement can cause air bubbles and weak spots.
What tools help with venting in silicone molds?
You can use brass tubing, an exacto knife, or make thin slits for vents. These tools help air escape and improve casting quality.