LKprototype
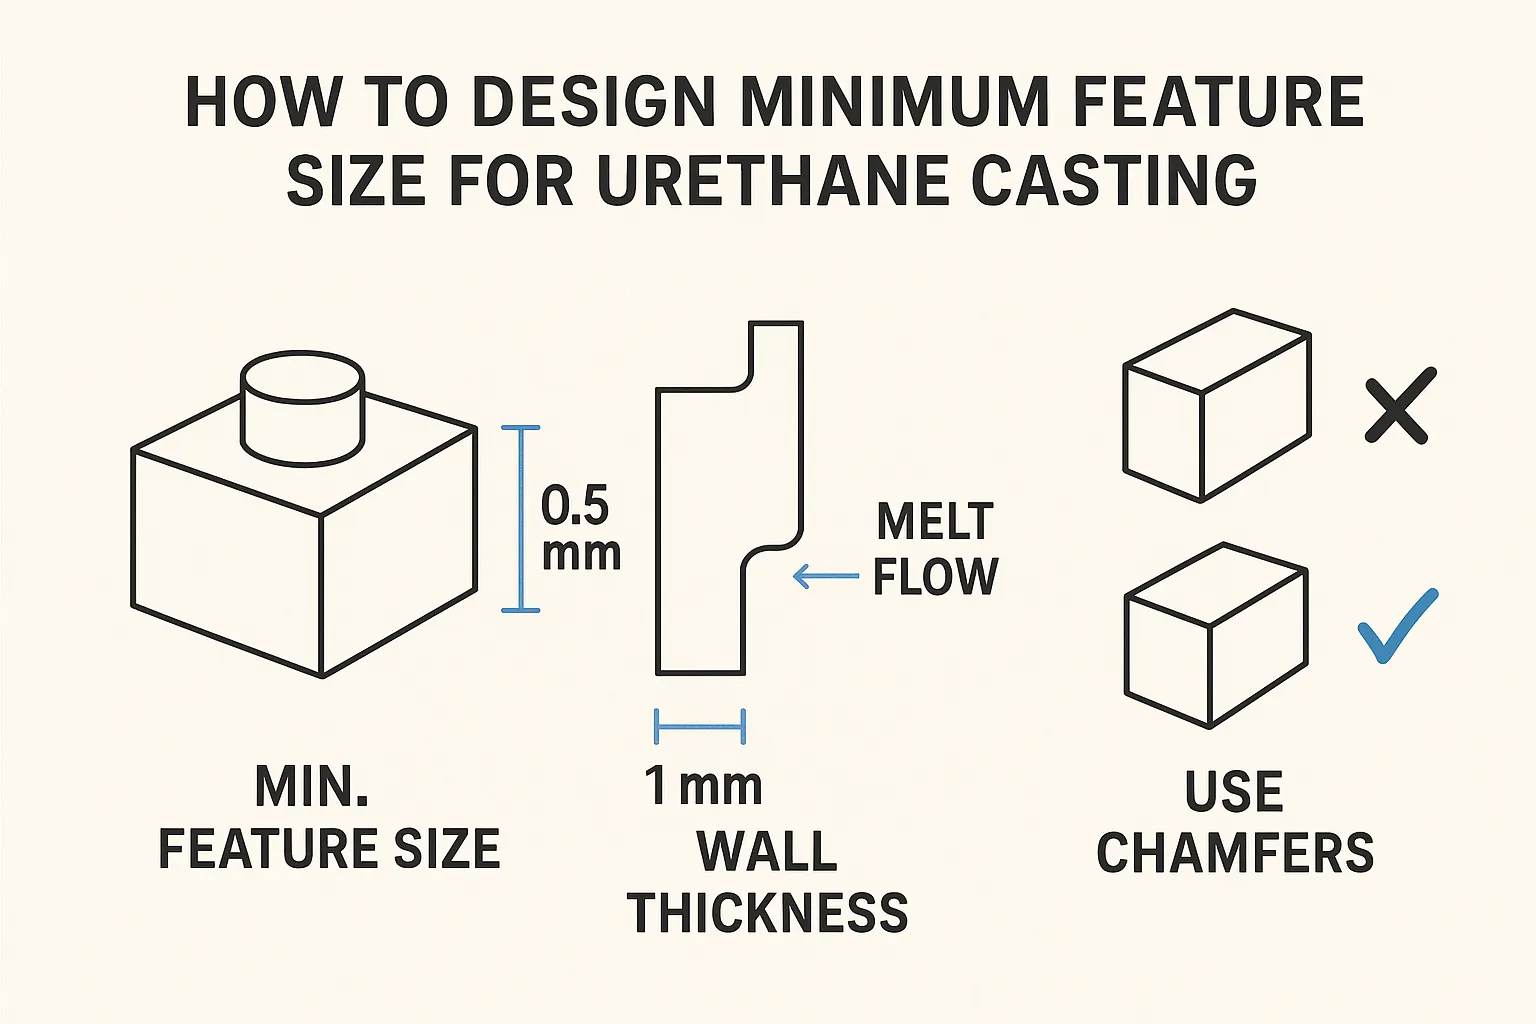
When you design custom urethane parts, knowing the right limits is important, especially regarding vacuum casting minimum feature size. This helps you make parts that are strong and work well. For urethane, the best wall thickness is 0.040 inches, and you can use 0.020 inches for small parts.
Parameter | Recommended Value | Feasible Value |
|---|---|---|
Wall Thickness | 0.040 in | 0.020 in |
Keep letters and numbers at least 1.3 mm apart. Make sure features are at least 0.050 inches apart. If you follow these vacuum casting rules, including the vacuum casting minimum feature size, you can avoid weak spots. You also prevent surprises in the size of your urethane cast parts. Always work with a polyurethane casting service to adhere to these guidelines.
Key Takeaways
Make sure the wall is at least 0.040 inches thick for strong urethane parts. Use 0.020 inches for very tiny parts.
Keep features at least 0.050 inches apart. This stops weak spots and keeps your design clear.
Always talk to your polyurethane casting supplier. They can help you check if your design will work and help you avoid expensive errors.
Make a prototype of your design first. This lets you test strength and details before making many parts. It helps you find problems early.
Plan for a shrinkage rate of about +0.15% in your designs. This helps your parts fit right after casting.
Minimum feature size in urethane casting

Definition and relevance
It is important to know what minimum feature size means for casting. Minimum feature size is the smallest detail or thickness you can make that the urethane casting process can copy. This number tells you how small or thin your features can be before problems happen. If you make features smaller than the vacuum casting minimum feature size, you might get defects or your part might break.
When you use polyurethane, the vacuum casting minimum feature size helps you choose how thin walls or small details should be. This number depends on the material, the mold, and the casting process. Most polyurethane casting services say the minimum wall thickness should be 0.040 inches. For very tiny parts, you can sometimes use 0.020 inches. The vacuum casting minimum feature size for things like holes or letters is usually about 0.635 mm. These numbers help you make sure your design will work well.
Tip: Always check the vacuum casting minimum feature size before you finish your design. This step saves time and helps you avoid expensive changes later.
Impact on part quality
The vacuum casting minimum feature size affects how good your finished part is. If you do not follow these limits, you might see weak spots, holes, or broken parts. Thin walls under the minimum can bend or break during the polyurethane casting process. Small features that are too tiny may not form at all.
You want your urethane parts to be high quality. Meeting the vacuum casting minimum feature size makes sure your parts look nice and work well. It also helps you avoid bubbles, rough surfaces, or missing details. When you follow the rules for polyurethane casting, you get strong and reliable parts every time.
Here are some ways the vacuum casting minimum feature size changes your casting results:
Strength: Thicker walls and the right feature sizes make your part stronger.
Detail: Features above the minimum size show up clearly in the final polyurethane part.
Consistency: You get the same quality in every casting run.
Durability: Parts last longer and resist damage when you follow the minimum feature size.
If you want great quality in your urethane casting process, always design with the vacuum casting minimum feature size in mind. This way, you get the best results from your polyurethane casting projects.
Vacuum casting minimum feature size standards
Wall thickness guidelines
When you design polyurethane cast parts, you need to pay close attention to wall thickness. The minimum wall thickness for small to medium-sized parts should be between 0.75 mm and 1.5 mm. Larger parts need thicker walls to stay strong and stable. If you keep the wall thickness consistent, you avoid weak spots and deformities during casting.
Here is a table that shows the recommended wall thickness for different part sizes:
Part Size | Recommended Wall Thickness | Notes |
|---|---|---|
Small Parts | At least .050” | Uniform thickness is critical to avoid issues like air entrapment. |
Large Parts | Thicker than small parts | Larger parts require thicker walls for proper support and stability. |
You should aim for wall thickness between 1.5 mm and 4 mm for the best flow and stability in polyurethane casting. If you make walls thinner, you risk weak sections or uneven filling. A minimum wall thickness of 0.75 mm only works if you add support features.
Tip: Always keep wall thickness uniform in your polyurethane cast parts. This helps you avoid air bubbles and makes your casting process smoother.
Small features and lettering
Small features and lettering need special care in polyurethane casting. The smallest feature size you can use is about 0.635 mm. For letters and numbers, keep them at least 1.3 mm apart. If you make features or text smaller than these limits, they may not show up clearly or could break during use.
Here is a table that shows how minimum feature size standards affect your design choices:
Feature | Minimum Standard | Implication |
|---|---|---|
Wall Thickness | 1.5 mm | Ensures full cavity filling and avoids deformation. |
Wall Thickness (non-load-bearing) | 0.75 mm | Higher risk of warping. |
You can include undercuts in your polyurethane cast parts, but deep undercuts may need extra features like tear-strips or multi-part molds. These help you remove the part from the mold without damage.
Keep lettering spacing at least 0.050 in.
Use features no smaller than 0.635 mm.
Add support features for thin walls.
If you follow these standards, your polyurethane cast parts will have clear details and strong features.
Shrinkage and tolerances
Polyurethane casting has a typical shrinkage rate of about +0.15%. This means your polyurethane cast parts will be slightly smaller than your mold. You need to plan for this shrinkage when you design your parts.
Dimensional tolerances for polyurethane casting are usually ±0.010 in. or ±0.003 in. per inch, whichever is larger. If your part has irregular shapes or thick sections, you might see more shrinkage or deflection.
Shrinkage rate: +0.15%
Tolerances: ±0.010 in. or ±0.003 in. per inch
Thick or irregular parts may shrink more
When you design polyurethane cast parts, always check the shrinkage and tolerances. This helps you make sure your parts fit and work as expected after casting.
Note: If you want your polyurethane cast parts to be accurate, talk to your casting supplier about shrinkage and tolerances before you finish your design.
Factors affecting minimum feature size
Material properties
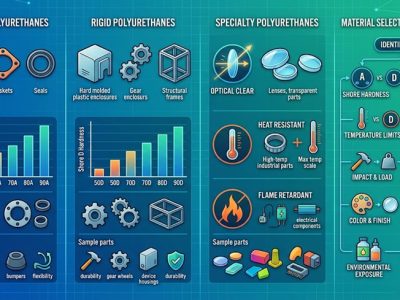
You should think about which polyurethane you use. Each type has special qualities that change how small features can be. Some flexible urethane types are good for making a few or many parts. These materials feel soft and can be squeezed. Flexible urethane can bend into tricky shapes without breaking. This helps you make thin walls and tiny details in your part. Picking the right polyurethane lets you make smaller features and better parts.
Flexible urethane is good for soft or squishy parts.
It lets you make thin walls and small details.
It does not crack in tricky mold shapes.
Mold and process limitations
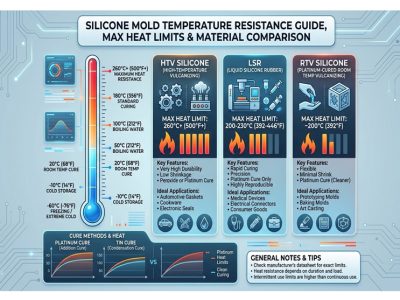
The mold you pick for polyurethane casting also sets size limits. Silicone molds are used a lot because they show small details well. But very tiny features might not fill if the mold is not made right. Air bubbles can get stuck in tight spots. You need to make sure the mold has good vents and smooth sides. The way you pour or inject polyurethane also matters. If you go too fast or too slow, you might miss details or get mistakes.
Tip: Always ask your casting supplier about mold design and settings. This helps you avoid trouble with small features.
Geometry considerations
The shape of your part is important for feature size. Thin walls, sharp corners, and deep holes make casting harder. If your part has very thin spots, polyurethane may not fill it all the way. This can make weak spots or missing features. Rounded corners and smooth changes in thickness help polyurethane flow better. You should not use sudden changes in shape. Even wall thickness makes your part stronger and more dependable.
Use rounded corners, not sharp ones.
Keep wall thickness the same everywhere.
Do not use deep, skinny holes that are hard to fill.
If you know about these things, you can design better polyurethane cast parts. Your parts will be stronger, have more details, and work better after casting.
Design guidelines for urethane casting
Best practices for thin walls
You can improve your polyurethane parts by following smart design tips for thin walls. Even wall thickness helps you avoid weak spots and makes the casting process smoother. You should keep wall thickness at least .040 inches (1 mm), but you can go thinner for small parts. Ribs add strength without making walls too thick. When you add ribs, keep their thickness at 50% to 60% of the wall thickness. This helps your part stay strong and avoids sunken areas. The table below shows some helpful tips for thin wall design:
Design Tip | Description |
|---|---|
Even Wall Thickness | Ensures uniformity to reduce deformation and improve mold filling. Minimum thickness is .040” (1mm), thinner for small parts. |
Account for Shrinkage | Thicker walls solidify slower, leading to potential sunken areas. Rib thickness should be 50%-60% of wall thickness. |
Employ Ribs | Ribs enhance strength without increasing thickness. Guidelines include rib height, width, draft angle, and spacing. |
Tip: Use ribs and keep wall thickness even to make your polyurethane casting more reliable.
Tips for small holes and text
You can add logos, text, and surface details to your polyurethane cast parts with CNC machining. This gives you sharp and clear features. Letters and numbers should be spaced at least 1.3 mm apart so they stay readable after casting. For small holes and text, follow these tips:
Use CNC machining for precise logos and text.
Space letters and numbers at least 1.3 mm apart for best results.
The table below shows the minimum sizes for holes and text in polyurethane casting:
Specification | Minimum Size |
|---|---|
Hole Diameter | Greater than .060" |
Font Size | Minimum .075" height |
You should check these sizes before you finish your design. This helps you avoid problems with legibility and strength.
Avoiding common pitfalls
You can avoid many problems in polyurethane casting by planning ahead. Thin walls that do not follow guidelines may warp or break. Small features that are too close together can disappear during casting. You should always think about drafts and undercuts when you design your part. These features help you remove the part from the mold without damage. If you ignore drafts and undercuts, you may struggle to get your part out or see defects.
Note: Talk to your supplier about drafts and undercuts before you start the casting process. This step saves you time and money.
Validating your design

Prototyping and testing
You should always try out your design before making a lot of parts. Polyurethane casting lets you make a model that looks like the real thing. This helps you see if your small features work well. You can check if thin walls, tiny details, or letters show up right.
Polyurethane casting works for tricky shapes, so you can test very detailed parts.
The process is fast and does not cost too much, so you can change things quickly if needed.
You can pick different polyurethane resins to test how soft or strong your part is.
You can make a few pieces, usually between 10 and 50. This is good for checking if your parts fit or for showing samples to customers. The surface is smooth and almost like what you get in big factories. This means you can trust your test results.
Tip: Make a few prototypes with polyurethane casting. Test each one for strength, details, and fit. This helps you find problems early and fix them before spending more money.
Supplier consultation
You should talk to your supplier when you start designing. Suppliers know a lot about polyurethane and casting. They can tell you if your design will work or if you need to change it. Show them your drawings and ask how to make your part the best way.
Ask your supplier which polyurethane resin is right for your project.
Check if your small features are possible with their casting process.
Get tips on wall thickness, letters, and other small details.
Suppliers can help you learn how polyurethane will act in your part. They might suggest changes to make your part stronger or easier to cast. Working with your supplier saves time and helps you avoid mistakes that cost money.
Note: Talking with your supplier helps you get better polyurethane parts and makes casting go smoother.
You can make strong and dependable parts if you follow the minimum feature size rules for urethane casting. Always keep wall thickness, feature size, and space between letters within the suggested limits. When you use polyurethane, you get better results if you talk to your supplier and make test models first. Doing these things gives you many good results:
Benefit | Description |
|---|---|
Cost-effectiveness | Urethane casting lets you make cheap test parts and small batches. |
Design flexibility | Silicone molds help you change your design easily without spending much more money. |
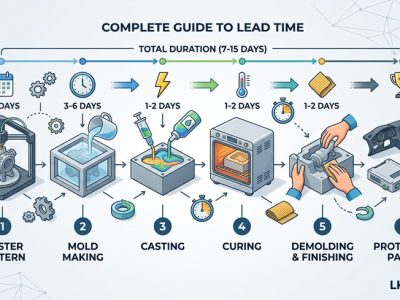
Shorter tooling times | You can have silicone molds finished in just one or two weeks. |
Keep talking with your supplier and try out your designs to make sure everything works well.
FAQ
What is the smallest wall thickness you can use in urethane casting?
You can use a minimum wall thickness of 0.040 inches (1 mm) for most parts. For very small parts, you can go down to 0.020 inches (0.5 mm). Thicker walls give you stronger parts.
Can you add small text or logos to urethane cast parts?
Yes, you can add text or logos. Make sure each letter is at least 1.3 mm apart. Use a font size of at least 0.075 inches. This helps your text stay clear and easy to read.
How does shrinkage affect my urethane cast part?
Shrinkage makes your part a little smaller than your mold. Plan for about 0.15% shrinkage. Always check with your supplier to make sure your part will fit as you expect.
What happens if I design features smaller than the minimum size?
Features smaller than the minimum may not form well. You might see missing details, weak spots, or even broken parts. Always follow the recommended minimum sizes for best results.
Should I prototype my design before full production?
Prototyping helps you test your design.
You can check if small features and thin walls work.
You save time and money by finding problems early.
Need help? Contact Us: lk@lkprototype.com
Need a PROTOTYPE or PARTS machining quote? Quote now